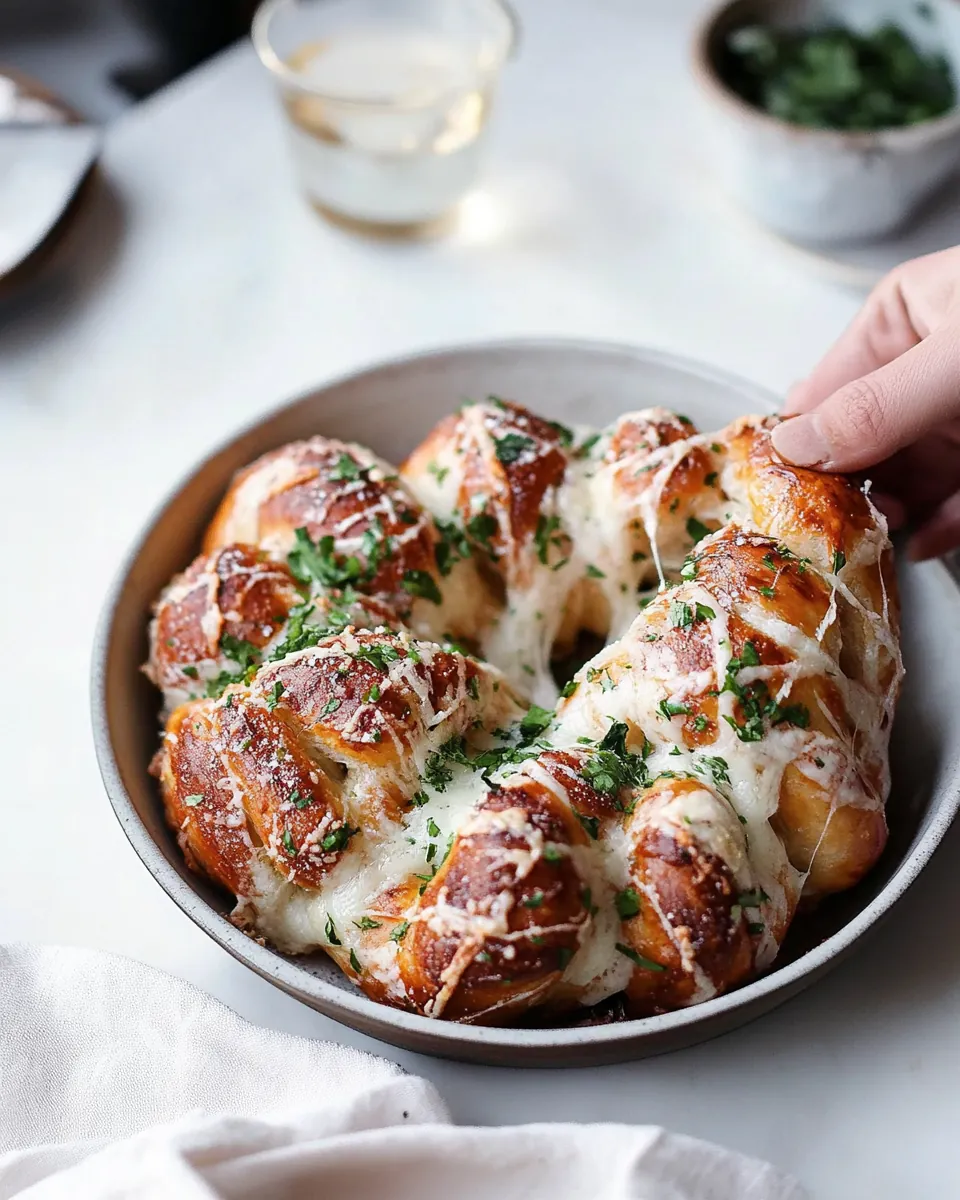
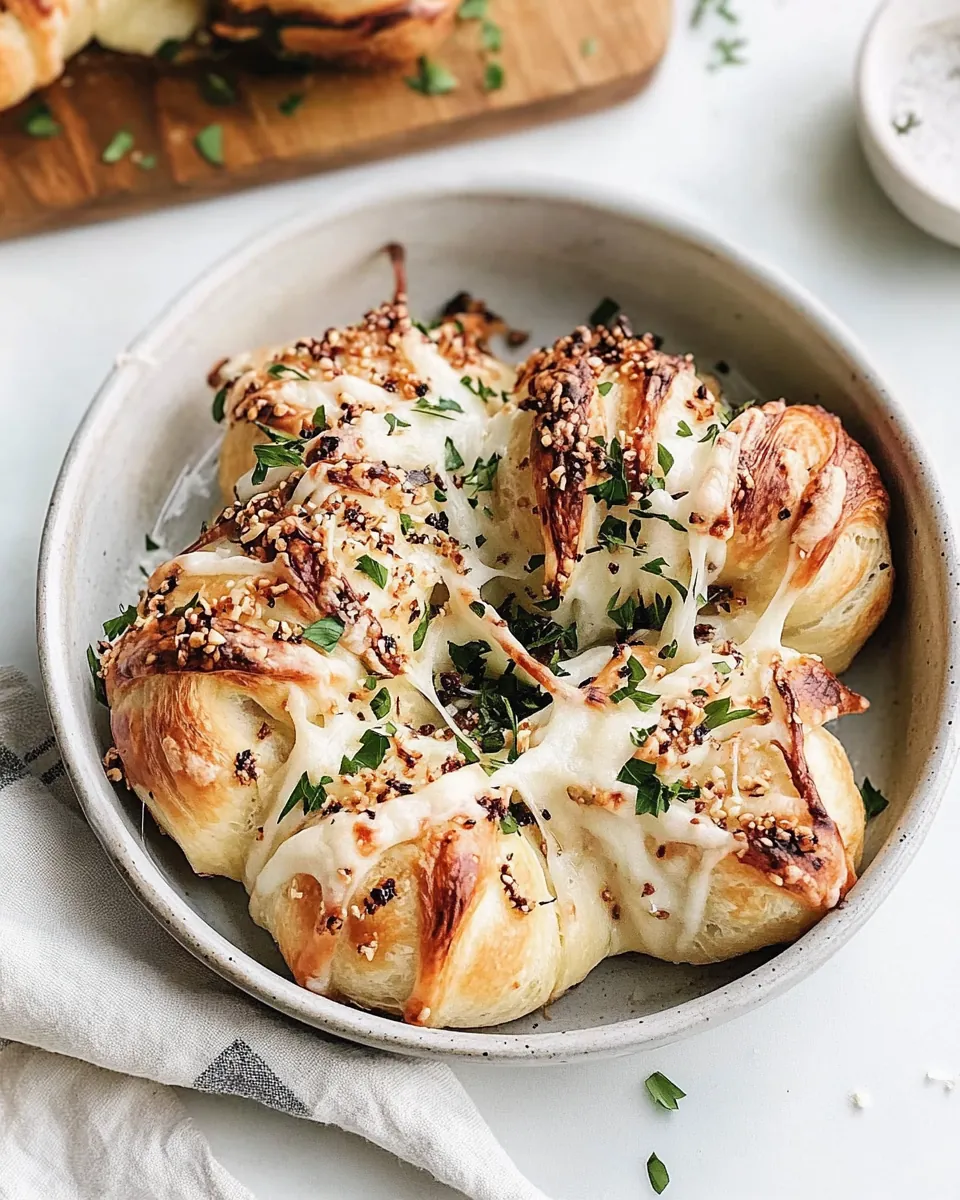
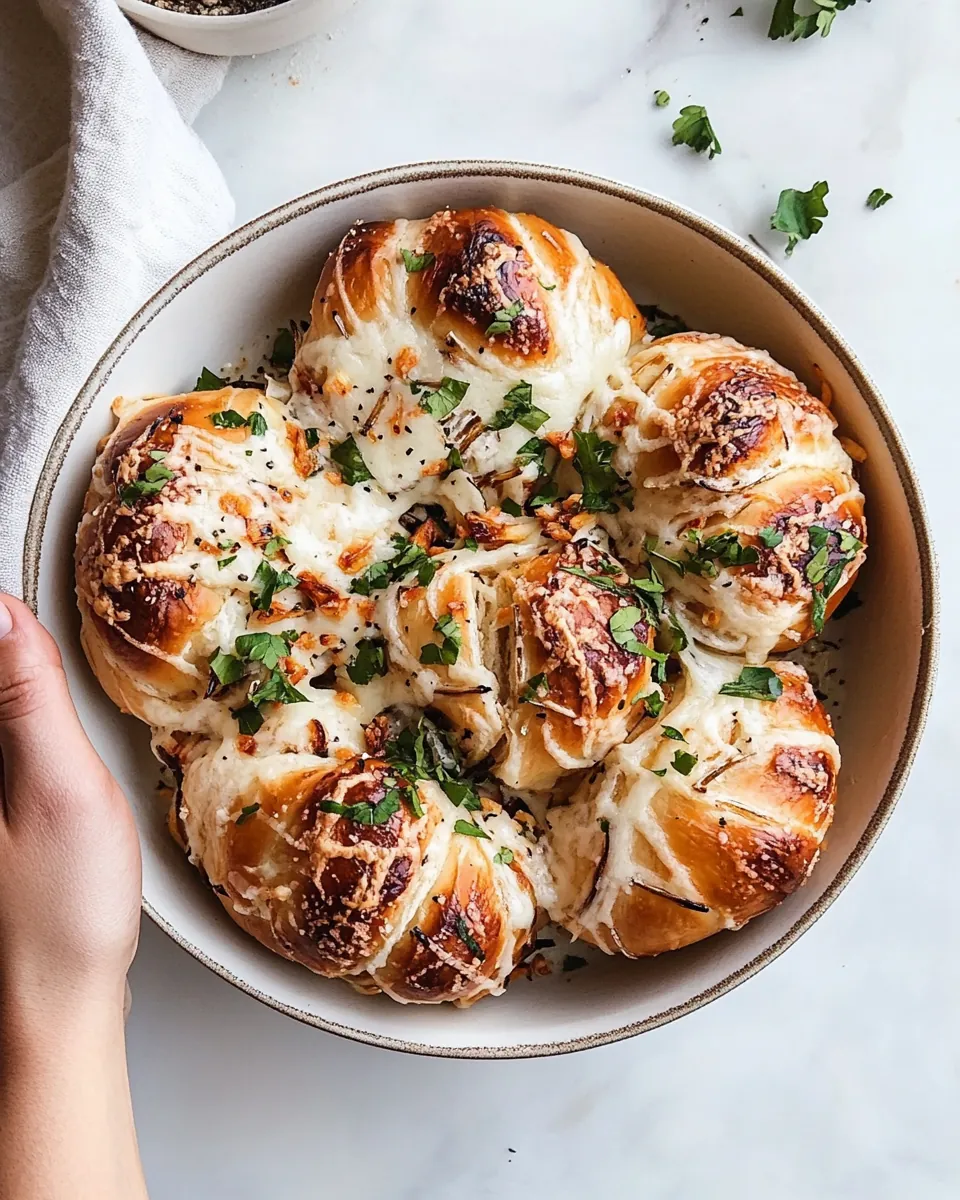
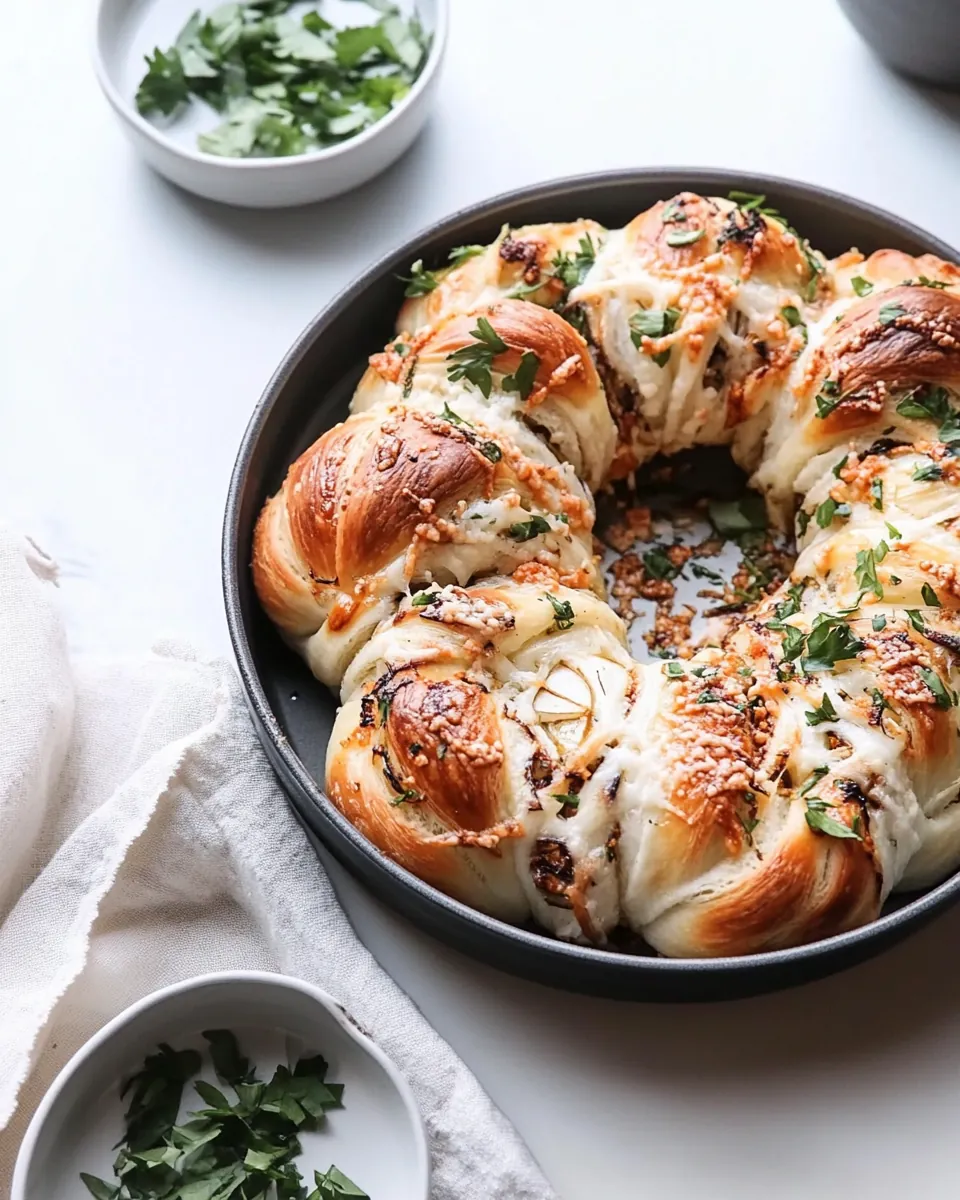
Cheesy Roasted Garlic Knots
There’s something magical about the aroma of freshly baked bread wafting through the kitchen, and that’s exactly what you get with Cheesy Roasted Garlic Knots. I remember the first time I tried these delightful treats at a friend’s gathering. They were warm, buttery, and bursting with flavor. Every bite was like a cozy hug, and I knew I had to recreate them at home. These knots are perfect for sharing, whether it’s a game night with friends or a cozy family dinner. Plus, the combination of roasted garlic and melted cheese is just downright irresistible.
Recipe Snapshot
1 hr 20 mins
45 mins
35 mins
Medium
250 kcal
6 g
Keto, Gluten-Free
12 g
Oven, Baking Sheet, Skillet, Chef’s Knife, Mixing Bowl
Why This Cheesy Roasted Garlic Knots Is So Good
Why do I love making Cheesy Roasted Garlic Knots? Let me share some of my favorite reasons.
1. A Flavor Explosion
These knots are packed with flavor. The roasted garlic adds a rich, savory depth that perfectly complements the gooey mozzarella. Each knot is a bite-sized explosion of taste that will leave your taste buds dancing.
2. Perfect for Any Occasion
Whether you’re hosting a party, need an appetizer for a family gathering, or just want a comforting snack while binge-watching your favorite show, these knots fit the bill. They’re versatile and sure to impress any crowd.
3. Fun to Make
Making Cheesy Roasted Garlic Knots can be a fun activity. You can involve your kids or friends in tying the knots, and it turns into a delightful kitchen project filled with laughter and joy.
4. Fresh Ingredients
Using fresh ingredients is key to this recipe. The aroma of roasted garlic and fresh parsley makes your kitchen smell divine, creating a truly welcoming atmosphere.
5. Customizable
Feel free to get creative! You can add herbs or spices to the butter mixture to make it even more flavorful, or try different cheeses to suit your taste. The possibilities are endless.
6. Leftover Bliss
If there happen to be leftovers (which is rare!), they taste delicious the next day. Just pop them in the oven for a quick reheat, and they’ll be just as delightful as when they first came out.
Cheesy Roasted Garlic Knots Ingredients
The philosophy behind the ingredients in Cheesy Roasted Garlic Knots is simplicity and flavor. Each ingredient plays a vital role in creating the perfect knot. From the savory roasted garlic to the rich butter and stretchy mozzarella, these components harmonize beautifully to create a delightful treat.
- 1 whole head of garlic, top sliced off – Roasting this transforms the sharpness of garlic into a sweet, buttery delight.
- 1 pound store-bought or homemade pizza dough – The base of our knots, providing the perfect chewy texture.
- 1/2 cup unsalted butter, at room temperature – Adds richness and helps the flavors meld together.
- 2 tablespoons minced Italian parsley, plus more for garnish – Freshness that brightens the overall dish.
- 2 teaspoons kosher salt – Essential for bringing out the flavors.
- 1/2 teaspoon crushed red pepper, plus more for garnish – A touch of heat to balance the richness.
- 1/2 teaspoon dried oregano – Adds an aromatic note.
- 1 3/4 cups shredded mozzarella, divided – For that melty, cheesy goodness.
How to Make Cheesy Roasted Garlic Knots
Making Cheesy Roasted Garlic Knots is an enjoyable experience that fills your kitchen with delicious aromas. Follow these steps closely, and you’ll be rewarded with golden, cheesy knots that everyone will love.
- Preheat your oven to 350 degrees F. While it heats, take a whole head of garlic and wrap it in a small sheet of foil. Place this on a baking sheet or in a baking dish and roast it for 1 hour. The garlic will become soft and sweet, perfect for our butter mixture.
- After an hour, carefully remove the garlic from the foil. Allow it to cool for a few minutes. Once cool enough to handle, press the roasted garlic out of the cloves and into a bowl.
- To the bowl with the roasted garlic, add the room temperature butter, minced parsley, salt, crushed red pepper, and dried oregano. Mix and mash everything together until well combined. Be sure to taste it and add a pinch more salt if needed!
- Now, lightly flour your work surface and divide the pizza dough into twelve equal pieces. It’s okay if they aren’t perfectly shaped; we just want them roughly the same size for even baking.
- Take each piece and roll and stretch it until it’s about 5 inches long. Spread about half a teaspoon of the garlic and butter mixture onto each piece of dough. Sprinkle a bit of mozzarella on top, pressing it into the butter.
- Now comes the fun part! Tie each strip of dough into a knot and gently transfer it to a cast iron skillet. Repeat this process until all the strips are knotted and in the skillet.
- Once all the knots are arranged, brush the tops with any remaining butter mixture. Cover the knots with a clean kitchen towel and allow them to rise until doubled in size, which should take about 30 minutes.
- During the last few minutes of rising, preheat your oven again, this time to 375 degrees F. When the knots have risen, uncover the skillet and place it in the oven to bake for 20 minutes.
- At the 20-minute mark, sprinkle the remaining cup of mozzarella over the top of the knots and bake for an additional 5 to 10 minutes. You’re looking for a beautiful golden brown color on top.
- Once done, remove the skillet from the oven and top with more minced parsley and crushed red pepper if you like it spicy. Let them cool for a few minutes before serving.
Things Worth Knowing
- Roasting garlic: Roasting garlic transforms its flavor, making it sweeter and less pungent. This step is essential for the best taste.
- Dough handling: When working with pizza dough, avoid overworking it to keep the texture light and airy.
- Rising time: Patience is key! Allowing the knots to rise ensures they become fluffy and soft.
- Baking temperature: Preheating the oven properly helps in achieving that golden-brown crust. Don’t skip this step!
Recipe Variations about Cheesy Roasted Garlic Knots
Making Cheesy Roasted Garlic Knots is a wonderful experience, but there are several ways to enhance or vary the recipe. Here are some ideas to inspire you:
- Add herbs: You can mix in different herbs like thyme or rosemary into the butter mixture for extra flavor.
- Cheese varieties: Try using different cheeses like Parmesan or Gouda to create a unique twist.
- Stuffed knots: Feel free to stuff the knots with other ingredients like sautéed spinach or sun-dried tomatoes for added flavor.
- Gluten-free option: Use gluten-free pizza dough for a gluten-free version of these knots.
- Serving style: Serve with marinara sauce on the side for dipping or drizzle with balsamic glaze for an added kick.
Great Combinations for Cheesy Roasted Garlic Knots
When it comes to serving Cheesy Roasted Garlic Knots, the options are plentiful. Here are some fantastic combinations:
- With pasta: These knots pair beautifully with your favorite pasta dishes, adding a delightful bread component.
- As an appetizer: Serve them as a starter at parties or gatherings. Guests will love the warm, cheesy bites.
- For brunch: They make a fantastic addition to a brunch spread alongside eggs and fresh salads.
- With soups: Pair with a comforting bowl of soup, such as tomato or minestrone—it’s a match made in heaven.
- Snack time: Perfect for an afternoon snack or a late-night craving, these knots are just right any time of the day.
FAQ
Conclusion
Cheesy Roasted Garlic Knots are a delightful treat that brings warmth and joy to any meal. Their combination of roasted garlic and gooey cheese makes them truly special. I encourage you to try making them for your next gathering or simply for yourself. You won’t regret indulging in these scrumptious knots!
Cheesy Roasted Garlic Knots
Ingredients
Equipment
Method
- Preheat your oven to 350 degrees F. While it heats, take a whole head of garlic and wrap it in a small sheet of foil. Place this on a baking sheet or in a baking dish and roast it for 1 hour. The garlic will become soft and sweet, perfect for our butter mixture.
- After an hour, carefully remove the garlic from the foil. Allow it to cool for a few minutes. Once cool enough to handle, press the roasted garlic out of the cloves and into a bowl.
- To the bowl with the roasted garlic, add the room temperature butter, minced parsley, salt, crushed red pepper, and dried oregano. Mix and mash everything together until well combined. Be sure to taste it and add a pinch more salt if needed!
- Now, lightly flour your work surface and divide the pizza dough into twelve equal pieces. It’s okay if they aren’t perfectly shaped; we just want them roughly the same size for even baking.
- Take each piece and roll and stretch it until it’s about 5 inches long. Spread about half a teaspoon of the garlic and butter mixture onto each piece of dough. Sprinkle a bit of mozzarella on top, pressing it into the butter.
- Now comes the fun part! Tie each strip of dough into a knot and gently transfer it to a cast iron skillet. Repeat this process until all the strips are knotted and in the skillet.
- Once all the knots are arranged, brush the tops with any remaining butter mixture. Cover the knots with a clean kitchen towel and allow them to rise until doubled in size, which should take about 30 minutes.
- During the last few minutes of rising, preheat your oven again, this time to 375 degrees F. When the knots have risen, uncover the skillet and place it in the oven to bake for 20 minutes.
- At the 20-minute mark, sprinkle the remaining cup of mozzarella over the top of the knots and bake for an additional 5 to 10 minutes. You're looking for a beautiful golden brown color on top.
- Once done, remove the skillet from the oven and top with more minced parsley and crushed red pepper if you like it spicy. Let them cool for a few minutes before serving.
Notes
- Tip 1: If you don’t have time to roast garlic, it’s ok. Just add half of the garlic (about 6 cloves) of minced garlic to the butter mixture. Raw garlic is more intense than roasted garlic so that’s why I recommend half of the amount.
- Tip 2: I use a cast iron for this recipe but a baking dish that’s about 9-inches round or rectangular will work just fine too.