Dye Free Deviled Eggs
The Dye Free Deviled Eggs have become a staple in our family gatherings, especially during Easter. I still remember the first time I decided to create a colorful twist on the classic deviled eggs. My kids were mesmerized by the vibrant colors, and it became a fun activity for us all. Each egg was a canvas, dyed with natural juices, making every bite not just delicious but also a feast for the eyes. Watching their faces light up as they picked their favorite colors was a moment I’ll always cherish. This tradition has now woven itself into our family history, where every holiday meal feels like a little art project. Whether it’s a spring brunch or a festive gathering, these Dye Free Deviled Eggs are the perfect conversation starter. It’s incredible how something so simple can bring so much joy and creativity into our lives.
Recipe Snapshot
30 mins
10 mins
20 mins
Medium
150 kcal
6 g
Paleo, Whole30, Gluten-Free
12 g
Large Pot, Saucepan, Blender, Peeler, Chef’s Knife, Mixing Bowl
Why This Dye Free Deviled Eggs Stands Out
Healthy and Natural Dyes
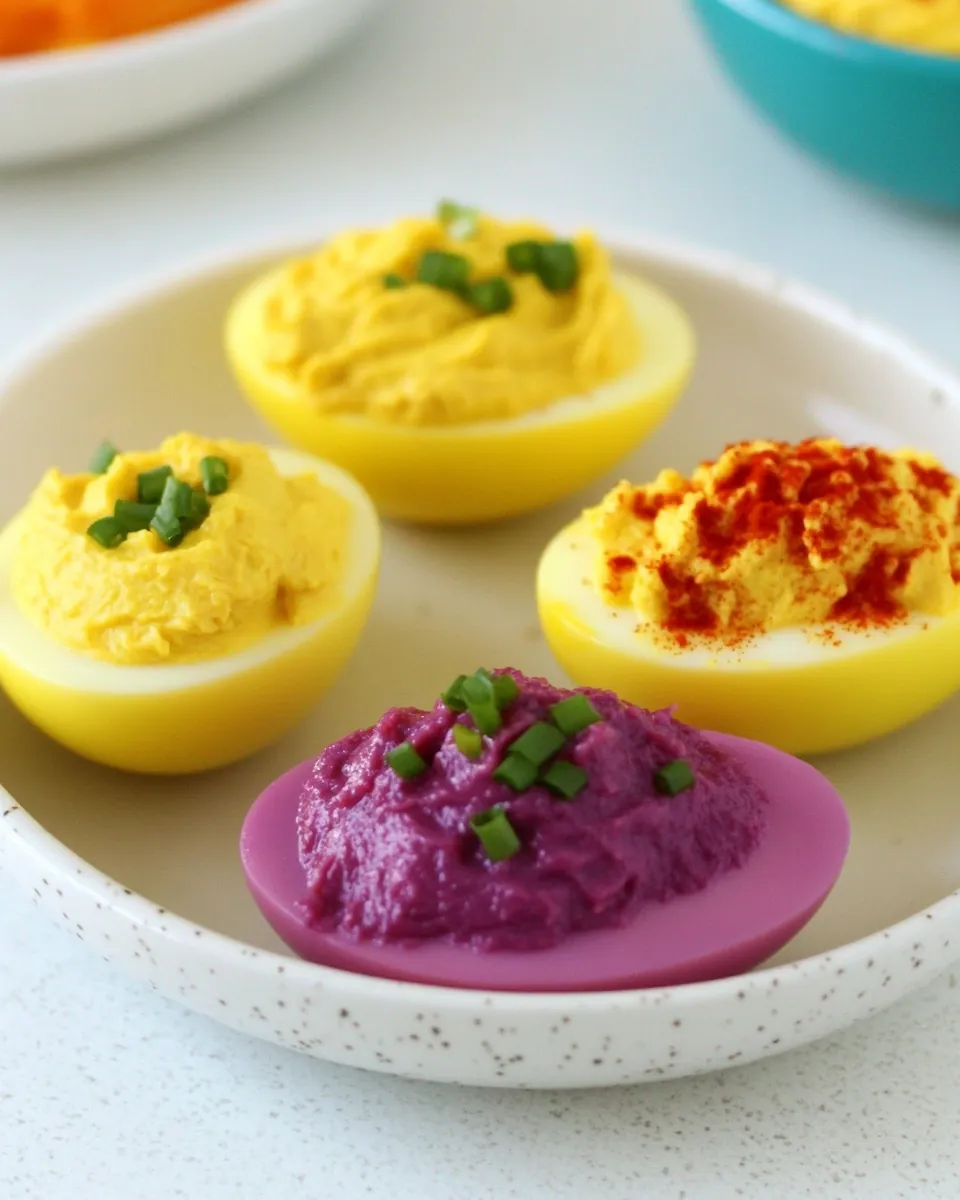
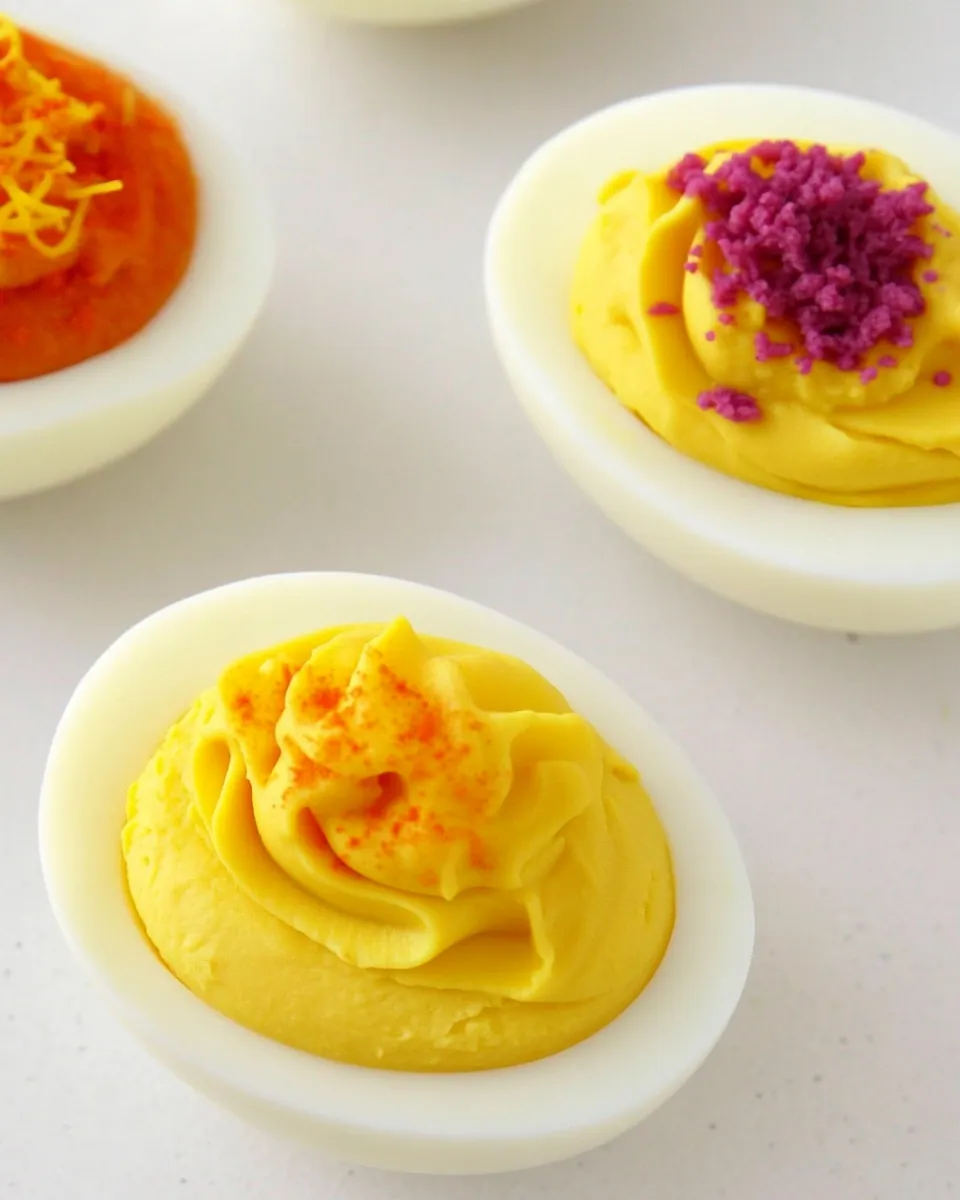
One of the standout features of these Dye Free Deviled Eggs is that they’re colored using natural ingredients. No artificial dyes or additives here! We use vibrant beet juice for a rich red hue and turmeric for sunny yellow. It’s a fun way to introduce kids to cooking with natural foods, making every egg not only eye-catching but also wholesome.
Interactive Activity
Making these eggs can be a delightful family activity. Kids love getting their hands involved in dyeing the whites, and it turns snack time into a colorful experiment. You can encourage them to mix different juices and see what colors they can create, making it a creative learning experience.
Perfect for Celebrations
Festive occasions are even more special with these Dye Free Deviled Eggs. They’re not just a dish; they’re a centerpiece! Guests are always excited to see the various hues, and it sparks conversations around the table. It’s an easy way to make gatherings feel more festive without a lot of extra effort.
Delightful Flavor Combinations
Beyond their visual appeal, the flavor combinations are truly delightful. The creamy filling made with egg yolks, mayonnaise, and a hint of dijon mustard is simply irresistible. Each bite is a balance of creaminess and tanginess, which pairs perfectly with the colorful presentation.
Healthier Option
These are a great alternative for those looking for a healthier option. The use of fresh ingredients not only makes them visually appealing but also adds nutritional value. You can customize the fillings to reduce calories or add new flavors, ensuring everyone at the table can enjoy them.
Kid-Friendly and Fun
Kids absolutely love the colorful aspect of these Dye Free Deviled Eggs. They’re more likely to try something that looks fun and exciting! Plus, seeing them enjoy a healthy snack that they helped create adds to the joy.
What’s In This Dye Free Deviled Eggs
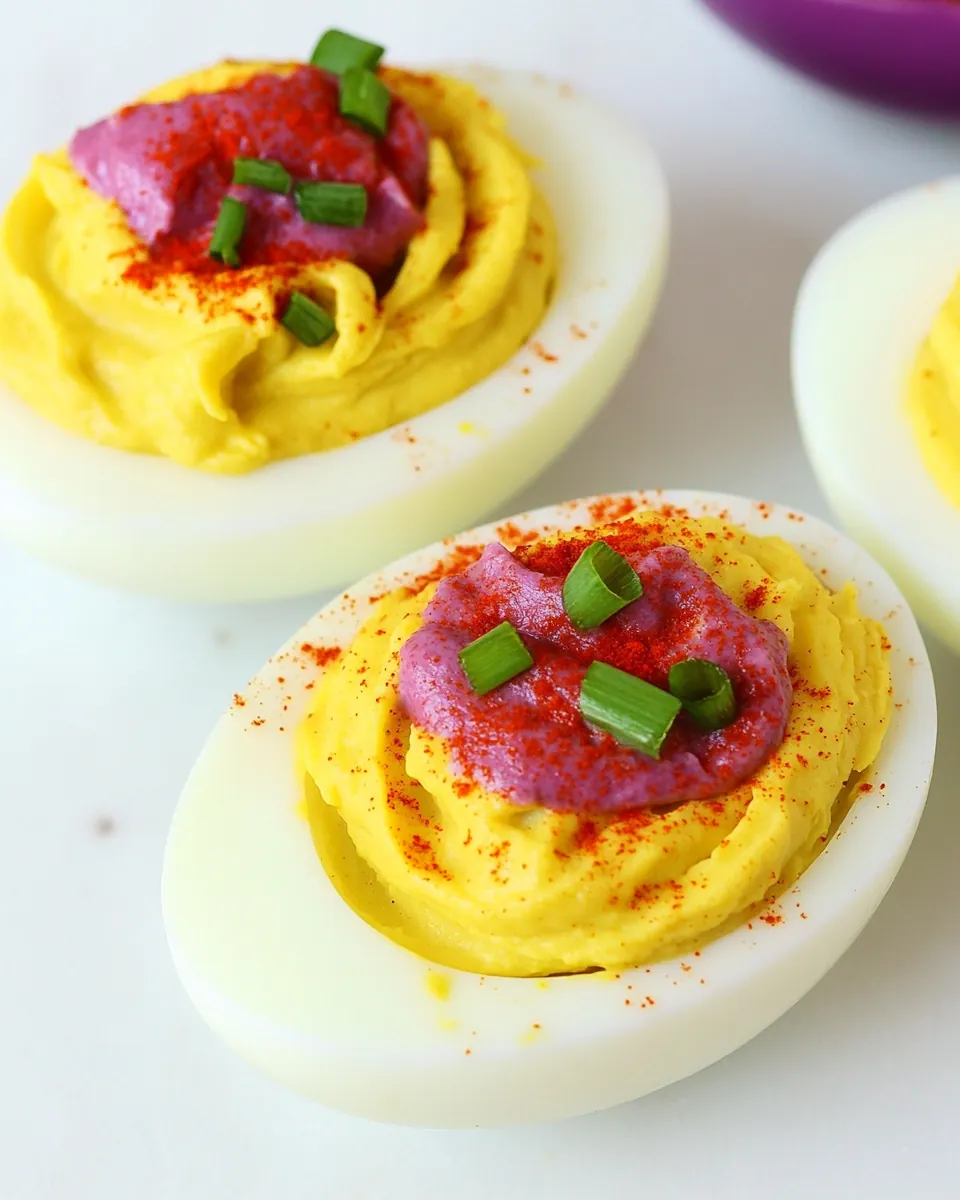
In this simple yet vibrant recipe for Dye Free Deviled Eggs, the ingredients play a crucial role in achieving both flavor and color. The key players, such as beets and blueberries, not only add stunning hues to your eggs but also provide essential nutrients. Each component works together to create a perfect balance of taste and visual appeal, making these eggs a standout dish for any occasion.
- 1/2 cup chopped red cabbage plus 1 cup water plus 1 tablespoon baking soda (bright blueish green) – This combination yields a striking blue color, perfect for making your eggs pop.
- 1/2 cup chopped red cabbage plus 1 cup water (light blue) – A simpler method to achieve a soft blue color, adding a lovely tint to your eggs.
- 1/2 cup chopped red cabbage plus 1 cup water plus 1 tablespoon lemon juice (violet) – The acid from the lemon juice reacts with the cabbage, creating a beautiful violet shade.
- 1 cup chopped beets plus 1 cup water (rust/purple/red) – This natural dye results in rich, earthy tones that are both vibrant and delicious.
- 1 tablespoon curry powder plus 1 cup water (bright yellow) – A bold and sunny choice, lending a cheerful brightness to your eggs.
- 1 tablespoon ground turmeric plus 1 cup water (light yellow) – Another natural coloring agent that offers a lovely light yellow shade.
- 1 cup 100% blueberry juice (purple) – Perfect for a deep purple hue, plus it adds a hint of fruity flavor.
- 1 cup 100% pomegranate juice (dark purple) – A rich and dark dye that not only looks beautiful but also is packed with antioxidants.
- 1 cup 100% grape juice (purple) – This classic juice gives a vibrant purple color and an added sweetness.
- 1 cup 100% raspberry juice (pink) – A sweet and fruity option that adds a fun pink hue.
- 12 large eggs boiled, split, and separated – The base of our dish, providing protein and substance.
- 2 teaspoons dijon mustard – Adds a zesty kick to the filling that enhances the overall flavor.
- 1/2 cup mayonnaise (or vegan mayonnaise) – This provides creaminess and binds the filling together.
- 1/2 teaspoon kosher salt – Enhances all the flavors beautifully.
How to Assemble Dye Free Deviled Eggs
Assembling these Dye Free Deviled Eggs is a delightful process that brings a touch of creativity to your kitchen. Follow my lead, and let’s make these beautiful, colorful eggs together. You’ll love how simple it is to create this masterpiece that’s as much fun to prepare as it is to eat!
- Start by preparing the natural dyes: Place the red cabbage and beets in separate small pots and cover each with water. Bring to a boil, then reduce the heat and simmer for 20 minutes. This process extracts the vibrant colors from the veggies into the water. Once done, strain the liquid and let it cool down. The color will be concentrated and ready to use for dyeing the eggs.
- Next, add a twist! For the cabbage water, add 1 tablespoon of lemon juice to get a delightful violet color or 1 tablespoon of baking soda to achieve a brilliant blueish-green hue. The acidity or alkalinity will affect the color, so have fun experimenting!
- Once the beets are ready, let them soak in their cooking liquid (off the heat) for 1 hour to achieve the desired red or rust color. You can use this liquid immediately for a stunning purple hue or let it sit for even deeper colors.
- Now, time to mix the dyes! You can simply place the egg whites in separate bowls filled with the cool dye mixtures. As they soak, you’ll see the egg whites begin to absorb the colors immediately. In about 20 minutes, they’ll turn more vibrant, so keep an eye on your creations!
- If you want to dye whole, unpeeled eggs, add 1 tablespoon of vinegar to each color. The eggs will soak up the dye after about 10 minutes, and they’ll continue to darken over the next 24 hours. If soaking overnight, be sure to cover and refrigerate them.
- Meanwhile, let’s get the eggs ready for filling! Place the eggs in a pot and cover them with cold water. Bring the water to a boil over high heat. As soon as it reaches a boil, turn off the heat and let the eggs sit covered for 12 minutes. This method ensures perfectly cooked yolks.
- After 12 minutes, drain the hot water and cover the eggs with cold water to cool them down completely. This helps in peeling them easily.
- Once cool, carefully peel the eggs. Slice each egg in half and remove the yolks to a separate bowl. Leave the egg whites halved and set aside for filling later.
- In the bowl with the yolks, mash together the yolks, dijon mustard, mayonnaise, and salt until you achieve a smooth consistency. This creamy filling is what makes the deviled eggs so delicious!
- Finally, fill each halved egg white with the yolk mixture using a spoon or piping bag for a more decorative look. Arrange them on a platter, and they’re ready to serve! Enjoy the colorful and delicious Dye Free Deviled Eggs with your family and friends.
Things Worth Knowing
- Color absorption: The longer you let the egg whites soak in the dye, the more vibrant the color will be. Just be sure to check periodically!
- Natural dye longevity: Natural dyes tend to fade over time, so it’s best to enjoy your creations soon after making them for the brightest colors.
- Layering colors: You can even layer colors! Allow one color to soak, then dip in another for a unique two-tone effect.
- Boiling tips: For perfectly boiled eggs that are easy to peel, remember to start with cold water and turn off the heat as soon as it boils.
Change It Up

There are endless ways to customize your Dye Free Deviled Eggs to make them even more exciting. Here are some fun tips to try out!
- Storage: If you have leftovers, store them in an airtight container in the fridge for up to 2 days to maintain freshness.
- Freezing: While you can freeze the egg yolk mixture, it’s best to serve them fresh. The texture may change when frozen.
- Pairing: Serve these colorful eggs with a fresh garden salad or on a charcuterie board for a delightful presentation.
- Flavor variations: Try adding ingredients like hot sauce, herbs, or even diced vegetables to the yolk mixture for extra flavor.
- Seasonal twist: For the holidays, you can decorate the eggs with edible glitter or herbs for an extra festive touch!
Perfect Matches for Dye Free Deviled Eggs
When serving your beautiful Dye Free Deviled Eggs, consider pairing them with these delightful options:
- Fresh Garden Salad: A vibrant salad with seasonal veggies makes a perfect complement to the creamy eggs.
- Light Appetizers: Serve alongside light appetizers such as cucumber sandwiches or cheese platters.
- Spring Brunch: These colorful eggs are ideal for brunch gatherings, adding a festive touch to your table.
- Picnics: Pack them in your picnic basket for a fun and colorful treat outdoors.
- Holiday Celebrations: They make a fantastic addition to Easter brunch or any festive gathering!
FAQ
Conclusion
The Dye Free Deviled Eggs are not just a delicious treat; they’re a celebration of color and creativity. This recipe brings together the joy of cooking and the excitement of vibrant, natural dyes, making them perfect for gatherings or family fun. I encourage you to give them a try and watch as they become a beloved part of your festive traditions!
Dye Free Deviled Eggs
Ingredients
Equipment
Method
- Place the red cabbage and beets in separate small pots and cover with water. Bring to a boil, reduce heat to low and simmer for 20 minutes. Strain the liquid and cool.
- Add 1 tablespoon of lemon juice to the cabbage water to get violet eggs or 1 tablespoon of baking soda to get bright blueish green eggs.
- Allow the beets to soak in their cooking liquid (off the heat) for 1 hour to get red, or use immediately for a rust-ish purple color.
- Place the egg whites in the color mixtures to dye. The egg whites will begin to absorb the color immediately and will continue to darken and become more vibrant over the next 20 minutes.
- To dye whole, unpeeled eggs, add 1 tablespoon of vinegar to each color. The eggs will absorb the color after about 10 minutes and will continue to darken and become more vibrant up to 24 hours in the liquid. If you will be soaking the eggs overnight or several hours, cover and refrigerate them.
- Place the eggs in a pot and cover with cold water. Bring the water and eggs to a boil over high heat. When the water comes to a boil, turn off the heat and let sit for 12 minutes.
- Drain off the hot water and cover with cold water to cool the eggs.
- Peel the eggs and cut in half for deviled eggs. Leave the eggs whole and unpeeled to dye the egg shells.
- In a bowl, mash together the egg yolks, mustard, mayonnaise, and salt until smooth. Fill the halved egg whites with the mixture and serve.
Notes
- Tip 1: Store leftovers in an airtight container in the fridge for up to 2 days.
- Tip 2: Freezing the yolk mixture is possible, but best enjoyed fresh.
- Tip 3: Pair with a fresh garden salad for a delightful meal.
- Tip 4: Try adding herbs or hot sauce to the filling for extra flavor.
- Tip 5: Decorate for holidays with edible glitter or herbs!