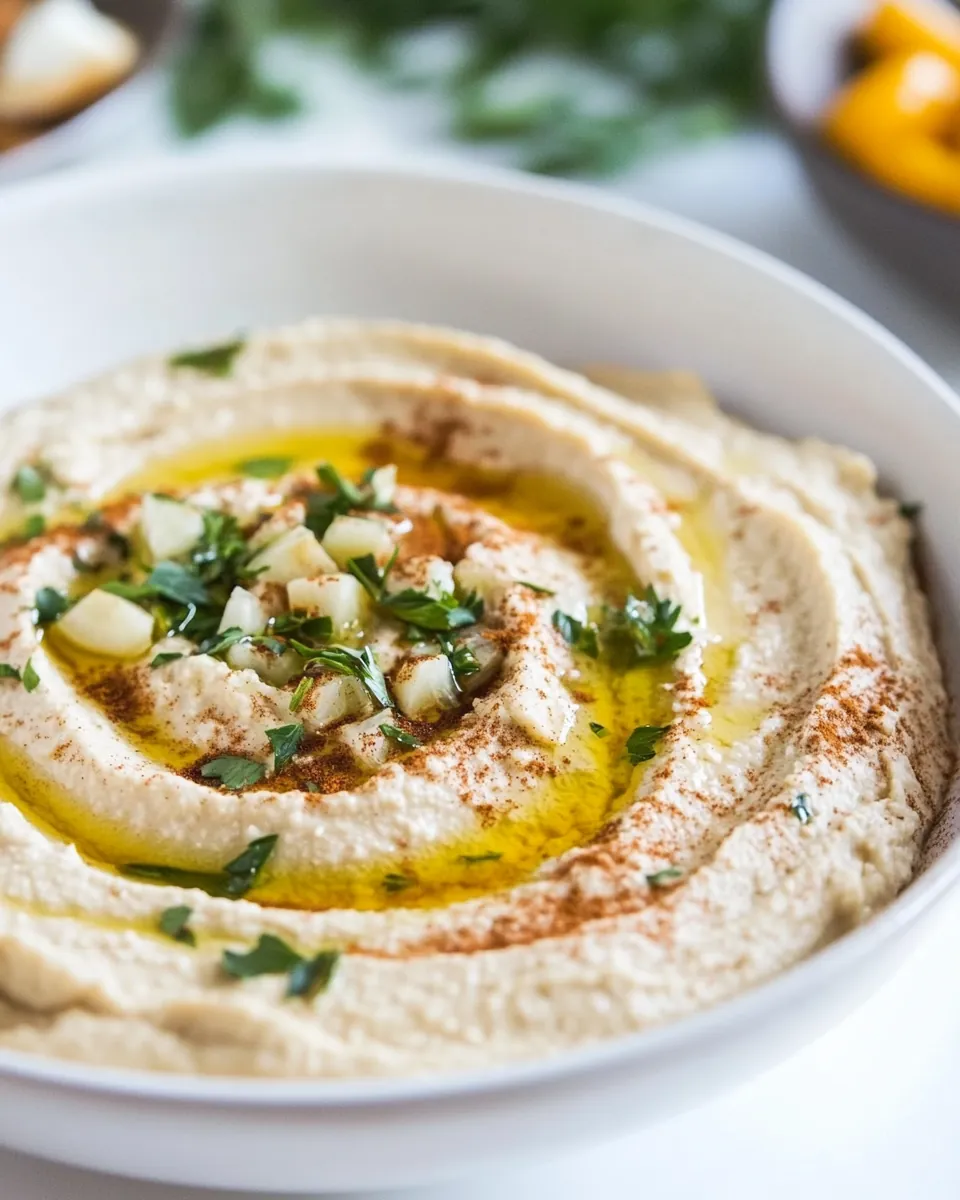
Creamy Roasted Garlic Hummus
The moment I first tried Creamy Roasted Garlic Hummus, I knew I had stumbled upon something special. Picture a cozy evening with friends, dipping crispy vegetables and warm pita into this velvety spread. The rich, nutty flavor of roasted garlic beautifully complements the creamy texture of chickpeas, creating a dish that’s not just a dip, but a celebration of flavors. I often find myself making this hummus for gatherings or just for a satisfying snack at home. It’s a recipe that brings comfort and joy, and I can’t help but share it with everyone I know.
Recipe Snapshot
55 mins
15 mins
40 mins
Medium
180 kcal
6 g
Keto, Paleo, Whole30
8 g
Large Pot, Food Processor, Oven, Baking Sheet, Blender, Frying Pan, Chef’s Knife
Every time I whip up this Creamy Roasted Garlic Hummus, I’m reminded of how versatile and delightful it can be. It’s perfect for any occasion—be it a potluck, a casual dinner party, or simply a quiet night at home. This hummus isn’t just about being a delicious dip; it’s about connecting with others over good food. Whether you’re serving it with crunchy veggies or slathering it on a fresh piece of bread, it’s sure to impress. And don’t get me started on the aroma that fills the kitchen as the garlic roasts—absolutely irresistible!
Why We Love This Creamy Roasted Garlic Hummus
Elevates Every Snack
One of the top reasons I adore this recipe is how it transforms ordinary snacks into something extraordinary. Instead of reaching for chips or store-bought dips, when I have Creamy Roasted Garlic Hummus on hand, I’m excited to serve up deliciously fresh veggies. The hummus becomes an inviting centerpiece, encouraging everyone to gather around and enjoy.
Health Benefits
This hummus is not only tasty, but it’s also packed with nutrients. Chickpeas are a fantastic source of protein and fiber, while garlic is known to boost immunity. So, every scoop of this creamy goodness is a step towards healthier eating. Plus, it’s vegan and gluten-free, making it a great option for diverse diets.
Easy to Make
One of the best parts about this Creamy Roasted Garlic Hummus is how simple it is to make. With just a handful of ingredients that you probably already have in your pantry, you can whip this up in no time! I love how straightforward the steps are, allowing even novice cooks to create something that tastes gourmet.
Customizable
This recipe is incredibly versatile. If you’re feeling adventurous, you can easily modify it to suit your taste. Want a spicier kick? Add some red pepper flakes. Craving a smokier flavor? A touch of smoked paprika does wonders! The options are endless, allowing each batch to be a little different and uniquely yours.
Perfect for Meal Prep
Preparing Creamy Roasted Garlic Hummus in advance is a game changer for busy weeks. It stores perfectly in the fridge, making it an easy grab-and-go option for lunches or snacks. Just keep it covered and enjoy it within a week. It’s my go-to solution for quick meals!
Ingredients for Creamy Roasted Garlic Hummus

The ingredients for Creamy Roasted Garlic Hummus are simple yet powerful. Each component plays a key role in creating that rich, creamy texture and deep flavor profile. The blend of roasted garlic and tahini brings a delightful earthiness, while lemon juice adds a refreshing brightness. Together, they create a perfect harmony that makes this dish so irresistible.
- 1 bulb of garlic (see note)
- 1 15-oz can of garbanzo beans
- ½ tsp of baking soda
- ½ cup of tahini
- 3 tbsp of cold water
- 2 tbsp of extra virgin olive oil
- 3 to 4 tbsp of lemon juice
- ½ tsp of sea salt
Recipe Steps for Creamy Roasted Garlic Hummus
Making Creamy Roasted Garlic Hummus is a delightful process that fills your kitchen with wonderful aromas. I find that taking the time to roast the garlic truly enhances the flavor, giving the hummus a depth that you just can’t get from raw garlic. Let’s dive into these steps to create a bowl of creamy goodness!
Preheat your oven to 400 degrees Fahrenheit. Roasting the garlic is the first step, and this ensures that it becomes soft and sweet. Take a bulb of garlic, and cut off the top. You want to expose the individual cloves, so don’t be shy. Place the whole bulb on a sheet of aluminum foil.
Drizzle the exposed cloves with olive oil. Make sure to coat it well; this will help it roast beautifully. Once it’s well-covered, wrap the bulb snugly in the foil. This keeps all the moisture in, allowing it to steam and caramelize. Pop it in the oven and roast for about 40 to 50 minutes, or until the cloves are golden brown and soft.
While the garlic is roasting, prepare your garbanzo beans. Drain the canned beans into a colander and transfer them to a large saucepan. Cover them with water and sprinkle in ½ teaspoon of baking soda. The baking soda helps break down the chickpeas, making them creamy when blended.
Bring the water to a full boil over high heat. Cook the beans for about 20 to 30 minutes, keeping an eye on them. You want them to be tender but not mushy. Once they’re done, drain them and let them cool for a bit. As they cool, you’ll notice that some of the skins may come off. Picking off the skins is optional but will result in an even smoother hummus.
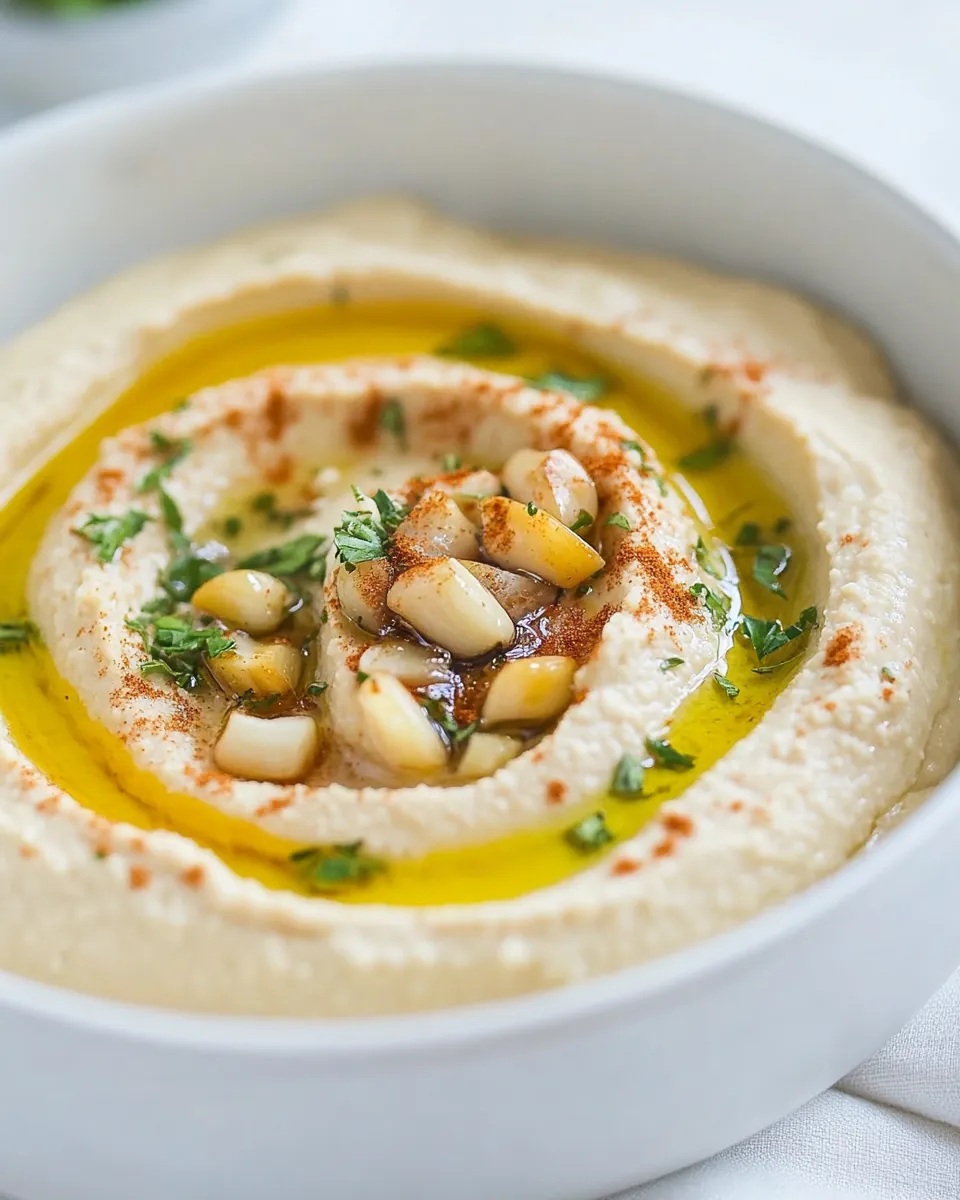
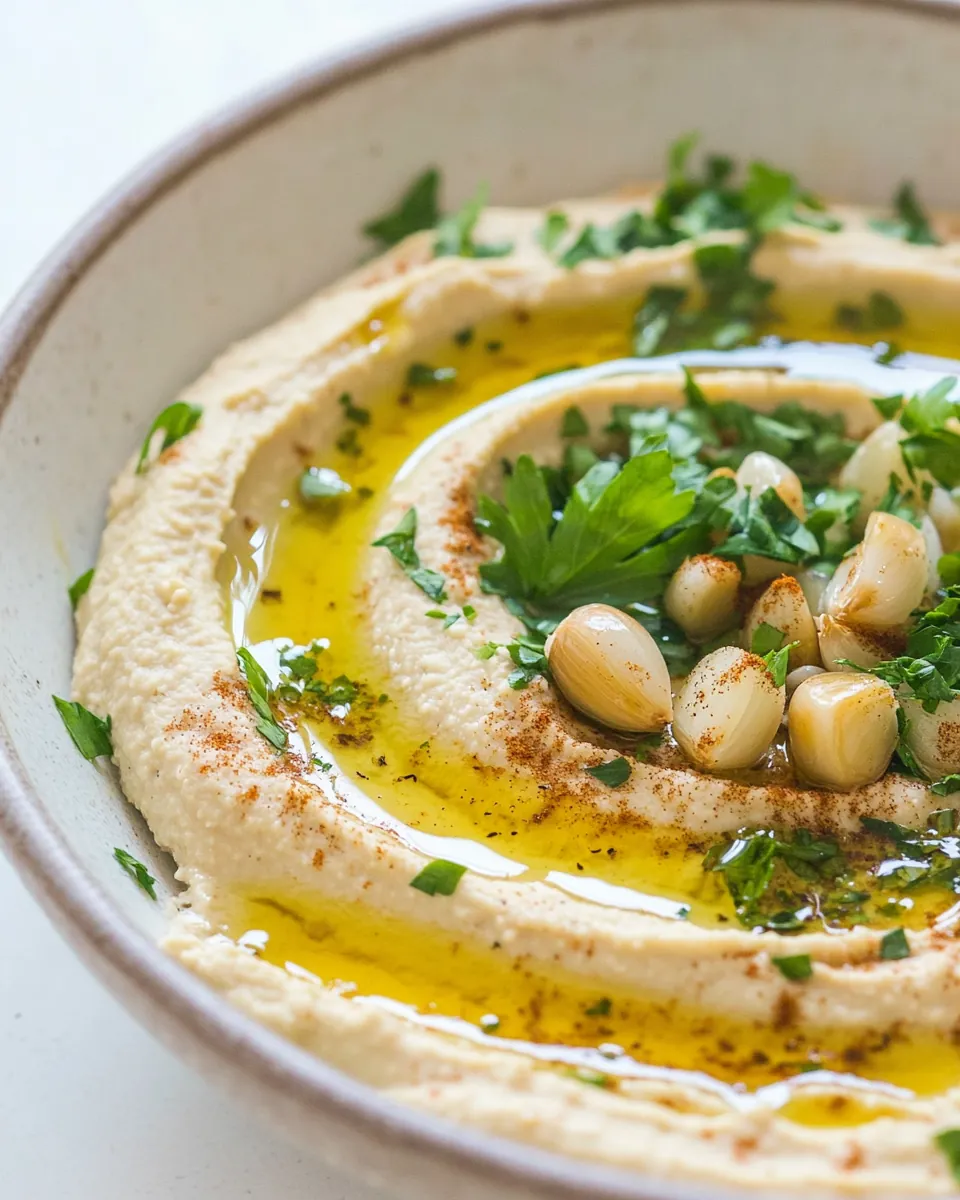
Next, it’s time to combine everything. Take the roasted garlic out of the oven and allow it to cool for a few minutes. Squeeze the bottom of the bulb to push out the individual cloves into a food processor. You can use about 3 to 6 cloves, depending on your garlic love!
Add the cooled chickpeas, ½ cup of tahini, 3 tablespoons of cold water, 2 tablespoons of extra virgin olive oil, 3 to 4 tablespoons of lemon juice, and ½ teaspoon of sea salt into the processor. This mix is where the magic happens!
Blend the ingredients until the mixture is super smooth. If your hummus seems a bit thick, feel free to add a little more cold water, one tablespoon at a time, until you reach your desired consistency. Don’t forget to stop and scrape down the sides of the processor as needed to ensure everything blends evenly.
Taste your hummus to see if it needs any adjustments. Sometimes, a little more lemon juice or salt can make all the difference. Adjust to your preference and blend again.
Once you’re happy with the flavor and consistency, transfer the hummus to a serving dish. Consider adding toppings like pistachios, pine nuts, a drizzle of olive oil, or a sprinkle of paprika for an extra pop of color and flavor.
Finally, serve your Creamy Roasted Garlic Hummus with an assortment of dippers like fresh vegetables, pita chips, or even toasted bread. Enjoy the journey of flavors and the smiles it brings to your table!
Things Worth Knowing
- Roasting garlic: Roasting garlic mellows its flavor, making it sweeter and less pungent, which is perfect for hummus.
- Blending tips: For an ultra-smooth texture, use a high-speed blender or food processor.
- Chickpea skins: Removing the skins can contribute to a creamier result, but it’s optional.
- Storage: Store any leftovers in an airtight container in the fridge for up to 10 days.
Customization Ideas
One of the best things about Creamy Roasted Garlic Hummus is how easily you can customize it to suit your tastes. Here are some tips to consider:
- Experiment with flavors: You can add roasted red peppers or sun-dried tomatoes for a different twist.
- Spice it up: If you like a kick, add jalapeños or cayenne pepper to the mix.
- Herb infusion: Fresh herbs like basil or cilantro can infuse a fresh taste into your hummus.
- Mix with avocado: For an extra creamy texture, blend in some ripe avocado.
- Serve with variety: Pair with different types of dippers—crackers, veggies, or pita.
- Top it off: Use toppings like crumbled feta or olives for added flavor and texture.
Serve This Creamy Roasted Garlic Hummus With
When it comes to serving Creamy Roasted Garlic Hummus, the possibilities are endless. Here are some ideas to elevate your serving experience:
- Fresh vegetables: Serve with crunchy vegetables like carrots, celery, and bell peppers for a healthy snack.
- Pita chips: These are an excellent accompaniment, providing a satisfying crunch.
- Toasted bread: Consider serving with warm, toasted bread for a comforting option.
- Cheese platter: Pair with a cheese board for a more extensive appetizer spread.
- Picnics: Perfect for outdoor gatherings and picnics, adding a gourmet touch to your meal.
- Game day: Ideal for game day snacks, allowing everyone to dig in and enjoy a flavorful treat.
FAQ
Conclusion
The Creamy Roasted Garlic Hummus shines with its rich flavors and creamy texture, making it a standout choice for any gathering or quiet night in. I encourage you to try making this delightful recipe at home and experience the joy it brings. With such easy preparation and endless serving possibilities, this hummus is bound to become a staple in your kitchen!
Creamy Roasted Garlic Hummus
Ingredients
Equipment
Method
- Preheat your oven to 400 degrees Fahrenheit. Cut off the top of a bulb of garlic, exposing the cloves. Place it on aluminum foil, drizzle with olive oil and wrap snugly. Roast for 40 to 50 minutes until golden brown.
- Drain the garbanzo beans and transfer to a saucepan. Cover with water and add ½ teaspoon of baking soda. Bring to a boil and cook for 20 to 30 minutes until tender.
- Once the garlic is cool, squeeze the cloves into a food processor. Add the cooked garbanzo beans, ½ cup of tahini, 3 tablespoons of cold water, 2 tablespoons of extra virgin olive oil, 3 to 4 tablespoons of lemon juice, and ½ teaspoon of sea salt.
- Blend until very smooth. You can adjust the consistency with more water if needed. Taste and add more salt or lemon juice to your liking.
- Transfer the hummus to a serving dish. Top with pistachios, pine nuts, or a drizzle of olive oil before serving.
Notes
- Tip 1: You don’t need to use the full bulb of roasted garlic; 3 to 6 cloves will do.
- Tip 2: Adjust lemon juice to your taste; I recommend ¼ cup for a nice zing.
- Tip 3: Store in an airtight container for up to 10 days in the fridge.