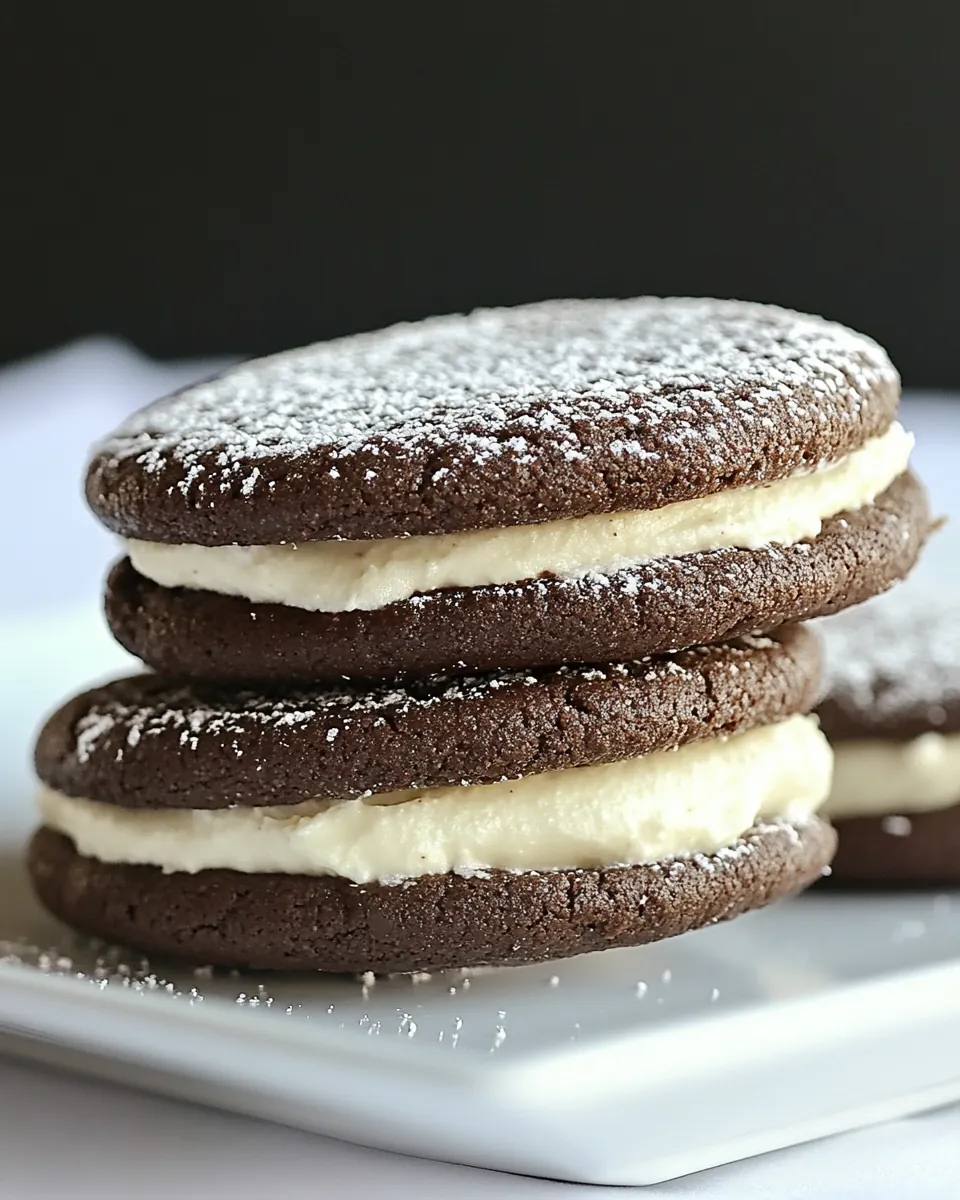
Peppermint Cream Chocolate Cookie Sandwiches
There’s something magical about the combination of chocolate and peppermint, especially during the winter months. When I think of special occasions, the Peppermint Cream Chocolate Cookie Sandwiches come to mind. I remember the first time I made these delightful treats for a holiday gathering. The kitchen was filled with the warm aroma of baking chocolate cookies, and the anticipation in the air was almost palpable. As friends and family gathered around, the first bite was met with smiles and nods of approval. These cookie sandwiches quickly became a staple in our home, perfect for sharing and celebrating joy during Christmas.
Recipe Snapshot
25 mins
15 mins
10 mins
Medium
210 kcal
2 g
Gluten-Free, Low FODMAP
9 g
Oven, Baking Sheet, Frying Pan, Wooden Spoon, Mixing Bowl
These aren’t just any cookies; they’re a nostalgic trip down memory lane, reminding us of the warmth of family gatherings and the sweetness of togetherness. The creamy peppermint filling nestled between two rich chocolate cookies creates a texture and flavor explosion that’s simply irresistible. Whether you’re hosting a festive party or simply treating yourself, these cookie sandwiches are bound to bring cheer and smiles. Let’s delve into why this recipe is a must-try!
Why This Peppermint Cream Chocolate Cookie Sandwiches Is So Good
Irresistible Flavor Combination
The pairing of chocolate and peppermint is truly a match made in heaven. The rich, buttery flavor of the chocolate cookies harmonizes beautifully with the cool, refreshing taste of peppermint cream. Each bite of the Peppermint Cream Chocolate Cookie Sandwiches provides a delightful contrast that keeps you coming back for more.
Perfect for Any Occasion
While these cookies are a holiday favorite, they can be enjoyed any time of the year. Whether it’s a birthday, a summer picnic, or just a treat for yourself, these cookie sandwiches fit the bill. Their festive appearance makes them a centerpiece for any dessert table.
Easy to Make
One of the best aspects of this recipe is how simple it is to prepare. With common ingredients and straightforward steps, you’ll find yourself whipping up a batch in no time. It’s perfect for both novice bakers and experienced chefs looking for a quick treat.
Kid-Friendly Fun
Involving kids in the kitchen is one of my favorite ways to create lasting memories. Making Peppermint Cream Chocolate Cookie Sandwiches is a fun activity to do together, from mixing the dough to decorating the cookies. Plus, they’ll love the chance to indulge in their creation!
Make Ahead and Store
These cookie sandwiches keep well, making them an excellent option for preparation in advance. You can bake the cookies ahead of time and assemble them just before serving. This flexibility allows you to prepare for gatherings without the last-minute rush.
Customize Your Ingredients
The beauty of this recipe lies in its versatility. Feel free to experiment with different types of chocolate or add in extra ingredients like crushed peppermint candies for a delightful crunch. Each batch can have its unique twist, making it a fun recipe to play around with!
Ingredients You’ll Need for Peppermint Cream Chocolate Cookie Sandwiches
The ingredients for these delightful cookie sandwiches are simple yet effective. Each one plays a crucial role in crafting that perfect taste and texture. Let’s explore the key players that make up the Peppermint Cream Chocolate Cookie Sandwiches.
- 1/2 cup (113g) butter, softened – This is the base of our cookie dough, adding richness and helping achieve that tender texture.
- 1/4 cup (21g) unsweetened cocoa powder – Essential for giving our cookies that deep chocolate flavor.
- 2 tablespoons (25g) vegetable oil – This adds moisture and helps create a softer cookie.
- 1 cup (170g) chocolate chips – Melty goodness that enhances the chocolate experience.
- 2 cups (240g) all-purpose flour – Provides structure for our cookies.
- 1/2 teaspoon (2g) baking powder – Helps the cookies rise and maintain a fluffy texture.
- 1/2 teaspoon (1g) kosher salt – Balances out the sweetness and enhances flavor.
- 4 large (200g) eggs – Adds moisture and binds the ingredients together.
- 1 1/2 cups (297g) sugar – Sweetness is key in any dessert, and this ingredient delivers perfectly.
- 2 teaspoons (9g) vanilla extract – A classic flavor enhancer for baked goods.
- 1/2 cup (92g) shortening – Contributes to a soft texture and helps the cookies maintain their shape.
- 1 1/2 cups (144g) marshmallow cream – This forms the delightful filling that adds a creamy texture.
- 2 cups (227g) confectioners’ sugar – A key ingredient in the filling, providing sweetness and smoothness.
- 1 teaspoon (4g) peppermint extract – For that signature refreshing flavor.
- 1 1/2 tablespoons (21g) milk – Helps to achieve the perfect consistency for our cream filling.
Instructions for Peppermint Cream Chocolate Cookie Sandwiches

Making these cookie sandwiches is a fun process that’s simple enough to do with family or friends. Let’s walk through the steps together, ensuring we get those cookies just right!
Preheat your oven to 350º F (180º C). This is crucial as it ensures our cookies bake evenly. While the oven warms up, line a sheet pan with parchment paper or a silicone baking mat. This prevents sticking and makes cleanup easy.
In a mixing bowl, cream together the butter, cocoa powder, and vegetable oil until the mixture is well-combined and fluffy. This step incorporates air into the dough, resulting in a light texture.
Next, stir in the chocolate chips. They’ll melt slightly while baking, creating gooey pockets of chocolate within each cookie.
Now, mix in the flour, baking powder, and kosher salt until everything is fully combined. You want a smooth dough without any lumps.
Add the eggs, sugar, and vanilla extract to the mixture. Mix until all the ingredients are thoroughly combined and creamy. This is where the magic happens, and your dough will start coming together beautifully.
Using a spoon or cookie scoop, scoop tablespoon-sized amounts of dough onto the prepared sheet pan. Make sure to leave about 1 1/2 inches between each scoop to allow the cookies to spread while baking.
Bake the cookies in your preheated oven for about 10 minutes. When they’re done, they should look slightly puffed and set at the edges. Remove them from the oven and allow them to cool completely on a wire rack.
While the cookies cool, prepare your peppermint cream filling. In another bowl, cream together the marshmallow cream, confectioners’ sugar, peppermint extract, and milk until it’s smooth and fluffy. This filling is what makes the Peppermint Cream Chocolate Cookie Sandwiches truly special.
Once the cookies have cooled completely, scoop about 1 teaspoon of the cream filling and place it on the flat side of one cookie. Carefully top it with another cookie, pressing down gently to create a sandwich.
Finally, serve the cookie sandwiches at room temperature. They’re perfect to enjoy with a warm cup of tea or coffee or on their own as a sweet treat!
Things Worth Knowing
- Make sure your butter is softened. This is essential for creaming properly and achieving that light texture.
- Don’t skip the cooling step. Allowing the cookies to cool completely ensures that the filling doesn’t melt and is easy to spread.
- Store leftover cookies. Keep them in an airtight container to maintain freshness, ideally in a cool place.
- Variations are encouraged! Feel free to experiment with different extracts or add-ins like nuts for a personal twist on these sandwiches.
Tips for Success

To ensure your Peppermint Cream Chocolate Cookie Sandwiches turn out perfectly, here are some handy tips:
- Storage: Keep leftovers in an airtight container at room temperature for up to four days. If you want to enjoy them longer, refrigerate them.
- Freezing: These cookies freeze well! You can freeze the assembled sandwiches or just the cookies themselves. Just remember to wrap them tightly to prevent freezer burn.
- Pairing: Try pairing these cookies with a warm beverage like hot cocoa or a spiced tea for a cozy treat.
- Presentation: Dust the sandwiches with a little extra confectioners’ sugar before serving for an elegant touch.
- Experiment: Feel free to add crushed peppermint candies to the filling for an extra crunch and burst of flavor!
Accompaniments for Peppermint Cream Chocolate Cookie Sandwiches
When it comes to serving these Peppermint Cream Chocolate Cookie Sandwiches, the options are as delightful as the cookies themselves! Here are some ideas:
- Tea Party Treat: Serve alongside a selection of teas for an elegant afternoon gathering.
- Holiday Celebrations: These cookies are perfect for Christmas parties, adding a festive touch to any dessert table.
- Bake Sales: Package these sandwiches beautifully for a bake sale, sure to attract customers with their charming appearance.
- Family Gatherings: They’re an excellent addition to family reunions or potluck dinners, providing a sweet option everyone will enjoy.
- Storing Leftovers: If you have any cookies left, store them in a cool place or refrigerate for freshness.
- Seasonal Events: With their peppermint flavor, they are especially popular during winter and the holidays, making them a seasonal favorite.
FAQ
Conclusion
The Peppermint Cream Chocolate Cookie Sandwiches are not just a treat; they’re a celebration of flavor and nostalgia. Each bite brings back memories of warm kitchens and joyful gatherings. I encourage you to give this recipe a try and make it your own. Whether you share them with loved ones or enjoy them solo, these cookies are bound to bring a smile to your face. So, roll up your sleeves and start baking!

Peppermint Cream Chocolate Cookie Sandwiches
Ingredients
Equipment
Method
- Preheat your oven to 350º F (180º C). This is crucial as it ensures our cookies bake evenly. While the oven warms up, line a sheet pan with parchment paper or a silicone baking mat. This prevents sticking and makes cleanup easy.
- In a mixing bowl, cream together the butter, cocoa powder, and vegetable oil until the mixture is well-combined and fluffy. This step incorporates air into the dough, resulting in a light texture.
- Next, stir in the chocolate chips. They’ll melt slightly while baking, creating gooey pockets of chocolate within each cookie.
- Now, mix in the flour, baking powder, and kosher salt until everything is fully combined. You want a smooth dough without any lumps.
- Add the eggs, sugar, and vanilla extract to the mixture. Mix until all the ingredients are thoroughly combined and creamy. This is where the magic happens, and your dough will start coming together beautifully.
- Using a spoon or cookie scoop, scoop tablespoon-sized amounts of dough onto the prepared sheet pan. Make sure to leave about 1 1/2 inches between each scoop to allow the cookies to spread while baking.
- Bake the cookies in your preheated oven for about 10 minutes. When they’re done, they should look slightly puffed and set at the edges. Remove them from the oven and allow them to cool completely on a wire rack.
- While the cookies cool, prepare your peppermint cream filling. In another bowl, cream together the marshmallow cream, confectioners' sugar, peppermint extract, and milk until it’s smooth and fluffy. This filling is what makes the Peppermint Cream Chocolate Cookie Sandwiches truly special.
- Once the cookies have cooled completely, scoop about 1 teaspoon of the cream filling and place it on the flat side of one cookie. Carefully top it with another cookie, pressing down gently to create a sandwich.
- Finally, serve the cookie sandwiches at room temperature. They’re perfect to enjoy with a warm cup of tea or coffee or on their own as a sweet treat!