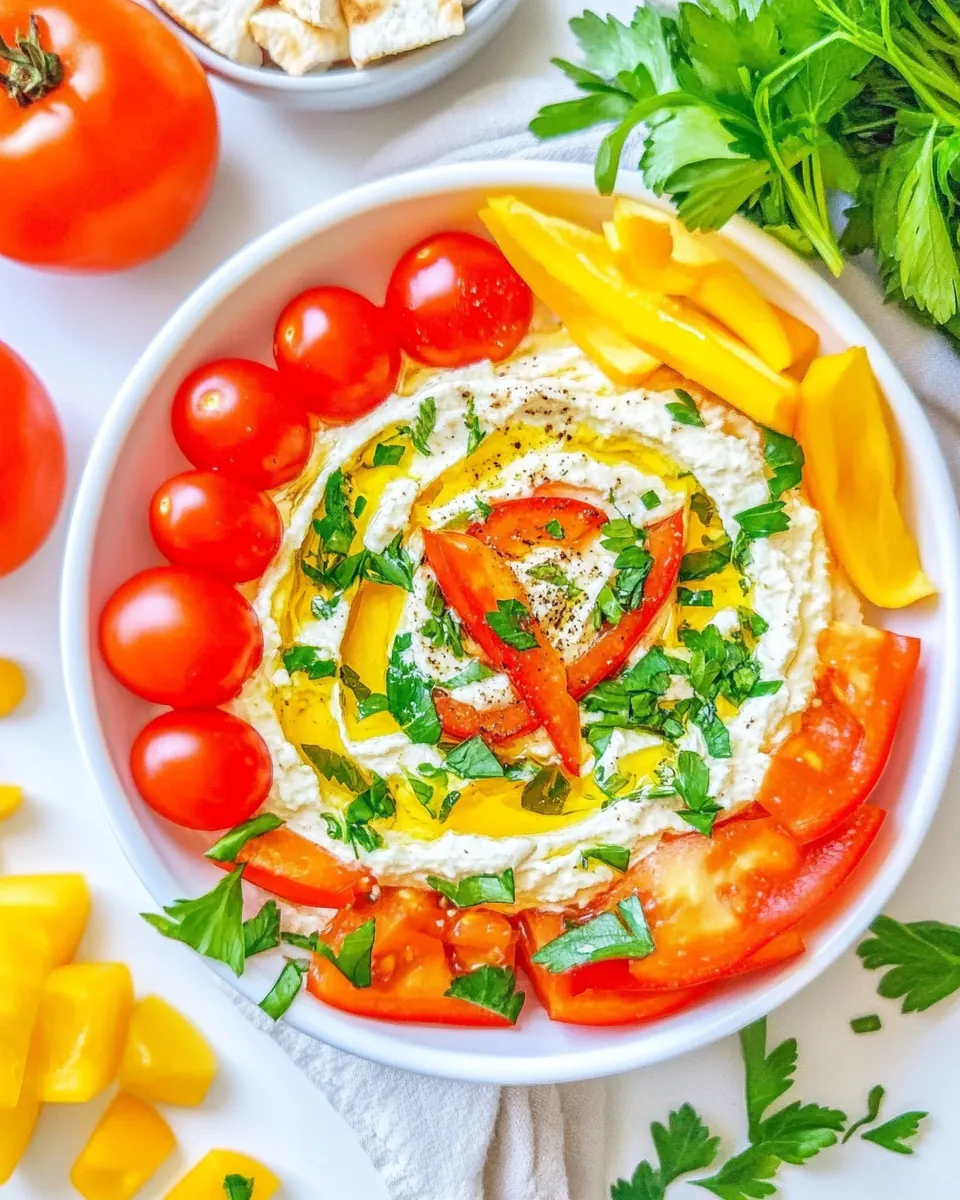
Whipped Feta Dip
When it comes to entertaining, there’s nothing quite like serving a bowl of Whipped Feta Dip that brings a burst of flavor to the table. This dip has become my go-to for gatherings, whether it’s a cozy night with friends or a big family celebration. The creamy, tangy notes of feta cheese paired with Greek yogurt create a luscious texture that is simply irresistible. I remember the first time I made it – I was experimenting with a few ingredients and was blown away by how delicious it turned out. Each bite is a little taste of heaven, and I love watching my guests swoon as they dip their favorite veggies and crackers into this delightful concoction. The best part? It’s incredibly easy to whip up, requiring just a handful of ingredients that work beautifully together.
Recipe Snapshot
5 mins
5 mins
0 mins
Medium
120 kcal
8 g
Keto, Gluten-Free, Low FODMAP
9 g
Food Processor, Wooden Spoon
The Appeal of This Whipped Feta Dip
1. Simple Yet Elegant
There’s an undeniable charm in crafting a dish that appears sophisticated but is so accessible. Whipped Feta Dip strikes that perfect balance. With just a few pantry staples, you can create an elegant appetizer that astounds your guests. The combination of feta cheese and Greek yogurt gives it a creamy texture and a complex flavor profile that feels gourmet.
2. Versatile Pairing Options
This dip is incredibly versatile, making it a fantastic companion to a wide variety of dippers. Whether you prefer crispy vegetables, crunchy crackers, or warm pita bread, it complements them all perfectly. You can even spread it on sandwiches or wraps for an instant upgrade to your meal. It’s the kind of recipe that adjusts to your preferences and the season.
3. Make-Ahead Convenience
One of my favorite features of this Whipped Feta Dip is that it can be made ahead of time. This aspect is a game-changer for busy hosts. By preparing it a day or two in advance, you allow the flavors to meld beautifully. Just remember to let it come to room temperature before serving for the best taste experience!
4. A Healthy Indulgence
For those of us who love to indulge without the guilt, this dip offers a healthier alternative to traditional creamy dips. With the use of Greek yogurt and high-quality feta cheese, you’re enjoying something that’s both tasty and nutritious. It packs proteins and probiotics, all while still satisfying your cravings.
5. Perfect for Any Occasion
Whether it’s a summer BBQ, a cozy winter gathering, or even a festive holiday party, Whipped Feta Dip fits right in. Its casual yet chic vibe makes it ideal for any occasion. Plus, I love how it invites conversation; everyone wants to know the secret behind that creamy goodness!
6. Easy Customizations
If you love experimenting in the kitchen, this dip is your canvas. You can easily customize it by adding different herbs, spices, or toppings. Want a bit of heat? Toss in some red pepper flakes. Feeling fancy? Top with a drizzle of honey or a sprinkle of herbs. Your creativity can make each batch unique!
What Goes Into Whipped Feta Dip

The ingredients in Whipped Feta Dip come together to create a harmonious blend of flavors and textures. Each component plays a critical role in achieving the perfect creamy consistency and vibrant taste. The star of the show, feta cheese, is complemented by the tanginess of Greek yogurt, while garlic adds a savory punch. Together, they form a dip that is not only delicious but also healthy.
- Feta Cheese: 8 ounces of feta cheese provides that characteristic salty and tangy flavor. It’s best to use high-quality feta for the creamiest results.
- Greek Yogurt: ¾ cup of Greek yogurt adds creaminess while keeping the dip light. Opt for full-fat varieties for the best texture.
- Garlic: 2 garlic cloves, minced, lend a wonderful aromatic quality that elevates the dip.
- Lemon Zest: The zest from one lemon brightens the dip, giving it a refreshing citrus note that balances the richness of the cheese.
- Olive Oil: 2 tablespoons of olive oil smooth the mixture and add depth of flavor.
- Lemon Juice: 1 tablespoon of lemon juice enhances the dip’s tartness.
- Dried Dill: ½ teaspoon of dried dill offers a subtle herbaceous note that works beautifully with the feta.
- Smoked Paprika: ½ teaspoon of smoked paprika introduces a smoky warmth and a lovely color.
- Salt: ½ teaspoon of salt enhances all the flavors.
- Freshly Ground Pepper: ½ teaspoon of freshly ground pepper can be added to taste for a gentle kick.
- Optional Fresh Herbs: Fresh herbs like thyme, oregano, basil, mint, or rosemary can be used for garnishing.
The Process for Making Whipped Feta Dip

Making Whipped Feta Dip is a breeze and one that I absolutely love because it’s so satisfying to make. You’ll find that as you blend the ingredients, the aroma will be simply delightful! Let’s dive into the steps of creating this creamy masterpiece.
- Start by gathering all your ingredients. It’s essential to have everything ready before you begin. This ensures a smoother process and allows you to focus on the flavors.
- Take a 14-cup food processor or a similar large food processor and add the feta cheese, Greek yogurt, garlic, and the zest from the lemon. Pulse everything together until the mixture is smooth and creamy. Take your time here to ensure there are no lumps.
- While the food processor is running on low speed, slowly drizzle in the olive oil and lemon juice. This step is crucial as it helps emulsify the dip, making it velvety in texture.
- Open the lid and scrape down the sides of the canister as needed. Then, add in the dried dill, smoked paprika, and salt. You might want to add a touch of freshly ground pepper at this stage as well. Pulse again to combine all these flavors.
- Now, it’s time to taste the dip! Adjust the seasoning if necessary. You might want a pinch more salt or a dash of pepper depending on your preference. This is your opportunity to customize it to your liking.
- Transfer the dip into a serving bowl. While you can enjoy it right away, I highly recommend covering it with plastic wrap and letting it sit at room temperature for about 30 minutes. This allows the flavors to meld beautifully.
- If your kitchen is especially warm, consider placing the dip in the refrigerator for a short while instead. This will keep it fresh and tasty.
- Before serving, consider garnishing the dip with fresh herbs or a drizzle of olive oil. You can even add more crumbled feta cheese on top for extra flair.
- Enjoy your Whipped Feta Dip with your favorite dippers like veggies, crackery, or chips. It’s a crowd-pleaser, and I can’t wait for you to share it!
Things Worth Knowing
- Use High-Quality Ingredients: The flavor of your dip heavily relies on the quality of your ingredients. Opt for full-fat, high-quality feta cheese and Greek yogurt for the best results.
- Let It Rest: Allowing the dip to sit at room temperature for a bit enhances the flavor. It gives time for the ingredients to meld together beautifully.
- Adjust Consistency: If the dip becomes too thick after chilling, stir in a little more olive oil or Greek yogurt to achieve your desired creaminess.
- Experiment with Flavors: Don’t hesitate to modify the spices to suit your taste preferences. Try adding a pinch of red pepper flakes or fresh herbs for a unique twist.
Customization Ideas

One of the best parts about Whipped Feta Dip is how adaptable it is! You can easily make it your own with a few simple tweaks. Here are some ideas to get you started:
- Fresh Herbs: Consider using fresh herbs instead of dried ones. Chopped thyme or basil can add a fresh punch.
- Spicy Kick: Add a pinch of cayenne or red pepper flakes for heat. It adds an exciting layer of flavor that will surprise your taste buds!
- Smoky Flavor: Incorporate a few drops of liquid smoke for an intense smoky flavor that complements the feta cheese.
- Different Cheeses: Mix in a bit of goat cheese for a tangy twist, or try adding cream cheese for added creaminess.
- Serve Warm: For a different texture, serve the dip warm by baking it in a small dish until heated through. Pair it with warm pita for a comforting option.
- Top with Nuts: Chopped nuts like walnuts or pistachios can add a nice crunch on top of the dip.
- Pair with Seasonal Veggies: Tailor your dippers to the season. In summer, serve with fresh cucumbers and bell peppers. In fall, try warm sweet potato chips.
Serve This Whipped Feta Dip With
When it comes to serving Whipped Feta Dip, the possibilities are endless! Here’s a comprehensive list of what to pair with this delicious dip:
- Crispy Vegetables: Fresh carrot sticks, celery, and bell pepper slices offer a satisfying crunch and freshness that complements the creamy dip.
- Chips: Try serving with pita chips or tortilla chips for a fun texture contrast. The crunchiness pairs beautifully with the creamy dip.
- Crackers: A variety of crackers, from plain to herbed, can elevate your dipping experience.
- Bread: Warm, crusty bread or baguette slices make for a hearty option, perfect for scooping up the dip.
- Perfect for Gatherings: This dip is ideal for parties, whether casual or formal. It works as a fantastic appetizer or snack during any celebration.
- Seasonal Pairings: In the warmer months, serve it at outdoor picnics, while in winter, it can be a cozy addition to a holiday spread.
- Storage Tips: If you happen to have leftovers, store them in an airtight container in the fridge for up to five days. Just be aware the flavors will intensify over time.
FAQ
Conclusion
In summary, Whipped Feta Dip is a versatile, delicious dip that never fails to impress. Its creamy, tangy flavor combined with a hint of garlic and lemon zest makes it truly special. I encourage you to give this recipe a try at your next gathering. You’ll love how easy it is to whip up and how much your guests will enjoy it!
Whipped Feta Dip
Ingredients
Equipment
Method
- Start by gathering all your ingredients. It’s essential to have everything ready before you begin. This ensures a smoother process and allows you to focus on the flavors.
- Take a 14-cup food processor or similar large food processor and add the feta cheese, Greek yogurt, garlic, and the zest from the lemon. Pulse everything together until the mixture is smooth and creamy. Take your time here to ensure there are no lumps.
- While the food processor is running on low speed, slowly drizzle in the olive oil and lemon juice. This step is crucial as it helps emulsify the dip, making it velvety in texture.
- Open the lid and scrape down the sides of the canister as needed. Then, add in the dried dill, smoked paprika, and salt. You might want to add a touch of freshly ground pepper at this stage as well. Pulse again to combine all these flavors.
- Now, it’s time to taste the dip! Adjust the seasoning if necessary. You might want a pinch more salt or a dash of pepper depending on your preference. This is your opportunity to customize it to your liking.
- Transfer the dip into a serving bowl. While you can enjoy it right away, I highly recommend covering it with plastic wrap and letting it sit at room temperature for about 30 minutes. This allows the flavors to meld beautifully.
- If your kitchen is especially warm, consider placing the dip in the refrigerator for a short while instead. This will keep it fresh and tasty.
- Before serving, consider garnishing the dip with fresh herbs or a drizzle of olive oil. You can even add more crumbled feta cheese on top for extra flair.
- Enjoy your Whipped Feta Dip with your favorite dippers like veggies, crackers, or chips. It’s a crowd-pleaser, and I can’t wait for you to share it!
Notes
- Use High-Quality Ingredients: The flavor of your dip heavily relies on the quality of your ingredients. Opt for full-fat, high-quality feta cheese and Greek yogurt for the best results.
- Let It Rest: Allowing the dip to sit at room temperature for a bit enhances the flavor. It gives time for the ingredients to meld together beautifully.
- Adjust Consistency: If the dip becomes too thick after chilling, stir in a little more olive oil or Greek yogurt to achieve your desired creaminess.
- Experiment with Flavors: Don't hesitate to modify the spices to suit your taste preferences. Try adding a pinch of red pepper flakes or fresh herbs for a unique twist.