Chocolate Sweet Potato Layer Cake
When I think of comfort and celebration, the Chocolate Sweet Potato Layer Cake immediately comes to mind. Imagine a cozy autumn day, the leaves turning brilliant shades of orange and gold, and the scent of baking sweet potatoes wafting through the kitchen. This cake captures that essence perfectly, blending tender layers of rich chocolate with the earthy sweetness of sweet potatoes. It’s a recipe that not only satisfies your sweet tooth but also brings a touch of nostalgia and warmth to any gathering.
Every bite of the Chocolate Sweet Potato Layer Cake is a reminder of the joy of sharing with loved ones. I remember the first time I made it for a family gathering. Everyone was curious about the secret ingredient, and when I revealed it was sweet potato, their eyes lit up! Not only does it add moisture and depth, but it also enhances the flavor without being overpowering. With its luscious molasses buttercream, this cake is truly a showstopper.
This cake is perfect for any occasion—birthdays, holidays, or simply a cozy afternoon treat. It’s the kind of dessert that invites everyone to gather around the table, sharing stories and laughter. So, roll up your sleeves and let’s dive into this delightful cake recipe that’s sure to become a staple in your home.
Recipe Snapshot
60 mins
0 mins
0 mins
Medium
620 kcal
6 g
Paleo, Gluten-Free, AIP
36 g
Large Pot, Food Processor, Oven, Baking Sheet, Frying Pan, Whisk, Chef’s Knife, Mixing Bowl
What Makes This Chocolate Sweet Potato Layer Cake Special
Rich, Unique Flavor
The Chocolate Sweet Potato Layer Cake offers a unique flavor profile that’s unlike any other chocolate cake. The sweet potatoes not only add moisture but also a subtle sweetness and earthiness that pairs beautifully with the rich chocolate. This unexpected combination elevates it from a simple dessert to a conversation starter at any gathering.
Perfect for Fall and Beyond
This cake is ideal for the fall season, making it perfect for Thanksgiving and other autumn celebrations. However, its delicious flavor makes it a year-round favorite. Whether you’re celebrating a special occasion or just indulging yourself, this cake fits the bill.
Impressive Yet Manageable
While the Chocolate Sweet Potato Layer Cake looks impressive, it’s surprisingly manageable to make. With simple ingredients and straightforward steps, you’ll feel like a professional baker, and your friends will think you’ve put in hours of work when they see this stunning dessert.
Beautiful Textures
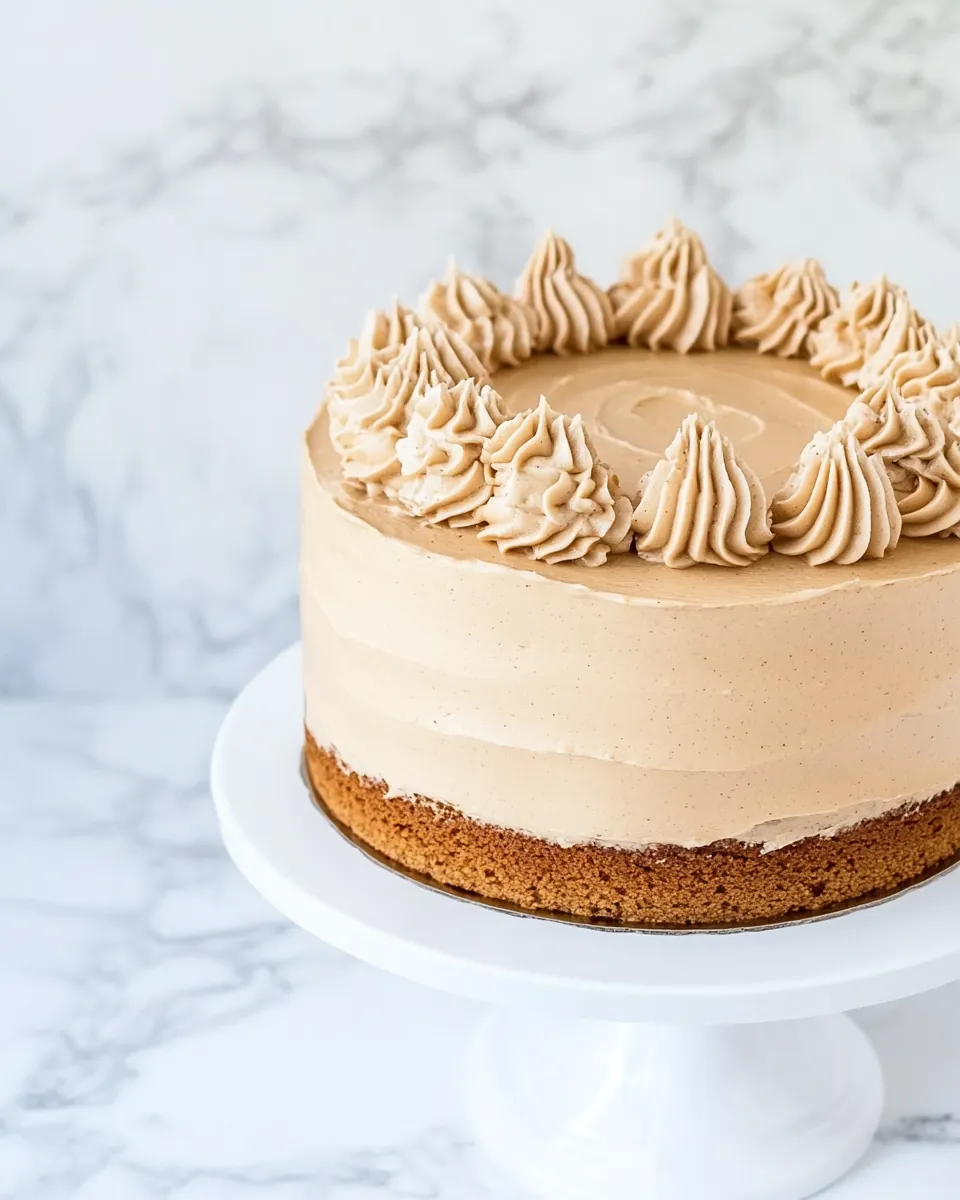
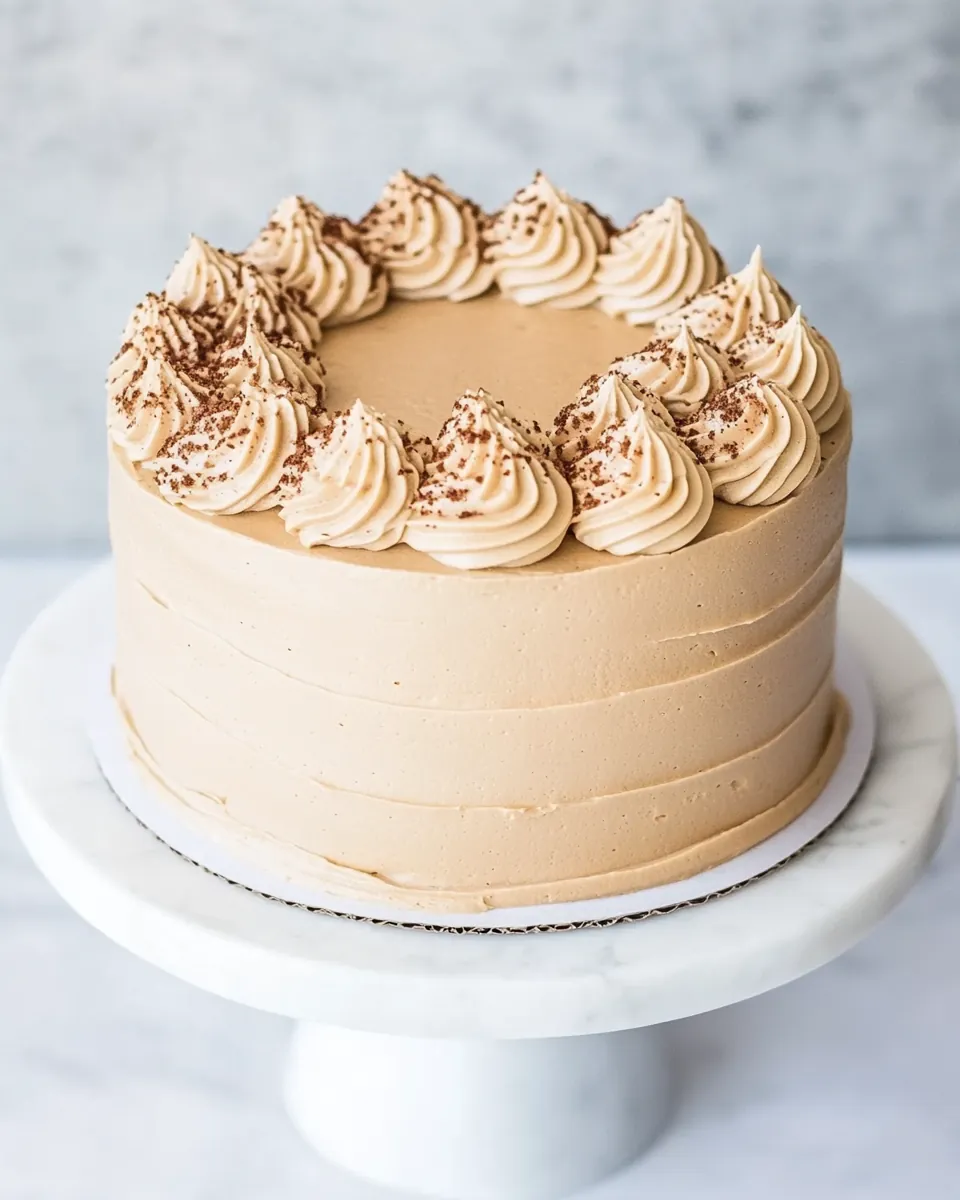
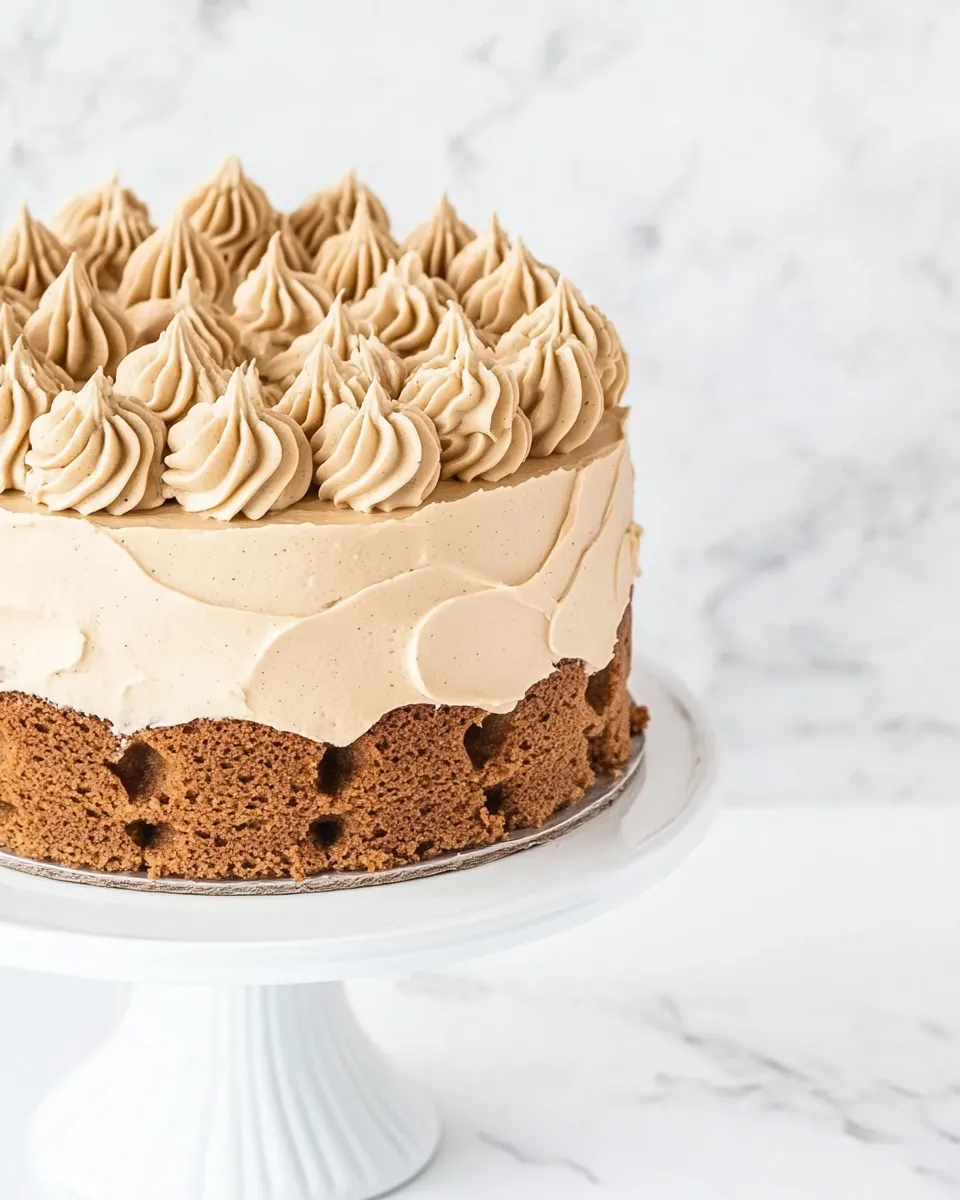
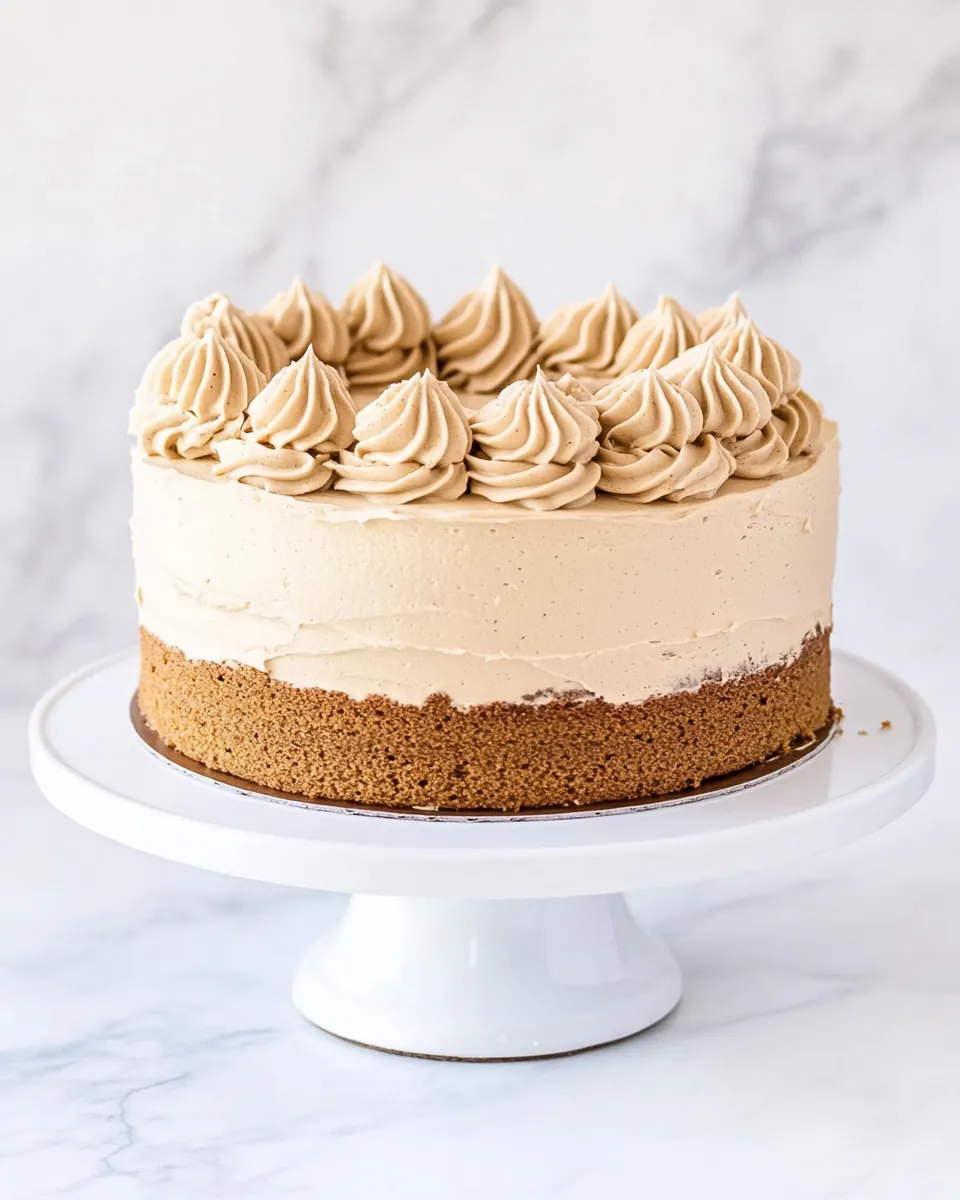
The cake layers themselves are soft and tender, thanks to the sweet potato, while the molasses buttercream adds a creamy, luscious texture. Coupled with the chocolate ganache, every slice is a delightful mix of flavors and textures that will keep everyone coming back for more.
Family-Friendly Recipe
This recipe is not only delicious but also family-friendly! Kids love the sweet flavors, and it’s a great way to introduce them to the goodness of vegetables in desserts. Making this cake can be a fun family activity—let everyone join in on the mixing, decorating, and, of course, the tasting!
Endless Customization Options
One of the best parts about the Chocolate Sweet Potato Layer Cake is its versatility. You can experiment with different frostings, add nuts for crunch, or even swap out the chocolate for different flavors. The possibilities are endless, making it a cake you can personalize to your taste!
What’s In This Chocolate Sweet Potato Layer Cake
The ingredients for the Chocolate Sweet Potato Layer Cake are thoughtfully chosen to create a harmonious balance of flavors and textures. Each component plays a vital role in contributing to the cake’s overall richness and depth. From the sweetness of the sweet potatoes to the decadence of the chocolate, these ingredients come together beautifully.
- 2 cups granulated sugar: This is the main sweetener, providing the cake with its delightful sweetness.
- 1 3/4 cup all-purpose flour: The base of the cake, giving it structure and body while keeping it tender.
- 3/4 cup dark or Dutch-processed cocoa powder, sifted: This adds a rich chocolate flavor and deep color to the cake.
- 2 teaspoons baking soda: A leavening agent that helps the cake rise to create a light texture.
- 1 teaspoon baking powder: Works alongside baking soda to ensure the cake has the perfect lift.
- 1 teaspoon fine sea salt: Enhances the sweetness and balances the flavors in the cake.
- 1 1/2 teaspoons ground cinnamon: Adds warmth and a lovely spice that complements the chocolate.
- 1/4 teaspoon ground cloves: Another spice that deepens the flavor and adds complexity.
- 1/4 teaspoon ground nutmeg: Contributes a warm, aromatic note to the cake.
- 1 cup sweet potato puree (canned or fresh): The star ingredient that adds moisture and natural sweetness.
- 3 large eggs: Bind the ingredients together and adds richness to the cake.
- 1/2 cup vegetable oil: Incorporates moisture and keeps the cake tender.
- 1 1/2 teaspoons vanilla extract: Adds a delightful flavor that enhances the sweetness.
- 1 cup full-fat buttermilk: Adds moisture and a slight tang that balances the sweetness.
- 3.5 ounces dark or semisweet chocolate, finely chopped: Used in the ganache for a rich, velvety texture.
- 1/3 cup heavy cream: Essential for making the luscious ganache.
- 1 tablespoon unsalted butter, cut into cubes: Helps to create a smooth and shiny ganache.
- 10 large egg whites (about 10 ounces): Used in the buttercream for a light, airy texture.
- 3 cups granulated sugar: Sweetens the buttercream and stabilizes the meringue.
- 1/4 cup plus 2 tablespoons molasses, divided: Adds rich flavor and depth to the buttercream.
- 2 pounds (8 sticks or 4 cups) unsalted butter, room temperature: The base of the buttercream, creating its creamy texture.
- 1 teaspoon vanilla extract: Enhances the flavor of the buttercream.
The Method for Chocolate Sweet Potato Layer Cake
Making the Chocolate Sweet Potato Layer Cake is an adventure in flavors and textures. I love how each step brings you closer to a masterpiece. Let’s dive into the process of creating this delicious cake, from the delicate layers to the rich frosting.
Preheat your oven to 350ºF and position the racks in the oven at the 1/3 and 2/3 positions. This allows for even baking of all three cake layers. Butter and line the bottoms of three 8-inch round cake pans with parchment paper, ensuring that the parchment is also buttered. This will prevent the cakes from sticking.
In a large mixing bowl or stand mixer, whisk together the granulated sugar, flour, cocoa powder, baking soda, baking powder, salt, cinnamon, cloves, and nutmeg. This dry mixture is essential for the flavor of the cake. Make sure everything is well combined.
In a separate bowl, whisk the sweet potato puree with the eggs until the mixture is smooth. Then, add in the vegetable oil and vanilla extract, mixing until everything is well incorporated.
Make a well in the center of the dry ingredients and pour in the sweet potato mixture along with buttermilk. Mix on low speed until the dry ingredients are just incorporated, being careful not to overmix. You want a smooth batter, so scrape down the sides of the bowl as needed.
Divide the batter evenly among the prepared cake pans, using approximately 2 cups of batter per pan. Bake in the preheated oven for 30 to 40 minutes, rotating the pans halfway through baking. A toothpick inserted into the center should come out clean when the cakes are done.
Once baked, place the pans on wire racks and allow the cakes to cool to room temperature. After cooling, run a knife around the edges of each pan, then invert onto a wire rack. Carefully remove the parchment paper and let the cakes cool completely.
To prepare the ganache, place the finely chopped chocolate in a heat-proof bowl. In a small saucepan, warm the heavy cream over medium-low heat until it just starts to steam—do not let it boil. Pour the warm cream over the chocolate and let it sit for 30 seconds. Then, whisk gently until the chocolate melts and the ganache is smooth.
Incorporate the unsalted butter into the ganache a little at a time, whisking until it’s fully incorporated. Refrigerate for 30 to 40 minutes or until the ganache thickens and becomes spreadable.
For the buttercream, combine egg whites, granulated sugar, and 2 tablespoons of molasses in a heat-proof bowl set over simmering water. Whisk gently until the mixture is warm and the sugar is dissolved, about 140ºF. Transfer to a stand mixer fitted with a whisk attachment. Beat on medium-high speed until the meringue is completely cool—this can take up to 45 minutes.
Once cooled, switch to the paddle attachment and add the unsalted butter, one tablespoon at a time, mixing well after each addition. Increase the speed to high and beat until the buttercream is light and fluffy. Mix in the remaining molasses and vanilla extract to taste. If not using immediately, cover and refrigerate until needed.
To assemble, level each cake layer by cutting off the domed tops with a serrated knife. Place one layer on a cake stand or serving plate. Top it with 1/2 cup of buttercream and spread it evenly to the edges. Pour half of the ganache over this layer, smoothing it out.
Place the second layer on top and repeat with another 1/2 cup of buttercream and the remaining ganache. Finally, place the third layer on top, flat side up.
Cover the entire cake with a thin layer of buttercream to create a crumb coat. This helps to keep any stray crumbs in place. Refrigerate for about 15 minutes to set the crumb coat, then spread a thicker final layer of buttercream over the top and sides. You can use the extra buttercream to pipe decorative details on the cake as desired.
Optionally, top the cake with meringue cookies and a light dusting of cocoa powder before serving at room temperature. Enjoy!
Things Worth Knowing
- Ensure even baking: Rotate your cake pans halfway through baking to promote even cooking.
- Cooling tips: Let your cakes cool completely before frosting to prevent the buttercream from melting.
- Leveling layers: Use a serrated knife for leveling the cake layers to achieve a flat top.
- Chilling ganache: If your ganache is too thin, chill it for a bit to thicken it up for easier spreading.
Variations to Try
The Chocolate Sweet Potato Layer Cake is so versatile. Here are some fun variations you can try to customize this recipe:
- Storage: Store leftovers in an airtight container at room temperature for up to 3 days.
- Freezing: You can freeze the cake layers individually wrapped in plastic wrap for up to three months. Just thaw them in the fridge before assembling.
- Pairing: Serve with whipped cream or a scoop of vanilla ice cream for an extra treat!
- Decoration: Add fresh fruit or edible flowers on top for a bright, colorful garnish.
- Spice things up: Experiment with spices like ginger or cardamom for a unique flavor twist.
- Nutty addition: Fold in chopped nuts like walnuts or pecans for added texture.
Serve This Chocolate Sweet Potato Layer Cake With
When it comes to serving the Chocolate Sweet Potato Layer Cake, think about creating a delightful spread that complements the rich flavors of the cake. Here are some ideas:
- Fresh fruit: Paired with slices of fresh berries or poached pears can add a refreshing contrast.
- Coffee or tea: A warm cup of coffee or tea enhances the experience, especially during cozy gatherings.
- Whipped cream: A dollop of lightly sweetened whipped cream adds a lovely touch to each slice.
- Ice cream: Vanilla or cinnamon ice cream can turn this delicious cake into a stunning dessert experience.
- Seasonal occasions: This cake is perfect for Thanksgiving or fall celebrations, adding a festive touch to your dessert table.
- Storage tips: Any leftovers can be stored in an airtight container for up to three days, keeping it fresh and ready to enjoy.
FAQ
Conclusion
The Chocolate Sweet Potato Layer Cake is a beautiful blend of flavors and textures that will impress your family and friends. It’s not just a dessert; it’s an experience that brings warmth and joy to any gathering. I encourage you to try your hand at making this cake. You’ll find that it’s not only rewarding, but it also creates delightful memories in the kitchen. Enjoy the baking process and the wonderful moments that come with sharing this cake with loved ones!
Chocolate Sweet Potato Layer Cake
Ingredients
Equipment
Method
- Preheat your oven to 350ºF and position the racks in the oven at the 1/3 and 2/3 positions. This allows for even baking of all three cake layers. Butter and line the bottoms of three 8-inch round cake pans with parchment paper, ensuring that the parchment is also buttered. This will prevent the cakes from sticking.
- In a large mixing bowl or stand mixer, whisk together the granulated sugar, flour, cocoa powder, baking soda, baking powder, salt, cinnamon, cloves, and nutmeg. This dry mixture is essential for the flavor of the cake. Make sure everything is well combined.
- In a separate bowl, whisk the sweet potato puree with the eggs until the mixture is smooth. Then, add in the vegetable oil and vanilla extract, mixing until everything is well incorporated.
- Make a well in the center of the dry ingredients and pour in the sweet potato mixture along with buttermilk. Mix on low speed until the dry ingredients are just incorporated, being careful not to overmix. You want a smooth batter, so scrape down the sides of the bowl as needed.
- Divide the batter evenly among the prepared cake pans, using approximately 2 cups of batter per pan. Bake in the preheated oven for 30 to 40 minutes, rotating the pans halfway through baking. A toothpick inserted into the center should come out clean when the cakes are done.
- Once baked, place the pans on wire racks and allow the cakes to cool to room temperature. After cooling, run a knife around the edges of each pan, then invert onto a wire rack. Carefully remove the parchment paper and let the cakes cool completely.
- To prepare the ganache, place the finely chopped chocolate in a heat-proof bowl. In a small saucepan, warm the heavy cream over medium-low heat until it just starts to steam—do not let it boil. Pour the warm cream over the chocolate and let it sit for 30 seconds. Then, whisk gently until the chocolate melts and the ganache is smooth.
- Incorporate the unsalted butter into the ganache a little at a time, whisking until it’s fully incorporated. Refrigerate for 30 to 40 minutes or until the ganache thickens and becomes spreadable.
- For the buttercream, combine egg whites, granulated sugar, and 2 tablespoons of molasses in a heat-proof bowl set over simmering water. Whisk gently until the mixture is warm and the sugar is dissolved, about 140ºF. Transfer to a stand mixer fitted with a whisk attachment. Beat on medium-high speed until the meringue is completely cool—this can take up to 45 minutes.
- Once cooled, switch to the paddle attachment and add the unsalted butter, one tablespoon at a time, mixing well after each addition. Increase the speed to high and beat until the buttercream is light and fluffy. Mix in the remaining molasses and vanilla extract to taste. If not using immediately, cover and refrigerate until needed.
- To assemble, level each cake layer by cutting off the domed tops with a serrated knife. Place one layer on a cake stand or serving plate. Top it with 1/2 cup of buttercream and spread it evenly to the edges. Pour half of the ganache over this layer, smoothing it out.
- Place the second layer on top and repeat with another 1/2 cup of buttercream and the remaining ganache. Finally, place the third layer on top, flat side up.
- Cover the entire cake with a thin layer of buttercream to create a crumb coat. This helps to keep any stray crumbs in place. Refrigerate for about 15 minutes to set the crumb coat, then spread a thicker final layer of buttercream over the top and sides. You can use the extra buttercream to pipe decorative details on the cake as desired.
- Optionally, top the cake with meringue cookies and a light dusting of cocoa powder before serving at room temperature. Enjoy!
Notes
- Tip 1: Store leftovers in an airtight container at room temperature for up to 3 days.
- Tip 2: You can freeze the cake layers individually wrapped in plastic wrap for up to three months. Just thaw them in the fridge before assembling.
- Tip 3: Serve with whipped cream or a scoop of vanilla ice cream for an extra treat!
- Tip 4: Add fresh fruit or edible flowers on top for a bright, colorful garnish.
- Tip 5: Experiment with spices like ginger or cardamom for a unique flavor twist.