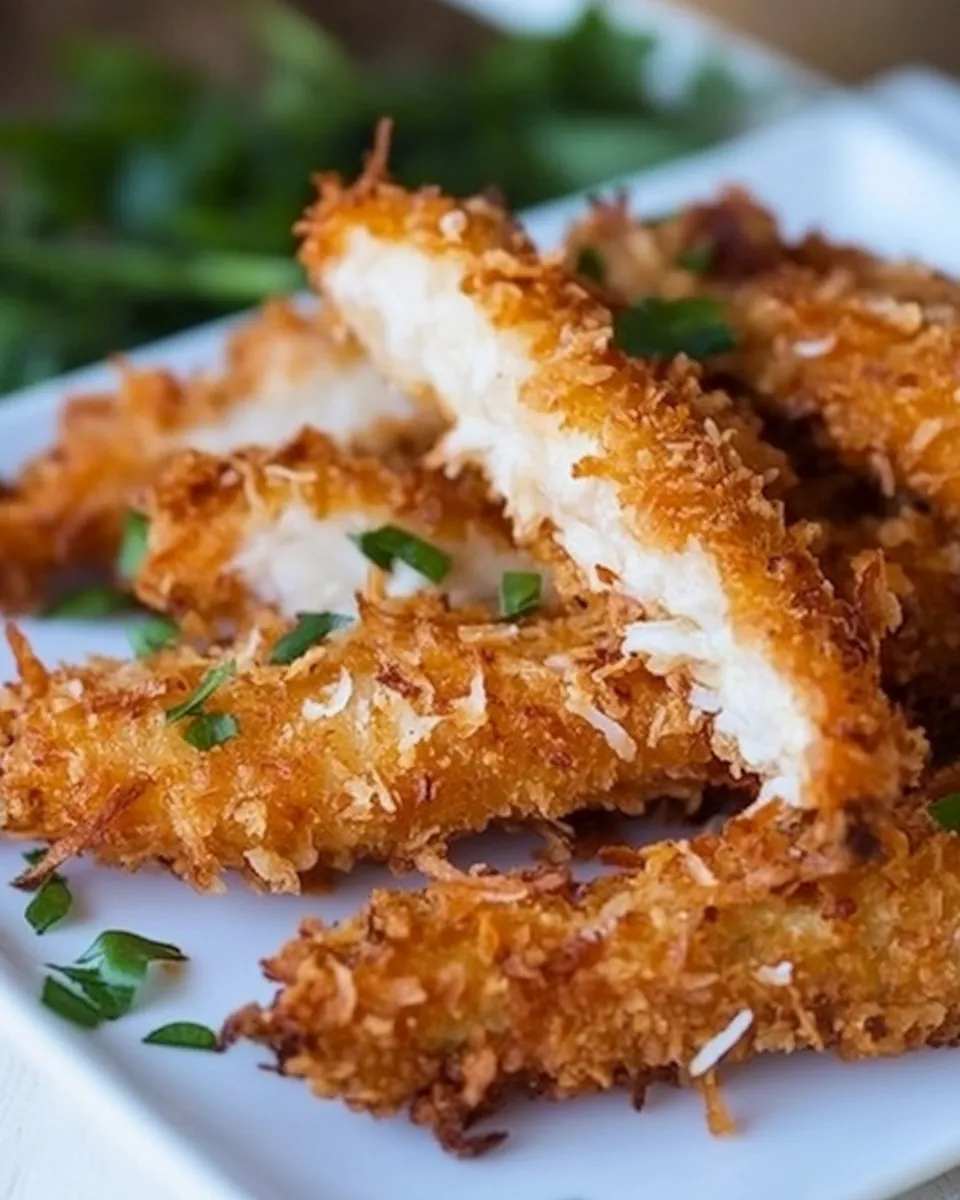
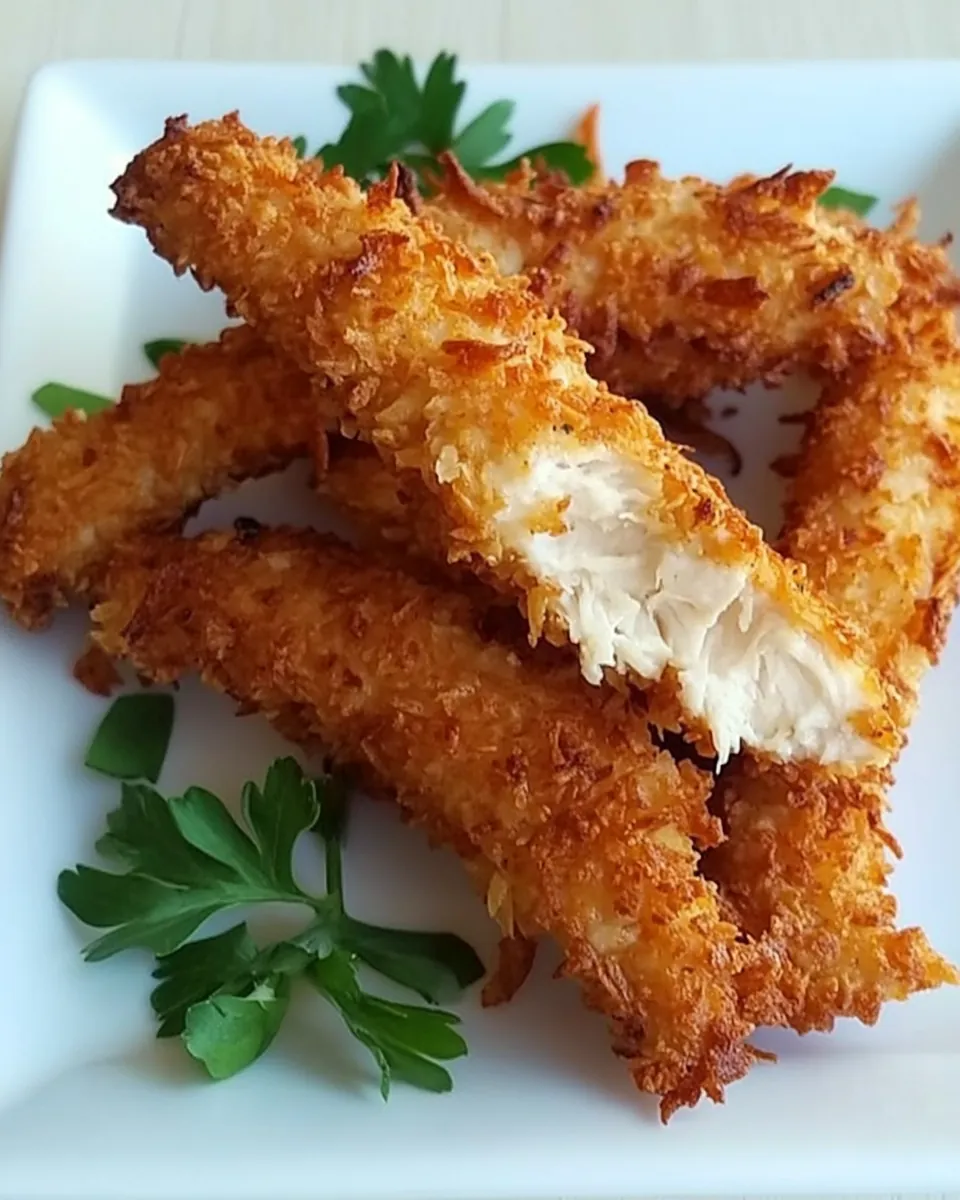
Coconut Chicken Fingers
Whenever I think of comfort food, the first thing that comes to mind is Coconut Chicken Fingers. There’s something so satisfying about biting into a crispy, golden piece of chicken that’s been perfectly coated. These delightful fingers remind me of sunny afternoons spent at the beach, where the aroma of fresh coconut fills the air. On one such day, I decided to recreate that joy at home. The combination of tender chicken, sweet coconut, and a spicy dip makes this dish irresistible, perfect for family gatherings or a quick snack after a long day. I remember serving them to my friends, and the smiles on their faces said it all. They were a hit! If you’re looking for a recipe that brings a little sunshine to your kitchen, you’ve found it.
Recipe Snapshot
45 mins
15 mins
30 mins
Medium
400 kcal
25 g
Whole30, Gluten-Free, Low FODMAP
20 g
Dutch Oven
Why You’ll Love This Coconut Chicken Fingers
1. It’s Fun to Make
Getting into the kitchen to whip up Coconut Chicken Fingers is an absolute blast. You’ll love the process of setting up your station with the different ingredients, especially the crunchy Panko crumbs and shredded coconut. Coating the chicken is like creating your own art piece, and I can assure you, it’s just as much fun as it sounds!
2. Perfect for Any Occasion
Whether it’s a casual dinner or a festive gathering, these Coconut Chicken Fingers are versatile enough to shine in any setting. Serve them at parties, alongside a refreshing salad, or even as a quick lunch on busy weekdays. They adapt beautifully to any occasion!
3. Crowd-Pleaser
It’s not just me who loves these; everyone does! When I first served these at a family event, they disappeared in minutes. The blend of textures from crispy coatings to juicy chicken makes it hard for anyone to resist. These are bound to become a staple in your recipe repertoire.
4. Kid-Friendly
If you’re wondering what to make for picky eaters, look no further! Kids adore Coconut Chicken Fingers. They can be dipped in their favorite sauces, and the sweetness from the coconut often makes them a delightful hit with younger palates. Your little ones will ask for seconds!
5. Healthy Ingredients
While they’re undeniably delicious, these chicken fingers are also made with ingredients you can feel good about. Using fresh chicken breasts and a few pantry staples means you can indulge without the guilt. It’s comfort food you can trust!
6. Great for Meal Prep
If you’re someone who likes to prepare meals in advance, these Coconut Chicken Fingers are perfect. They hold up well when stored, making them an excellent candidate for batch cooking. Simply reheat and enjoy a quick meal anytime!
Key Ingredients for Coconut Chicken Fingers

When it comes to making Coconut Chicken Fingers, the right ingredients make all the difference. Each component plays a role in creating that perfect crunch and flavor balance. The star of the dish is undoubtedly the chicken, but it’s the sweetened coconut that offers a delightful twist. Combined with spices and sauces, these ingredients come together beautifully!
- Mayonnaise: 1/2 cup – Acts as a creamy base for the dipping sauce, adding richness and tang.
- Sriracha sauce: 3 tablespoons – Brings the heat and a burst of flavor to the sauce.
- Honey: 3 tablespoons – Adds natural sweetness, balancing the heat from Sriracha.
- Rice vinegar: 1/2 tablespoon – Offers a hint of acidity, brightening the sauce.
- Boneless, skinless chicken breasts: 2 to 3 – The main protein, tender and juicy when cooked right.
- Salt and pepper: To taste – Essential seasonings for enhancing flavor.
- All-purpose flour: 3/4 cup – Used for coating the chicken, providing a crunchy texture.
- Large eggs: 2 – Help the coating adhere to the chicken.
- Milk: 1/4 cup – Adds moisture to the egg mixture for coating.
- Shredded sweetened coconut: 1 1/2 cups – Gives that signature tropical flavor and crunch.
- Panko crumbs: 1 cup – Contributes to an ultra-crispy exterior.
- Salt: 1 teaspoon – Enhances flavor in the coating mixture.
- Pepper: 1/2 teaspoon – Adds a subtle kick to the coating.
- Vegetable oil: For frying – Essential for achieving that golden, crispy finish.
The Process for Making Coconut Chicken Fingers
Creating Coconut Chicken Fingers is a rewarding journey that results in crispy, satisfying goodness. Let’s dive into the step-by-step process where you’ll witness the transformation from raw chicken to a crispy delight!
Start by preparing the sauce. In a small bowl, stir together all the sauce ingredients: mayonnaise, Sriracha sauce, honey, and rice vinegar. Mix until well combined, and then refrigerate it until needed. This allows the flavors to meld beautifully.
Next, take your chicken breasts and cut them lengthwise into 4 or 5 pieces based on their size. This will give you the perfect finger-sized pieces. Make sure to keep the pieces uniform for even cooking.
Season the chicken pieces lightly with salt and pepper. Then, coat each piece in flour, ensuring they’re well covered. This step is vital for achieving that crispy crust later.
In a shallow bowl, whisk together the eggs, milk, and 1 tablespoon of Sriracha sauce. This mixture will help the coating stick to the chicken, adding extra flavor.
On a plate, combine the shredded sweetened coconut, Panko crumbs, salt, and pepper. Mix them well; this combination will create the delicious crunchy coating.
Now comes the fun part! Dip each piece of chicken in the egg mixture, letting any excess drip off. Then, press each piece into the coconut-Panko mixture, ensuring it adheres well on all sides. This is where the magic happens!
In a deep cast iron skillet or a Dutch oven, pour in about 1 inch of vegetable oil and heat it to 350 degrees. Make sure the oil is hot enough, as this is crucial for frying to achieve that golden brown color.
Fry the chicken in batches, approximately for 3 minutes on each side or until they’re golden brown and cooked through. This step is essential; don’t overcrowd the pan, as it will lower the oil temperature.
Once cooked, remove the chicken fingers and let them drain on a paper towel-lined plate. This helps absorb any excess oil, keeping them crispy.
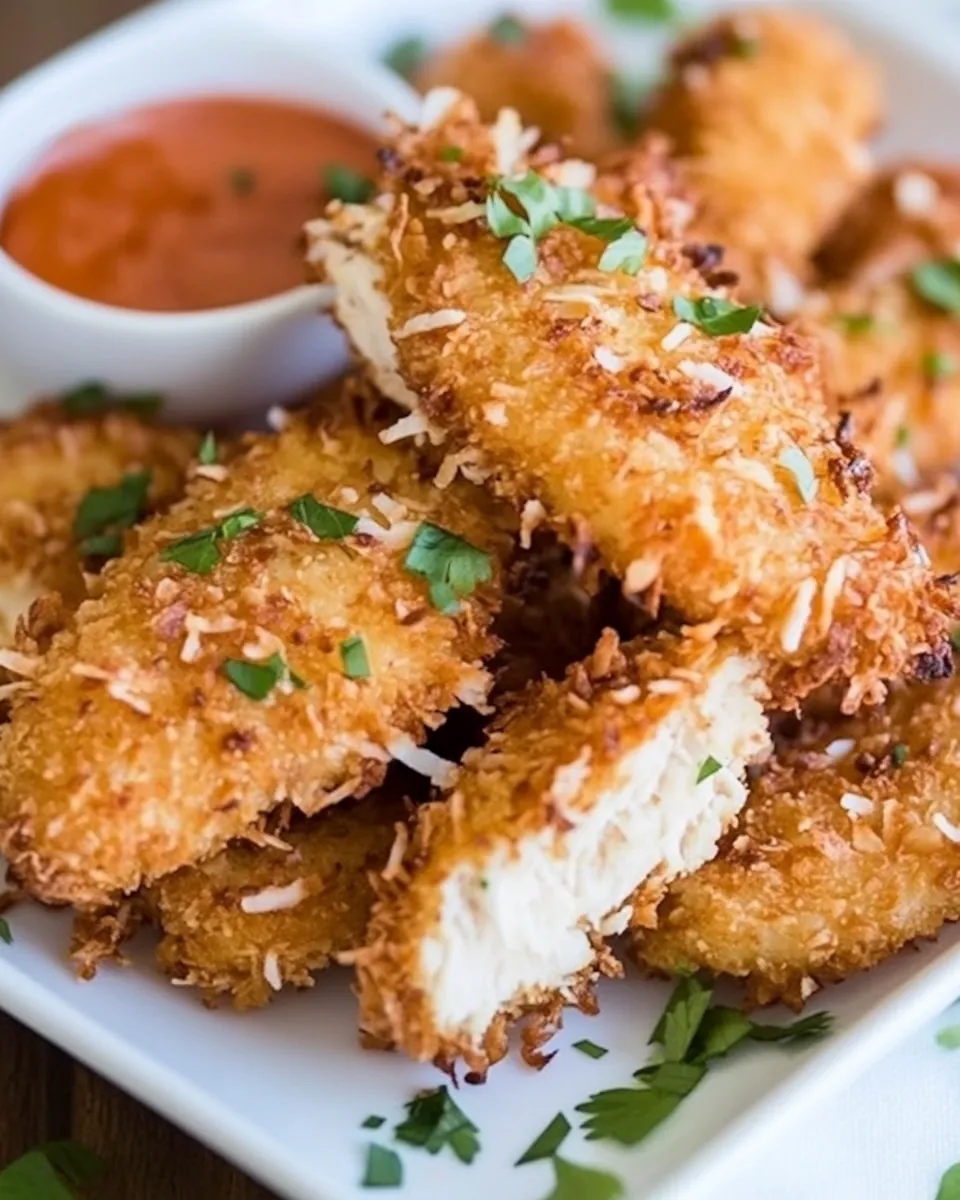
Finally, serve your Coconut Chicken Fingers hot with the prepared sauce for dipping. Enjoy every crunchy bite!
Things Worth Knowing
- Proper Oil Temperature: It’s crucial to ensure your oil reaches 350 degrees before frying. This ensures a crispy exterior while keeping the inside juicy.
- Batch Cooking: Don’t overcrowd the skillet when frying. Doing so drops the oil temperature, resulting in soggy chicken instead of crispy.
- Coating Technique: Pressing the chicken into the coconut mixture firmly helps the coating stick better and ensures a delicious crunch.
- Serving Fresh: For the best taste, serve these chicken fingers right after frying. If you need to keep them warm, place them on a baking sheet in a low oven.
Recipe Variations about Coconut Chicken Fingers
While the classic Coconut Chicken Fingers are amazing on their own, there are plenty of exciting ways to mix things up. Let’s explore some variations that can elevate this dish!
- Add spices: Incorporate spices like paprika or cayenne into the flour mixture for an extra kick.
- Use different sauces: Experiment with different dipping sauces like honey mustard or a tangy BBQ sauce.
- Try different meats: While chicken is the star, you could use shrimp or even tofu for a different take.
- Bake instead of fry: For a healthier option, place the coated chicken fingers on a baking sheet and bake them until golden brown.
- Make a salad: Serve your coconut chicken fingers on a bed of mixed greens with a light vinaigrette for a fresh twist.
- Infuse flavor into oil: You can infuse the frying oil with garlic or ginger for added depth of flavor.
Best Served With
When it comes to serving Coconut Chicken Fingers, the options are endless. Here are some suggestions to complement this delightful dish:
- Fresh Salads: Pair them with a crisp garden salad or a refreshing coleslaw to balance the richness of the chicken.
- Dips: Serve with a variety of dips such as sweet chili sauce or ranch for added flavor.
- Rice Dishes: A side of coconut rice or jasmine rice works beautifully with these fingers, enhancing the tropical vibe.
- Casual Gatherings: These chicken fingers are perfect for casual events, parties, or game nights.
- Picnic-Friendly: Pack them for a picnic; they hold up well and taste great cold or reheated.
- Seasonal Occasions: Their versatility makes them a great choice for any season, from summer BBQs to cozy winter dinners.
FAQ
Conclusion
In summary, Coconut Chicken Fingers are not just a recipe; they’re a delightful experience that combines flavor and crunch in every bite. Whether you’re serving them at a family gathering or enjoying them as a snack, they’re sure to be a hit. I encourage you to try them out and share with your loved ones—the smiles and satisfied taste buds will be worth it!
Coconut Chicken Fingers
Ingredients
Equipment
Method
- Start by preparing the sauce. In a small bowl, stir together all the sauce ingredients: mayonnaise, Sriracha sauce, honey, and rice vinegar. Mix until well combined, and then refrigerate it until needed. This allows the flavors to meld beautifully.
- Next, take your chicken breasts and cut them lengthwise into 4 or 5 pieces based on their size. This will give you the perfect finger-sized pieces. Make sure to keep the pieces uniform for even cooking.
- Season the chicken pieces lightly with salt and pepper. Then, coat each piece in flour, ensuring they’re well covered. This step is vital for achieving that crispy crust later.
- In a shallow bowl, whisk together the eggs, milk, and 1 tablespoon of Sriracha sauce. This mixture will help the coating stick to the chicken, adding extra flavor.
- On a plate, combine the shredded sweetened coconut, Panko crumbs, salt, and pepper. Mix them well; this combination will create the delicious crunchy coating.
- Now comes the fun part! Dip each piece of chicken in the egg mixture, letting any excess drip off. Then, press each piece into the coconut-Panko mixture, ensuring it adheres well on all sides. This is where the magic happens!
- In a deep cast iron skillet or a Dutch oven, pour in about 1 inch of vegetable oil and heat it to 350 degrees. Make sure the oil is hot enough, as this is crucial for frying to achieve that golden brown color.
- Fry the chicken in batches, approximately for 3 minutes on each side or until they’re golden brown and cooked through. This step is essential; don’t overcrowd the pan, as it will lower the oil temperature.
- Once cooked, remove the chicken fingers and let them drain on a paper towel-lined plate. This helps absorb any excess oil, keeping them crispy.
- Finally, serve your Coconut Chicken Fingers hot with the prepared sauce for dipping. Enjoy every crunchy bite!