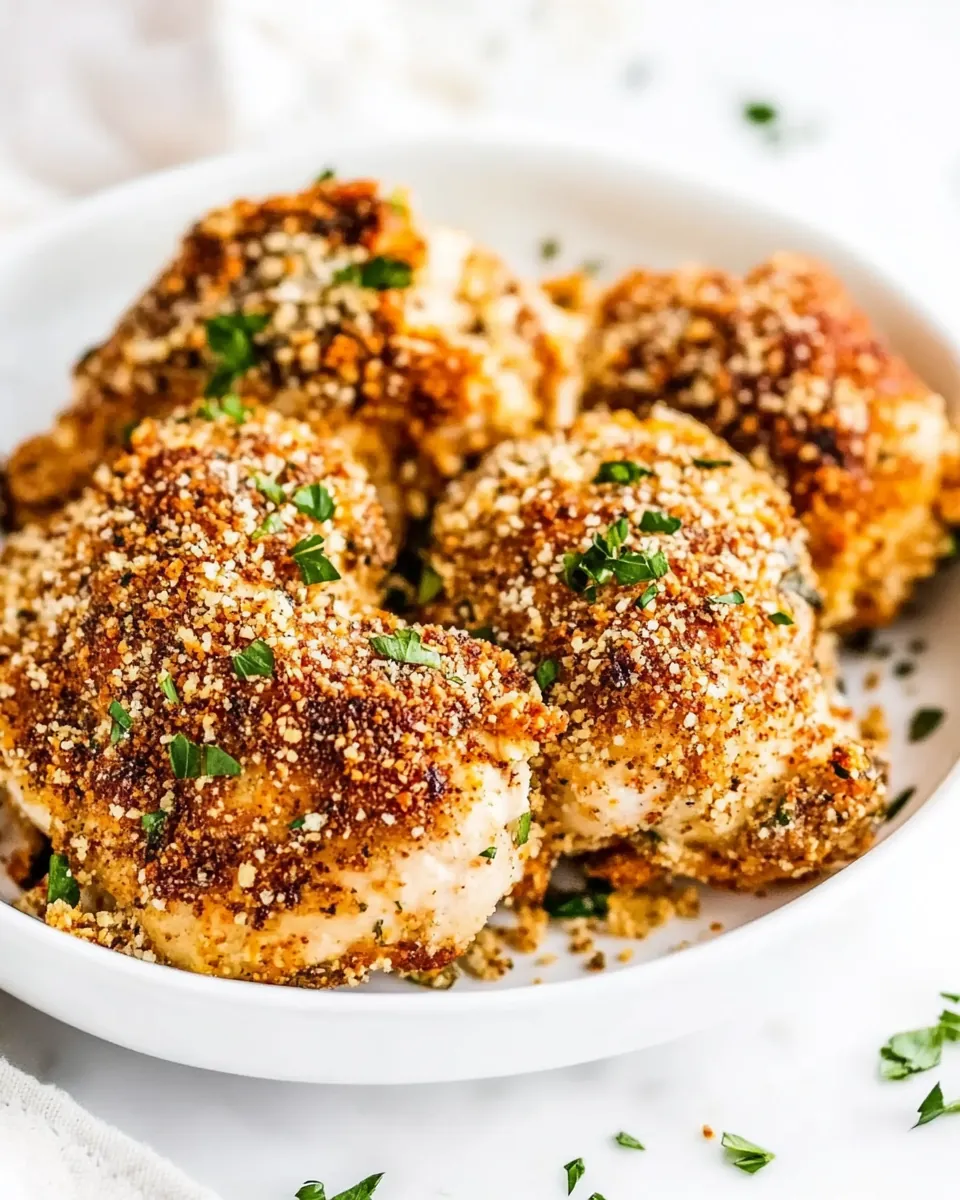
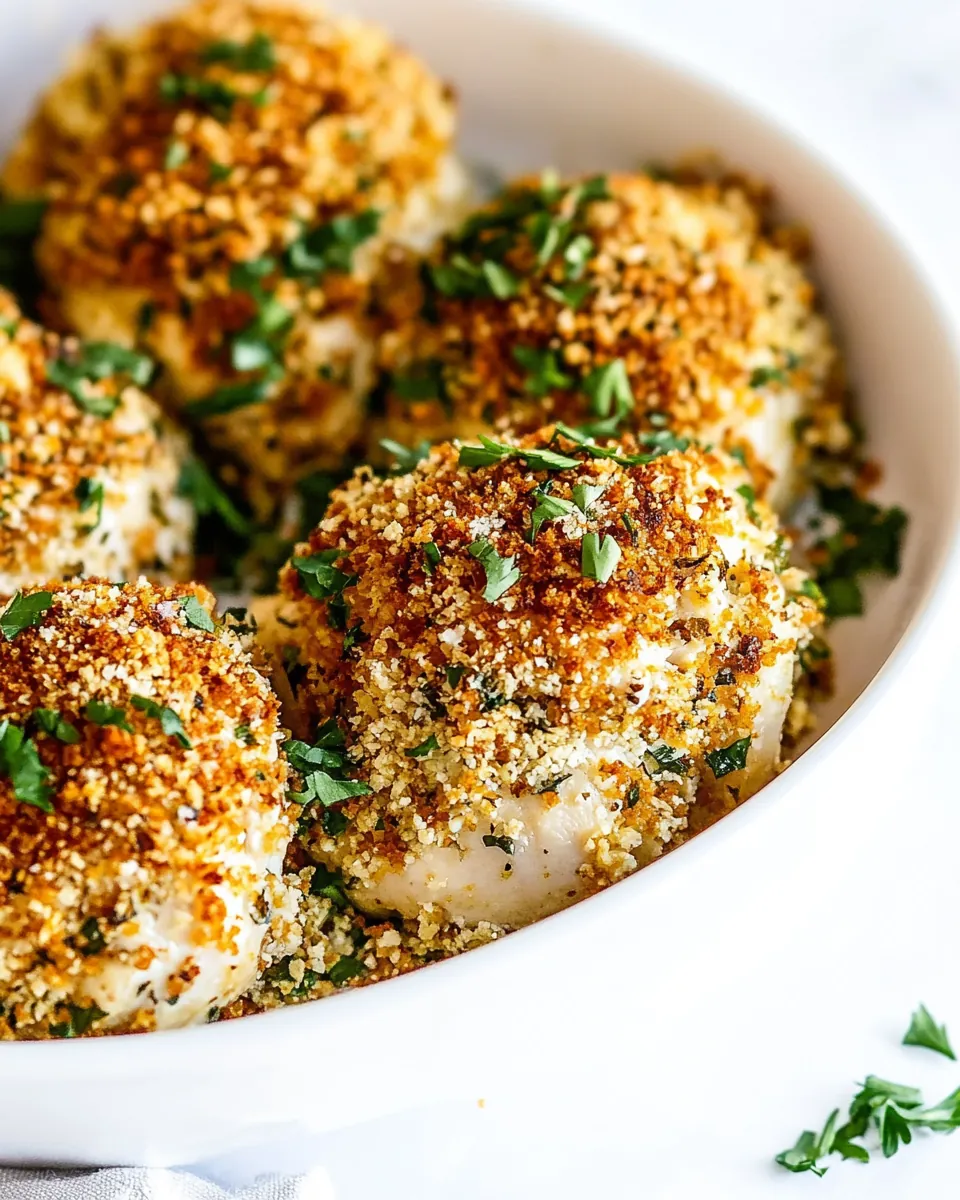
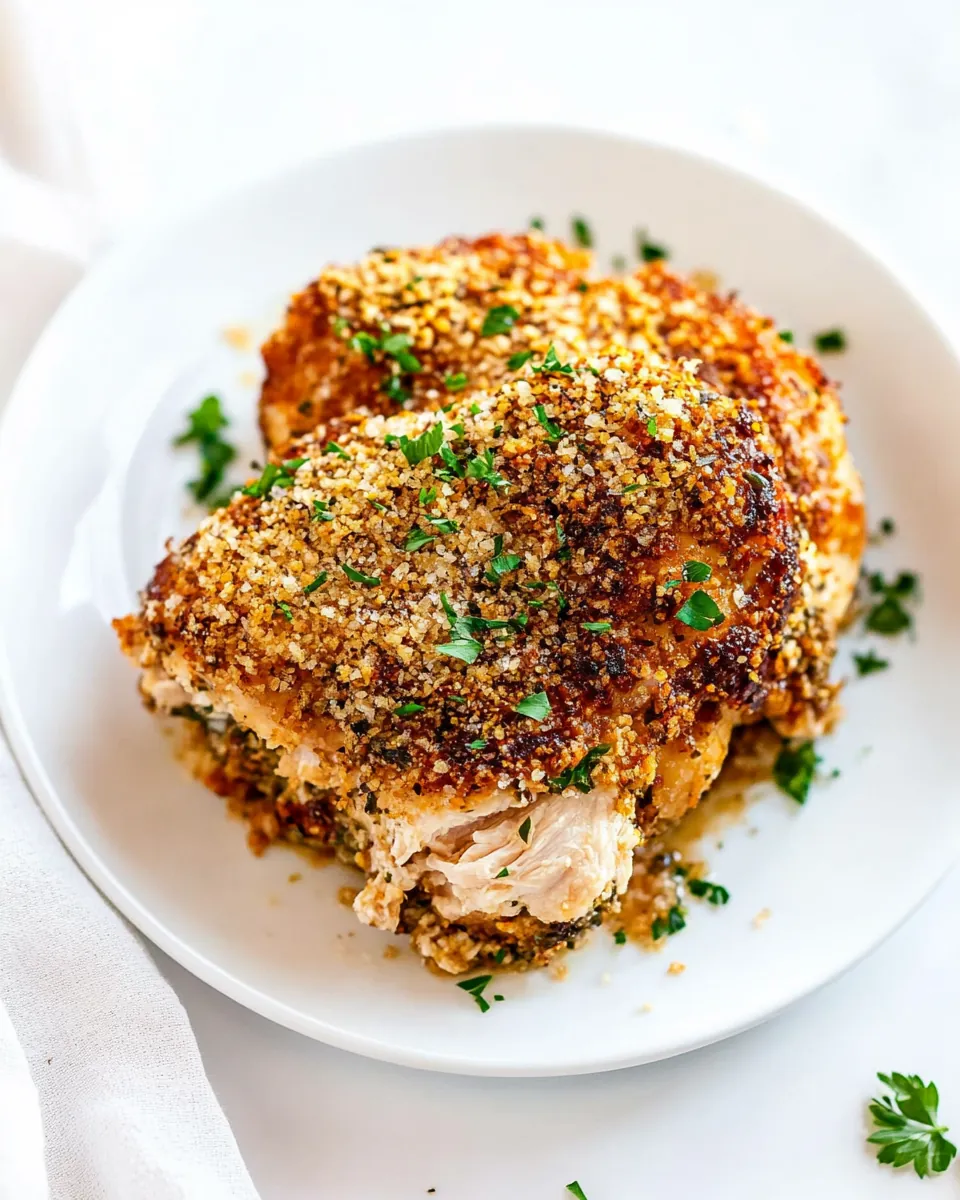
Deviled Chicken
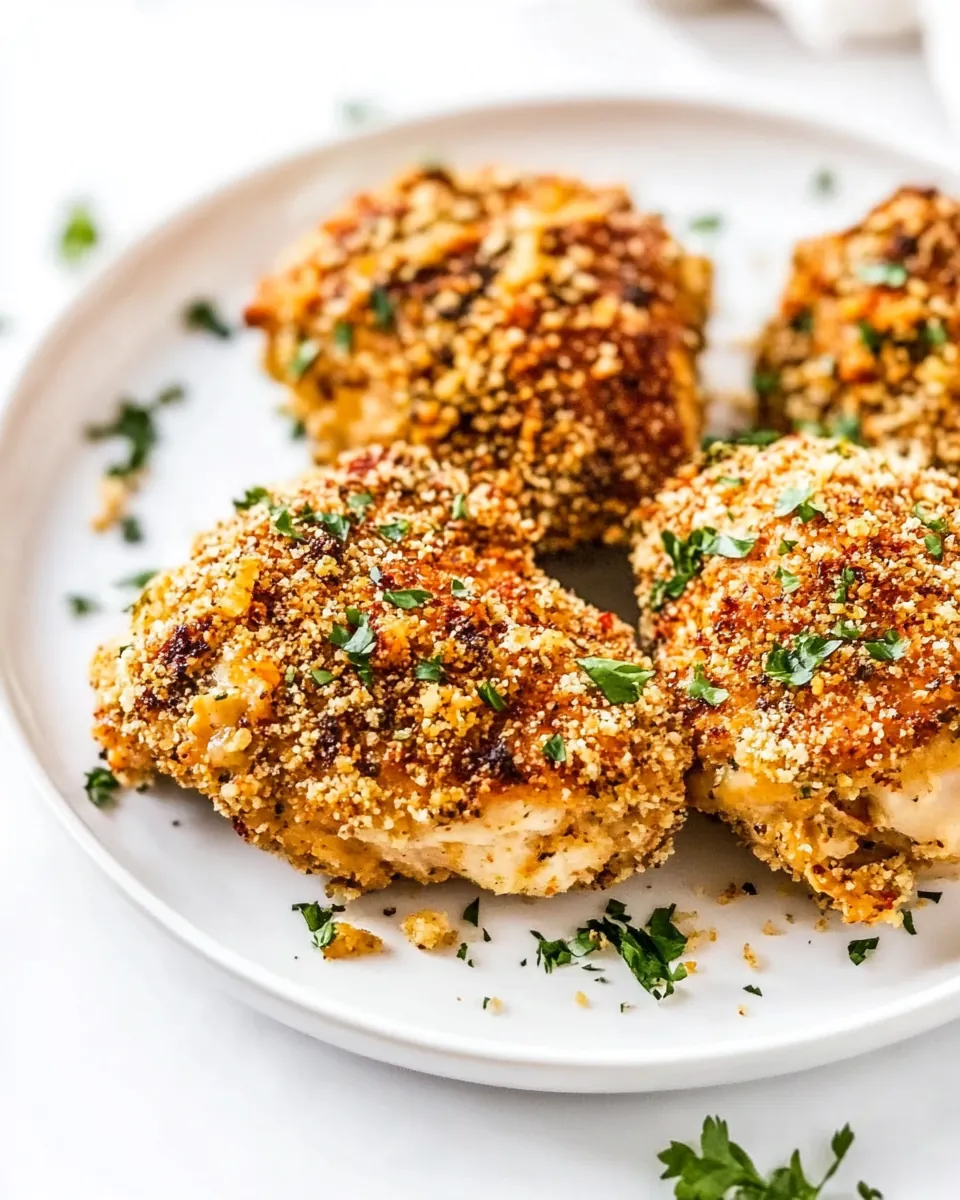
Deviled Chicken is one of those dishes that can instantly brighten your day. I remember the first time I tried it during a family gathering; the moment I bit into the crispy exterior, I knew I had stumbled upon something special. The combination of flavors from the zesty Dijon mustard and the spice of cayenne pepper creates a delightful contrast to the tender, juicy chicken. It’s this perfect balance that keeps me reaching for seconds, and I’m sure you will too! This dish is not only delicious but also incredibly fun to make. Picture yourself in the kitchen, dipping the chicken thighs into the flavorful mustard mixture, then rolling them in golden crumbs. There’s something satisfying about watching the transformation from simple ingredients to a mouthwatering dish. You can serve it up on a weeknight or impress your guests at a dinner party. Whichever occasion you choose, Deviled Chicken is sure to steal the spotlight.
Recipe Snapshot
60 mins
20 mins
40 mins
Medium
350 kcal
25 g
Keto, Paleo, Whole30
15 g
Baking Sheet
What Makes This Deviled Chicken Special
Irresistible Flavor
The unique blend of zesty Dijon mustard and aromatic spices is what truly sets Deviled Chicken apart. Each bite bursts with flavor, making it a memorable dish that will leave everyone asking for the recipe.
Perfectly Crispy
One of the best things about this recipe is the crispy coating. With the right technique, you’ll achieve that ideal crunch, elevating the entire dish. The Panko breadcrumbs create a texture that’s hard to resist, adding a satisfying crunch to each mouthful.
Easy to Prepare
This dish is surprisingly simple. You don’t need to be a culinary expert to whip up Deviled Chicken. With just a few straightforward steps, you can impress your family or friends without hours in the kitchen.
Versatile Serving Options
Whether you’re planning a casual family dinner or a more formal gathering, Deviled Chicken fits perfectly into any occasion. Pair it with roasted vegetables, a fresh salad, or your favorite dipping sauces for a complete meal.
Leftovers to Savor
If you happen to have leftovers (which is rare), Deviled Chicken reheats wonderfully! You’ll find that it still retains its crispy texture and flavor, making it a fantastic option for lunch the next day.
Shopping List for Deviled Chicken
When it comes to making Deviled Chicken, the philosophy behind the ingredients is all about balance and flavor. Each ingredient plays a vital role, from the zesty punch of Dijon mustard to the crispy texture of Panko breadcrumbs. Together, they create a dish that’s not only delicious but also richly satisfying.
- Dijon mustard: ½ cup – This mustard provides the essential tang and depth that makes the chicken flavorful.
- Lemon juice: 1 tablespoon – Freshly squeezed lemon juice brightens the dish and complements the mustard.
- Ground paprika: 1 teaspoon – Adds a mild smokiness and vibrant color to the coating.
- Ground cayenne pepper: ½ teaspoon – Provides a subtle heat that enhances the overall flavor.
- Panko breadcrumbs: 1½ cups – These breadcrumbs create an irresistible crunch when baked.
- Dried parsley: 1 tablespoon – Introduces a hint of freshness and color.
- Dried chives: 1 tablespoon – Adds a mild onion flavor that pairs well with the chicken.
- Garlic powder: ½ teaspoon – Delivers a savory undertone that elevates the dish.
- Boneless, skinless chicken thighs: 4-6 pieces – The star of the show, juicy and tender when cooked properly.
- Salt and pepper: to taste – Essential seasoning to enhance all flavors.
Recipe Directions for Deviled Chicken
Making Deviled Chicken is a joy, and the aroma that fills your kitchen is just the beginning. Follow these steps closely for a delicious outcome that will wow your family. Trust me, the end result will be worth every moment spent in the kitchen!
- Preheat your oven to 425°F. This ensures your chicken bakes perfectly, achieving a nice golden color. While it’s heating, line a baking sheet with parchment paper for easy cleanup.
- In a shallow bowl, whisk together the Dijon mustard, lemon juice, ground paprika, and ground cayenne pepper. This mixture is the key to infusing your chicken with flavor, so make sure it’s well combined.
- In a second shallow bowl, stir together the Panko breadcrumbs, dried parsley, dried chives, and garlic powder. This will be your crispy coating, so mix it thoroughly to blend the flavors.
- Season both sides of the chicken thighs with salt and pepper. This simple step enhances the chicken’s natural taste, making each bite scrumptious.
- One piece at a time, dip a chicken thigh into the Dijon mixture, ensuring it’s fully coated. Allow any excess to drip off before moving to the next step.
- Next, roll the chicken in the breadcrumb mixture. Make sure to coat all sides evenly so that every bite will have that delightful crunch.
- Place the coated chicken on the prepared baking sheet. Repeat the process with the remaining chicken pieces, making sure they have enough space between them.
- Bake in the preheated oven for 35 to 40 minutes. Keep an eye on them, and start checking around the 35-minute mark. Your chicken should reach an internal temperature of 175°F and be beautifully golden brown.
- Once done, remove the chicken from the oven and let it rest for about 5 minutes. This is crucial as it allows the juices to redistribute, ensuring juicy chicken.
- Serve your Deviled Chicken warm and enjoy the amazing flavors. You’ll be amazed at how delicious and crispy it is!
Things Worth Knowing
- Pat the chicken dry: Before dipping the chicken, make sure to pat it completely dry with paper towels. This helps the mustard mixture stick better and prevents the coating from sliding off as it bakes.
- Adjust the spice level: If you’re sensitive to spice, reduce the cayenne to ¼ teaspoon. If you love heat, add a pinch more or stir some hot sauce into the Dijon mixture.
- Use a wire rack: For even browning, place a wire rack on top of your baking sheet before arranging the chicken. This allows hot air to circulate under the chicken, ensuring it bakes up evenly crisp.
- Spray for better browning: For an extra crispy finish, spray the chicken all over with cooking spray before baking.
- Let it rest: Allow the chicken to rest for 5 minutes before serving so the juices can redistribute and the crust firms up slightly.
How to Switch It Up
There are many ways to customize Deviled Chicken to suit your tastes. Here are some ideas to elevate your cooking experience and adjust the recipe as you see fit.
- Storage: Leftovers can be stored in an airtight container in the fridge for up to three days. Just reheat in a 400°F oven to restore the crispiness.
- Freezing: You can freeze uncooked, coated chicken for up to two months. Thaw in the refrigerator before baking.
- Flavor variations: Try adding different spices, like smoked paprika or Italian seasoning, to the breadcrumb mixture for a unique twist.
- Serving suggestions: Pair Deviled Chicken with a fresh salad, roasted vegetables, or your favorite dipping sauce for a complete meal.
- Garnishes: For a finishing touch, consider garnishing with fresh herbs like parsley or cilantro before serving.
Great Combinations for Deviled Chicken
- Pair with salads: A light salad with greens, tomatoes, and a tangy dressing complements Deviled Chicken beautifully.
- Perfect for gatherings: This dish is a hit at potlucks or family dinners, making it a great option for serving multiple guests.
- Side dishes: Serve alongside roasted vegetables, mashed potatoes, or a hearty grain like quinoa for a satisfying meal.
- Occasions: Ideal for weeknight dinners, weekend gatherings, or even a special occasion like a birthday or anniversary.
- Storage tips: Ensure any leftovers are completely cooled and stored properly to maintain freshness.
FAQ
Conclusion
Deviled Chicken is an exceptional dish that combines crispy textures with bold flavors, making it a must-try for any chicken lover. Its ease of preparation and versatility make it perfect for both casual dinners and special occasions. I encourage you to give this recipe a shot; I promise you won’t regret it!
Deviled Chicken
Ingredients
Equipment
Method
- Preheat your oven to 425°F. This ensures your chicken bakes perfectly, achieving a nice golden color. While it's heating, line a baking sheet with parchment paper for easy cleanup.
- In a shallow bowl, whisk together the Dijon mustard, lemon juice, ground paprika, and ground cayenne pepper. This mixture is the key to infusing your chicken with flavor, so make sure it's well combined.
- In a second shallow bowl, stir together the Panko breadcrumbs, dried parsley, dried chives, and garlic powder. This will be your crispy coating, so mix it thoroughly to blend the flavors.
- Season both sides of the chicken thighs with salt and pepper. This simple step enhances the chicken’s natural taste, making each bite scrumptious.
- One piece at a time, dip a chicken thigh into the Dijon mixture, ensuring it’s fully coated. Allow any excess to drip off before moving to the next step.
- Next, roll the chicken in the breadcrumb mixture. Make sure to coat all sides evenly so that every bite will have that delightful crunch.
- Place the coated chicken on the prepared baking sheet. Repeat the process with the remaining chicken pieces, making sure they have enough space between them.
- Bake in the preheated oven for 35 to 40 minutes. Keep an eye on them, and start checking around the 35-minute mark. Your chicken should reach an internal temperature of 175°F and be beautifully golden brown.
- Once done, remove the chicken from the oven and let it rest for about 5 minutes. This is crucial as it allows the juices to redistribute, ensuring juicy chicken.
- Serve your Deviled Chicken warm and enjoy the amazing flavors. You’ll be amazed at how delicious and crispy it is!
Notes
- Tip 1: Before dipping the chicken, pat it completely dry with paper towels. This helps the mustard mixture stick better and prevents the coating from sliding off as it bakes.
- Tip 2: If you’re sensitive to spice, reduce the cayenne to ¼ teaspoon; if you love heat, add a pinch more or stir some hot sauce into the Dijon mixture.
- Tip 3: For all-over browning, place a wire rack on top of your baking sheet before arranging the chicken. This allows hot air to circulate under the chicken so it bakes up evenly crisp on all sides instead of getting soggy on the bottom.
- Tip 4: For better browning, I like to spray the chicken all over with cooking spray before baking.
- Tip 5: Let the chicken rest for 5 minutes before serving so the juices redistribute and the crust firms up slightly.
- Tip 6: To re-crisp leftovers, reheat in a 400°F oven or air fryer for 8-10 minutes, or until warmed through and crunchy again.