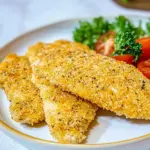
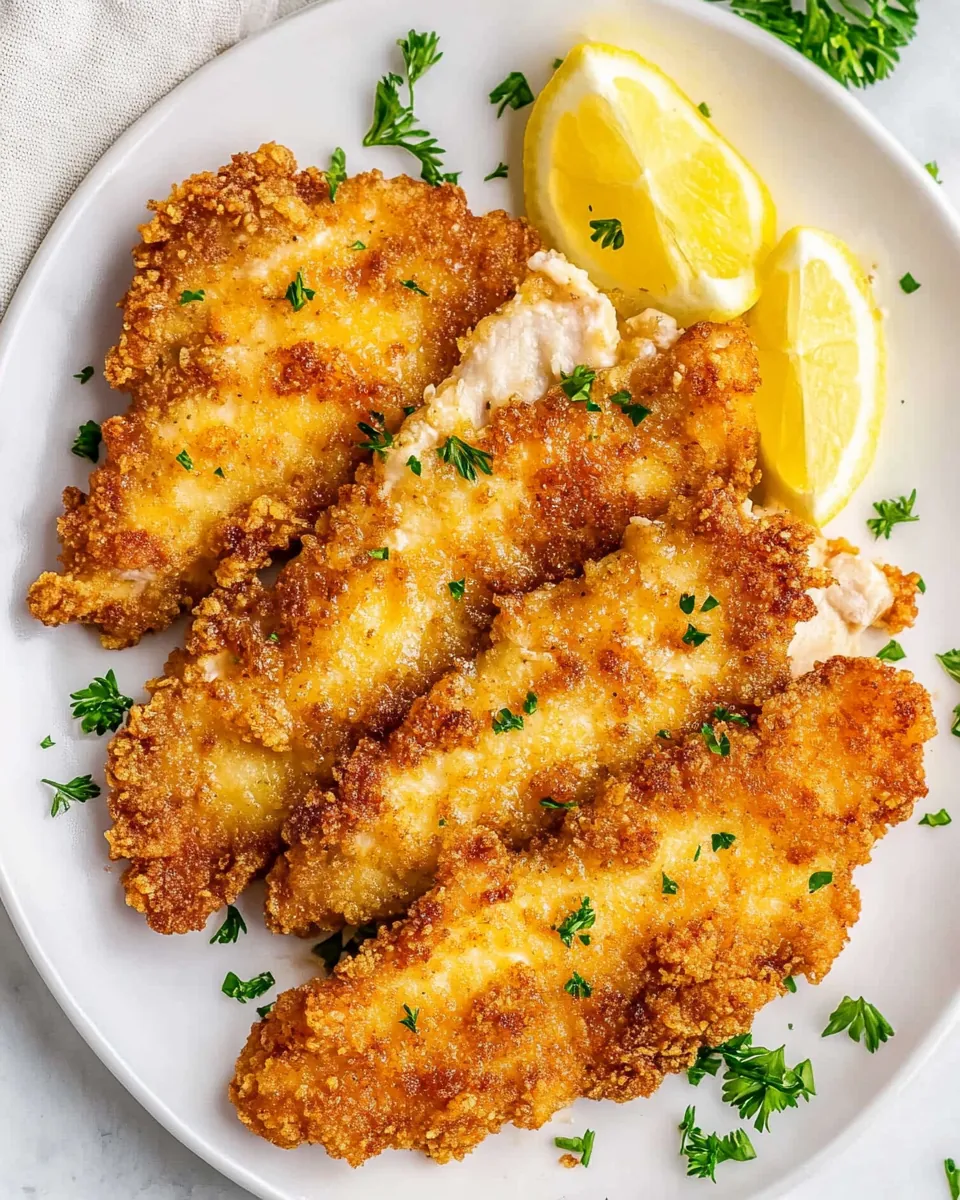
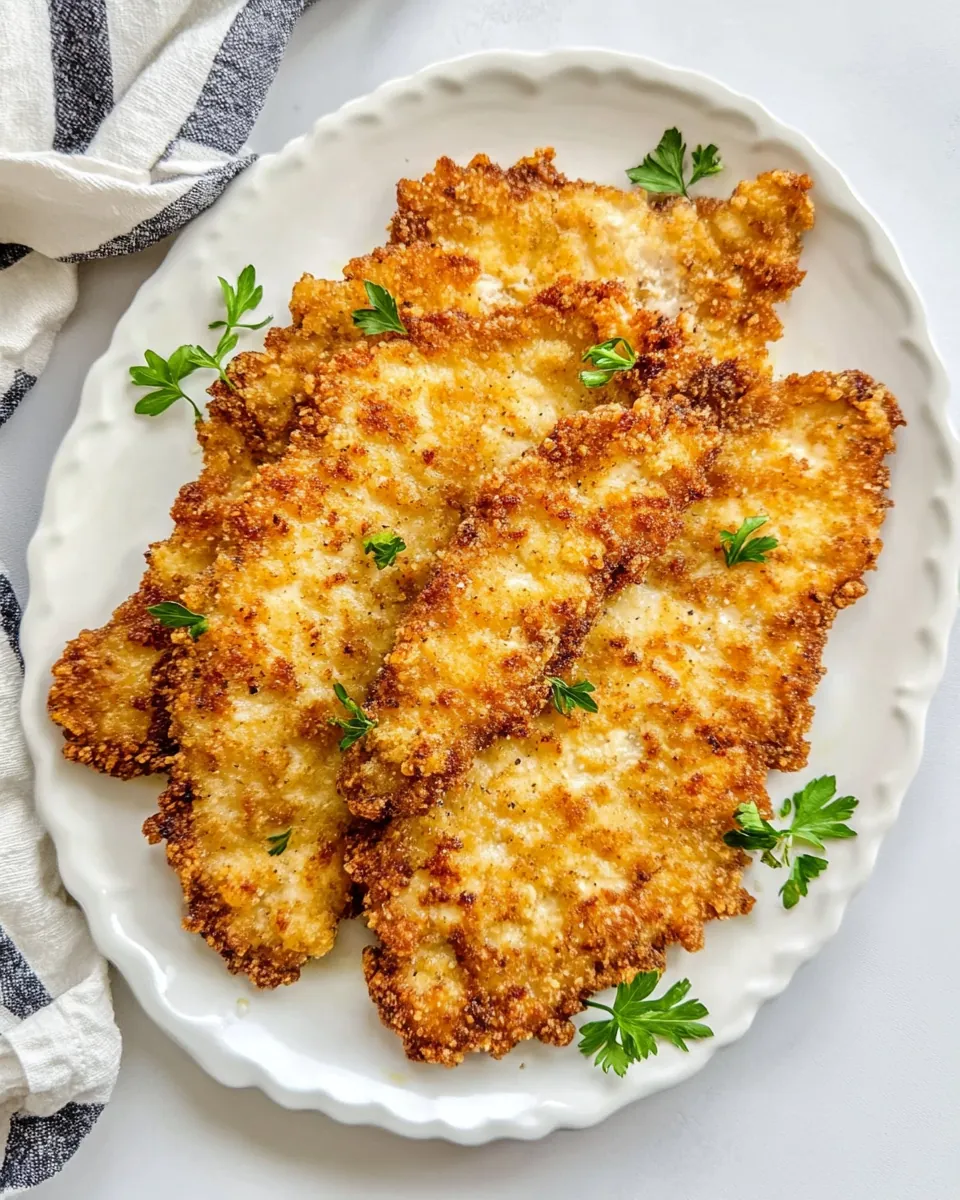
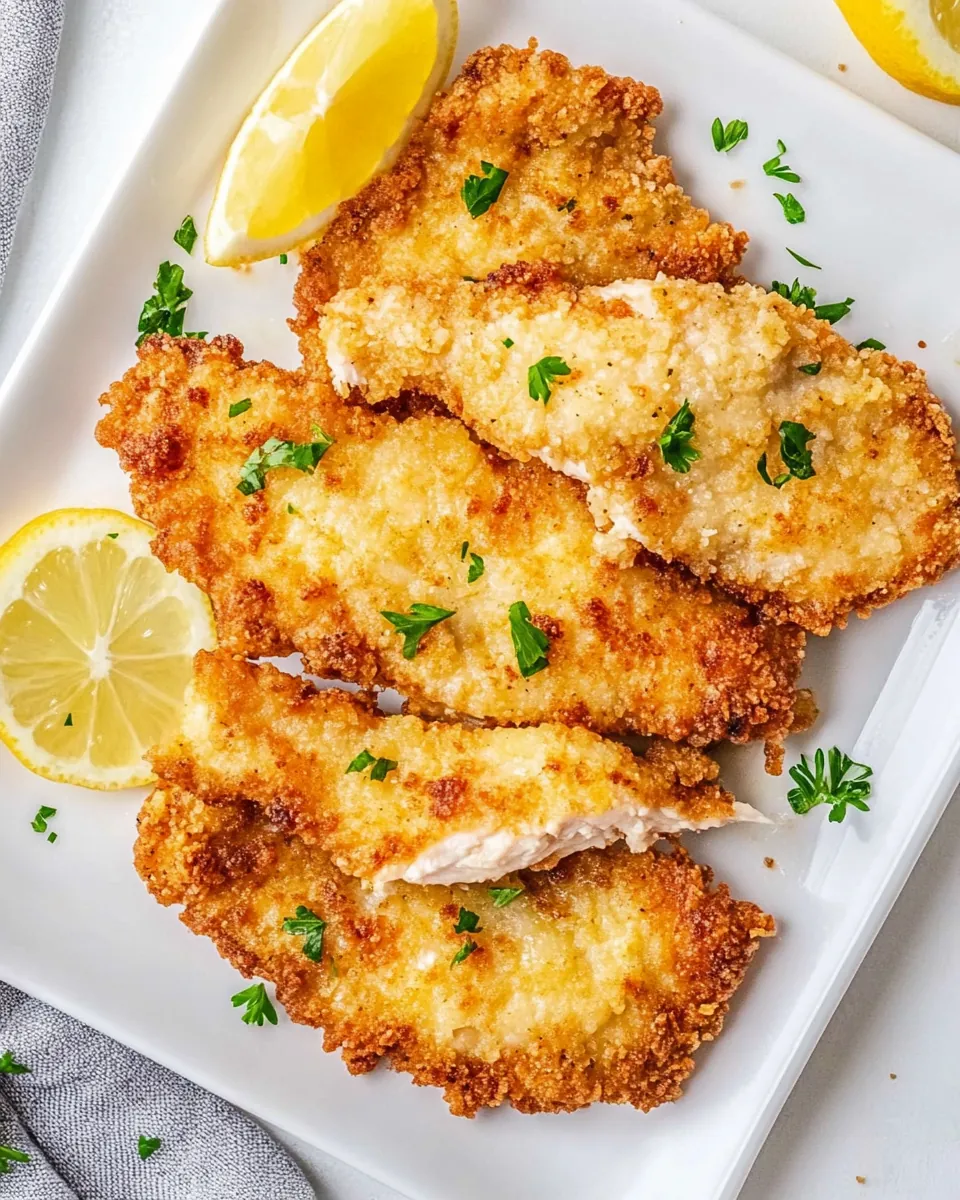
Crispy Chicken Cutlets
There’s something incredibly satisfying about indulging in Crispy Chicken Cutlets. I remember the first time I made them for a family gathering; the aroma filled the kitchen, drawing everyone in like a warm hug. Each cutlet was perfectly golden and crispy, and the excitement was palpable as we gathered around the table. I was a bit nervous, but as everyone took their first bite, I was met with smiles and compliments that warmed my heart. It’s moments like these that make cooking so rewarding, where a simple dish can bring laughter and joy. The beauty of Crispy Chicken Cutlets lies not only in their crunch but also in their versatility. Whether served with a side salad for a light lunch or alongside mashed potatoes for a hearty dinner, they never disappoint. The best part? They are surprisingly easy to make! You’ll want to add this recipe to your weekly rotation. So, let’s dive into this culinary adventure together!
Recipe Snapshot
25 mins
15 mins
10 mins
Medium
350 kcal
25 g
Low FODMAP
15 g
Skillet, Frying Pan, Grater, Mixing Bowl
Why This Crispy Chicken Cutlets Is a Winner
It’s All About the Crunch
What sets Crispy Chicken Cutlets apart is undeniably the crunch. When you bite into one, the sound is music to the ears. The crispy exterior gives way to tender, juicy chicken inside, making it a satisfying experience. I always use Panko breadcrumbs for an extra crunch factor. They add a lightness that traditional breadcrumbs can’t match, which is essential for achieving that perfect texture.
Customizable for Every Taste
One of my favorite things about making Crispy Chicken Cutlets is how easy it is to customize. You can experiment with various spices and herbs in the breadcrumb mixture. Personally, I love adding a hint of paprika for a smoky flavor or some garlic powder for a savory kick. The options are endless, allowing you to create unique flavors each time.
Meal Prep Friendly
These cutlets are perfect for meal prep. I often bread a whole batch on the weekend and store them in the fridge. When I’m ready to eat, I just fry or bake them, saving time during the busy week. It feels good knowing I have a delicious, homemade meal ready to go!
Great for Entertaining
Planning a gathering? Crispy Chicken Cutlets are always a hit! Serve them with a variety of dipping sauces like honey mustard or spicy mayo, and watch your friends rave about them. They’re finger food at its finest, making them an excellent choice for parties or casual get-togethers.
Kids Love Them
If you’re cooking for kids, these cutlets are sure to please. The crunchy coating and juicy chicken are a hit with little ones, and they can even help with the breading process. It’s a fun way to get them involved in the kitchen!
What You’ll Need for Crispy Chicken Cutlets

To create the perfect Crispy Chicken Cutlets, you’ll need a handful of simple yet essential ingredients. Each one plays a crucial role in building flavors and texture. The combination of fresh chicken, flavorful breadcrumbs, and aromatic spices creates a delicious meal that feels special without being overly complicated. Let’s take a closer look at these ingredients and what they bring to the table.
- 4 chicken breast (boneless and skinless) – The star of the show! Choosing boneless and skinless chicken breasts ensures easy cooking and allows the flavors of the coating to shine through.
- Salt and pepper (to taste) – Essential for seasoning the chicken, bringing out its natural flavors and enhancing the overall taste of the dish.
- 1 cup all-purpose flour – Used for dredging the chicken, this creates a base layer that helps the egg and breadcrumbs stick.
- 2 large eggs – Beaten with water, the egg wash acts as the glue that holds the breadcrumbs in place, ensuring a deliciously crispy coating.
- 2 tablespoons water – Mixed with the eggs, it lightens the mixture for better coating on the chicken.
- 2 cups breadcrumbs (preferably Panko) – The key to achieving that irresistible crunch. Panko breadcrumbs are lighter and deliver a crispier texture than traditional breadcrumbs.
- 1 teaspoon garlic powder – Adds a depth of flavor that perfectly complements the chicken and enhances the overall taste experience.
- 1 teaspoon paprika – Offers a subtle smokiness and vibrant color, making the dish visually appealing.
- ½ cup Parmesan cheese (grated) – A sprinkle of cheese in the breadcrumb mixture adds richness and a savory component that is hard to resist.
- Vegetable oil (for frying) – Provides the necessary heat for frying, creating that golden crust that makes these cutlets so delicious.
Step by Step Guide for Crispy Chicken Cutlets
Making Crispy Chicken Cutlets is easier than you might think. With a few simple steps, you’ll have a restaurant-quality meal right at home. Let’s walk through the process together!
- Start by preparing the chicken breasts. If they are thick, pound them to an even ½-inch thickness using a meat mallet. This helps them cook evenly and stay tender. Season both sides of the chicken breasts generously with salt and pepper.
- Next, set up a dredging station with three shallow dishes. In the first dish, place the flour. In the second dish, beat the eggs with the water. In the third dish, mix together the breadcrumbs, garlic powder, paprika, and Parmesan cheese.
- Coat each chicken breast in flour, shaking off the excess. This step is crucial for achieving a well-coated cutlet. Then, dip the floured chicken into the egg mixture, ensuring it’s fully coated.
- Now, press the chicken into the breadcrumb mixture, making sure it’s completely covered. Allow them to sit for about 10 minutes before frying. This resting period helps the coating set, ensuring it adheres better during cooking.
- In a large skillet, heat about ¼ inch deep of vegetable oil over medium-high heat. You want the oil hot enough that it sizzles when the chicken is added but not so hot that it burns.
- Once the oil is hot, carefully add the chicken cutlets to the skillet. Fry them for about 4 to 5 minutes on each side, or until they are golden brown and the internal temperature reaches 165°F (75°C). Depending on the size of your skillet, you may need to work in batches.
- Remove the fried cutlets from the skillet and let them drain on a wire rack. This helps keep them crispy instead of soggy.
Things Worth Knowing
- Resting Time: Allowing the breaded cutlets to sit before frying helps the coating stick better during cooking.
- Temperature Check: Use a meat thermometer to ensure the chicken reaches an internal temperature of 165°F (75°C) for safe consumption.
- Oil Temperature: If the oil is too hot, the exterior will burn before the inside is cooked. If it’s too cool, the cutlets will absorb excess oil and become greasy.
- Batch Cooking: Fry in batches if necessary to avoid overcrowding the skillet, which can lower the oil temperature.
Pro Tips and Tweaks
When it comes to making the best Crispy Chicken Cutlets, a few tips can elevate your dish to new heights. Here are some expert recommendations to consider.
- Storage: To store leftovers, let the cutlets cool completely before placing them in an airtight container. They can be kept in the fridge for up to 3 days.
- Freezing: You can freeze cooked cutlets in a single layer until solid. Transfer them to a freezer bag and reheat straight from frozen in the oven for best results.
- Baking Option: If you prefer a healthier alternative, bake the cutlets at 425°F (220°C) for about 20 minutes, flipping halfway through. Spraying with a little oil can help them crisp up.
- Air Fryer Option: Use an air fryer to cook the cutlets at 375°F (190°C) for 10 to 12 minutes, flipping halfway through for an even cook.
- Customize It: Feel free to swap in your favorite spices or add something extra like lemon zest for a fresh twist. Using chicken thighs can also yield juicier results.
What Goes Well With This Crispy Chicken Cutlets
- Serve with Fresh Salads: Pairing Crispy Chicken Cutlets with a crisp green salad makes for a balanced meal. A light vinaigrette will complement the richness of the cutlets beautifully.
- Perfect for Sandwiches: Use the cutlets in sandwiches with toppings like avocado, lettuce, and tomato for a delicious lunch or dinner option.
- Great with Dips: Serve with a variety of dips such as ranch dressing, honey mustard, or spicy mayo to enhance the flavor.
- Accompany with Side Dishes: They pair wonderfully with mashed potatoes, roasted vegetables, or even a classic mac and cheese for a comforting meal.
- Ideal for Family Gatherings: These cutlets are perfect for family dinners or casual gatherings. They’re sure to be a favorite among guests of all ages!
FAQ
Conclusion
In conclusion, Crispy Chicken Cutlets are more than just a meal; they are an experience that brings joy to the table. With their delightful crunch and juicy interior, they are a crowd-pleaser for any occasion. I encourage you to give this recipe a try and enjoy the smiles they bring to your family and friends. There’s nothing quite like homemade comfort food to brighten your day!
Crispy Chicken Cutlets
Ingredients
Equipment
Method
- Start by preparing the chicken breasts. If they are thick, pound them to an even ½-inch thickness using a meat mallet. This helps them cook evenly and stay tender. Season both sides of the chicken breasts generously with salt and pepper.
- Next, set up a dredging station with three shallow dishes. In the first dish, place the flour. In the second dish, beat the eggs with the water. In the third dish, mix together the breadcrumbs, garlic powder, paprika, and Parmesan cheese.
- Coat each chicken breast in flour, shaking off the excess. This step is crucial for achieving a well-coated cutlet. Then, dip the floured chicken into the egg mixture, ensuring it's fully coated.
- Now, press the chicken into the breadcrumb mixture, making sure it’s completely covered. Allow them to sit for about 10 minutes before frying. This resting period helps the coating set, ensuring it adheres better during cooking.
- In a large skillet, heat about ¼ inch deep of vegetable oil over medium-high heat. You want the oil hot enough that it sizzles when the chicken is added but not so hot that it burns.
- Once the oil is hot, carefully add the chicken cutlets to the skillet. Fry them for about 4 to 5 minutes on each side, or until they are golden brown and the internal temperature reaches 165°F (75°C). Depending on the size of your skillet, you may need to work in batches.
- Remove the fried cutlets from the skillet and let them drain on a wire rack. This helps keep them crispy instead of soggy.
Notes
- Make Ahead: Bread the cutlets and refrigerate for up to 4 hours before frying.
- Baking Option: Bake at 425°F (220°C) for about 20 minutes, flipping halfway through. Spray with a bit of oil for extra crunch.
- Air Fryer Option: Air fry at 375°F (190°C) for 10–12 minutes, flipping halfway.
- Leftovers: Store leftovers in the fridge for up to 3 days. Reheat in the oven to keep them crispy.
- Freezing: Freeze cooked cutlets in a single layer until solid, then transfer to a freezer bag. Reheat straight from frozen in the oven.
- Customize It: Swap in your favorite spices, add lemon zest, or use chicken thighs for a juicier cutlet.