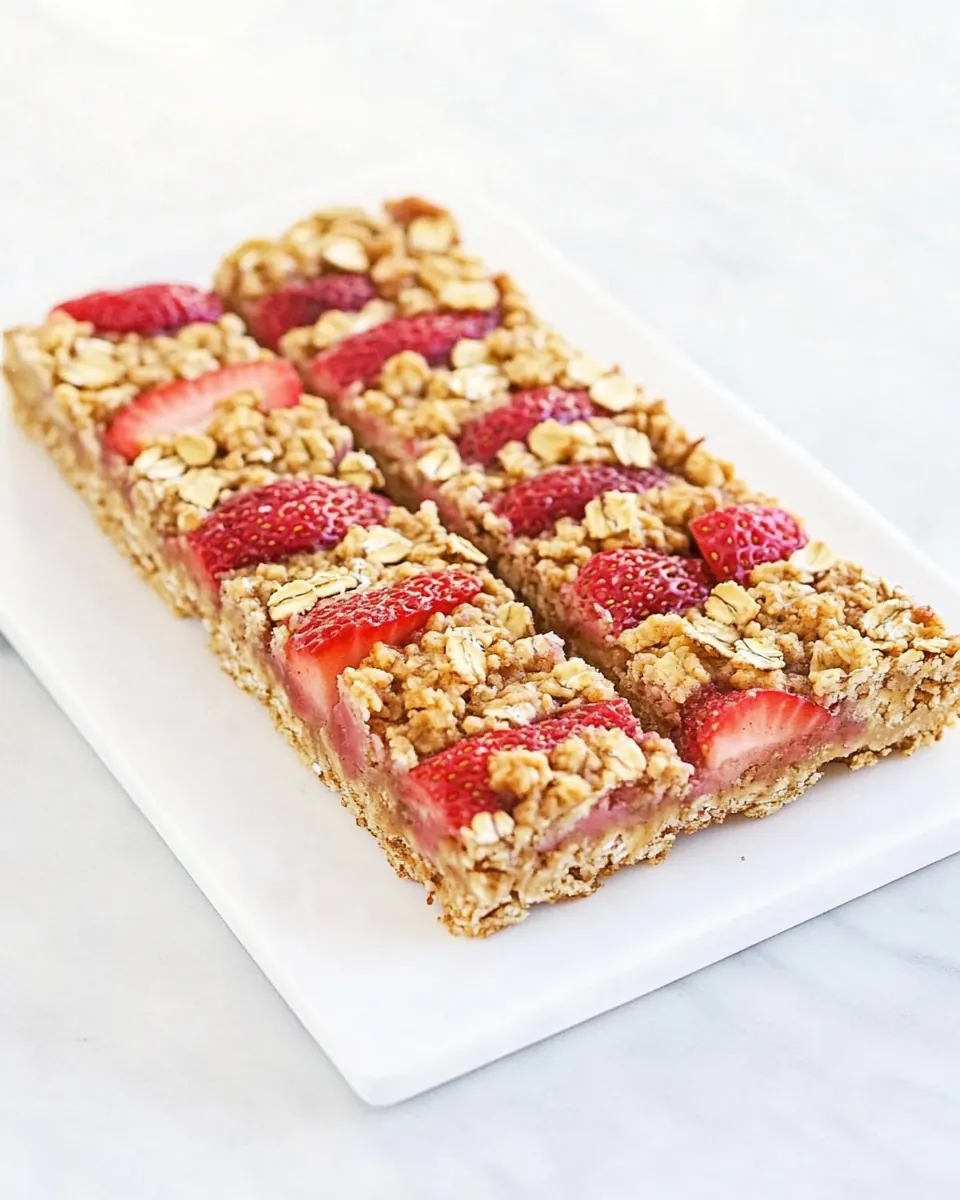
Strawberry Oatmeal Bars
I can’t tell you how many times I’ve found myself craving something sweet yet wholesome. That’s when I whip up a batch of Strawberry Oatmeal Bars. These delightful treats are perfect for those cozy afternoons when you want a snack that’s both satisfying and easy to make. The combination of hearty oats and luscious strawberries creates a perfect balance of texture and flavor, making them a favorite not just for me, but for everyone I share them with. Every bite is a reminder of warm spring days and the joy of home baking. With a cup of tea or a glass of milk, these bars transform into a quick breakfast or an energizing snack that keeps you going. I love how simple ingredients can come together to create something so delicious and special.
Recipe Snapshot
45 mins
10 mins
35 mins
Medium
180 kcal
2 g
Gluten-Free, Low FODMAP
8 g
8×8-inch Baking Pan, Parchment Paper, Rolled Oats
What Sets This Strawberry Oatmeal Bars Apart
Wholesome Goodness
One of the best aspects of Strawberry Oatmeal Bars is their wholesome nature. Packed with rolled oats, these bars offer a great source of fiber, keeping you full and satisfied. They are not just a treat but also a nourishing option that you can feel good about.
Easy to Make
Even if you’re not an experienced baker, these bars are incredibly easy to prepare. The steps are straightforward, and you can have a batch ready in no time. Plus, there’s something so satisfying about mixing the ingredients by hand, allowing you to connect with the process.
Customizable to Your Taste
What’s fantastic about this recipe is its versatility; you can easily customize the flavors. Want to add some nuts? Go for it! Prefer a different fruit? Sliced bananas or blueberries work beautifully too. The basic recipe is a great canvas for your creativity.
Perfect for Any Occasion
These bars are perfect for any occasion. Whether you’re hosting a brunch, packing a school lunch, or needing a snack for a road trip, Strawberry Oatmeal Bars fit the bill. They are portable and easy to share, making them a hit among friends and family.
Freezer Friendly
Have leftovers? No problem! These bars freeze remarkably well. Just wrap them up individually and pop them in the freezer. On those busy days when you need a quick snack, you can pull one out and enjoy it in no time.
A Family Favorite
Last but not least, Strawberry Oatmeal Bars have become a family favorite in my household. Watching my kids enjoy them with smiles on their faces makes all the effort worthwhile. It’s a great way to introduce wholesome ingredients to their diet while still indulging their sweet tooth.
What’s In This Strawberry Oatmeal Bars
The ingredients in Strawberry Oatmeal Bars are as simple as they are essential. Each component plays a crucial role in creating the perfect texture and flavor. The star of the dish is the rolled oats, lending a hearty base, while strawberries and strawberry preserves provide a burst of fruity sweetness. With just a few other pantry staples, you can create a delicious treat that everyone will love.
- 1½ cups rolled oats: The foundation of the bars, providing texture and fiber.
- 1 cup all-purpose flour: Adds structure to the bars, making them sturdy yet tender.
- ½ cup unsalted butter (melted): Brings richness and moisture to the recipe.
- 1 cup sugar: Sweetens the mixture, balancing the tartness of the strawberries.
- ¼ cup milk: Helps bind the ingredients together and adds moisture.
- 1 teaspoon vanilla extract: Enhances the overall flavor with a warm note.
- ¼ teaspoon salt: Balances sweetness and enhances flavor.
- ½ cup natural strawberry preserves: Infuses the bars with delicious strawberry flavor.
- 1 cup finely diced strawberries: Fresh strawberries add natural sweetness and texture.
- 1 tablespoon fresh lemon zest (optional): Brightens the flavor profile with a citrus note.
Step by Step Instructions for Strawberry Oatmeal Bars
Making Strawberry Oatmeal Bars is a delightful experience! Once you gather your ingredients and get started, you’ll see how easy it is to create these delicious treats. Follow these steps carefully, and you’ll be rewarded with a scrumptious batch of bars that will impress everyone.
- Preheat your oven to 350 degrees Fahrenheit. While it’s heating up, take an 8×8-inch baking pan and line it with parchment paper, leaving some overhang. This will make it easier to lift the bars out once they’re cooled.
- In a medium bowl, combine the rolled oats, all-purpose flour, sugar, melted butter, milk, vanilla extract, and salt. Stir everything together until well combined. The mixture should be thick and hold together when pressed between your fingers.
- Set aside one cup of this batter for the topping. With the remaining batter, press it evenly into the bottom of your prepared baking pan. Make sure it’s well covered.
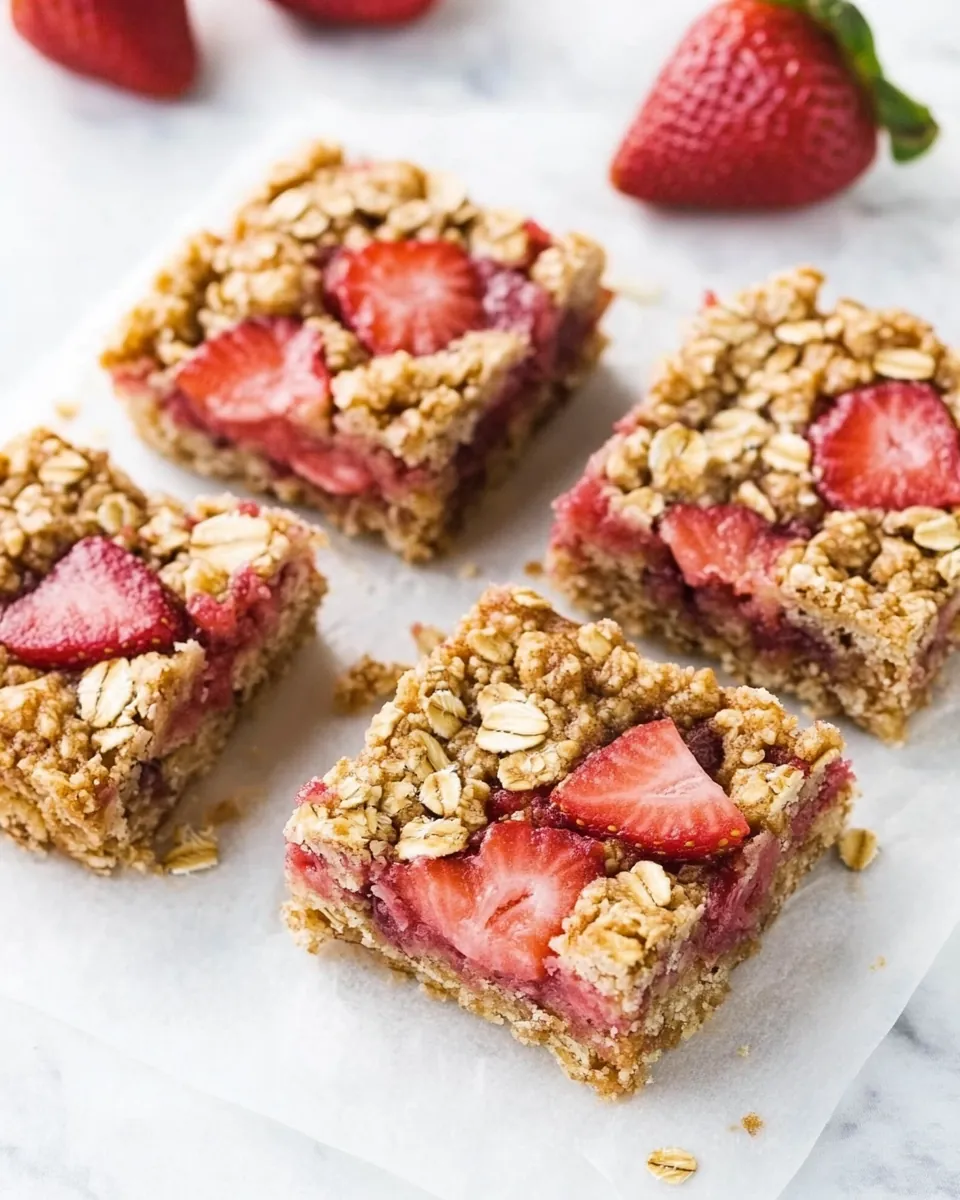
- Now it’s time to add the filling! Spread the strawberry preserves evenly over the batter, making sure to cover it well.
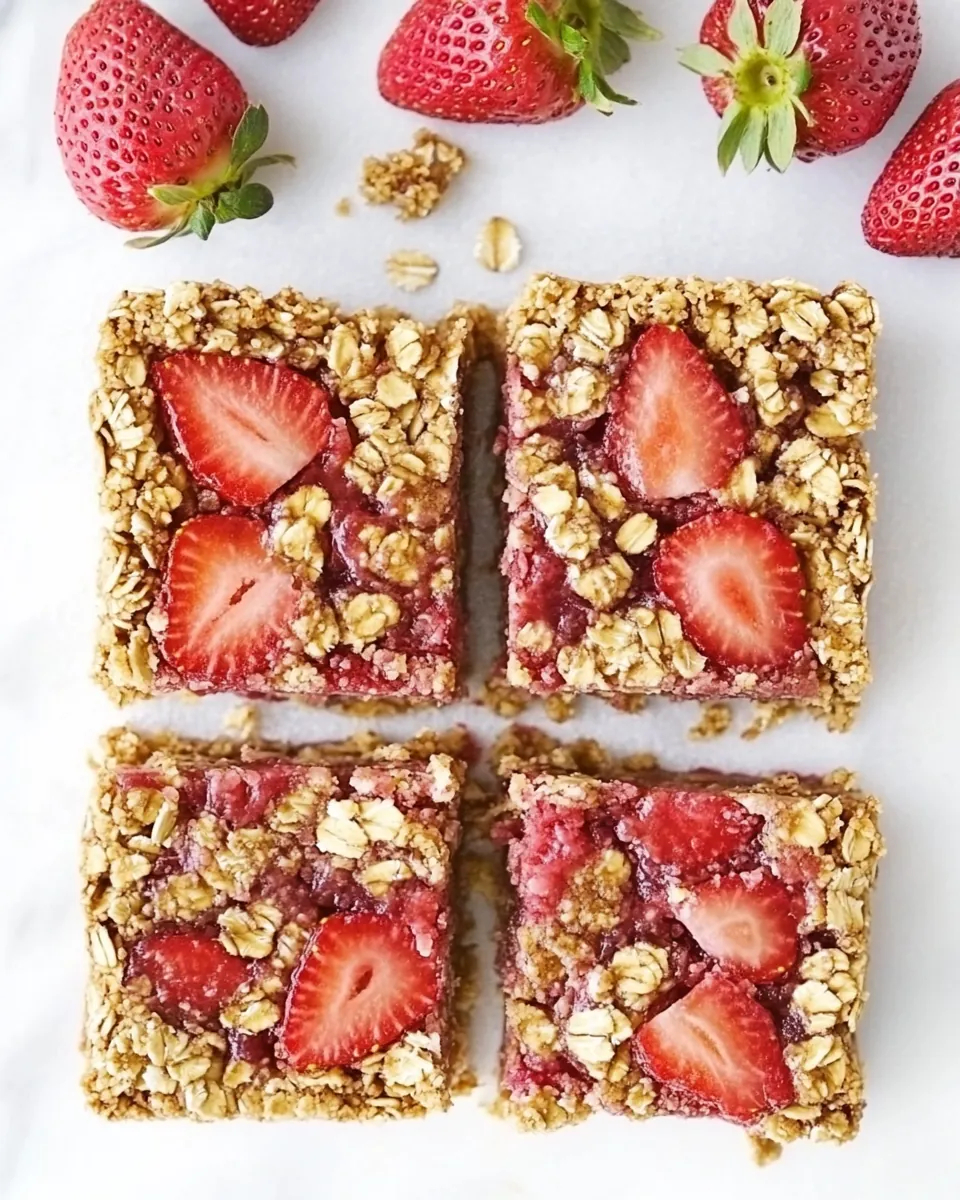
- Next, sprinkle the diced strawberries over the preserves. Press them down slightly to incorporate them into the mixture.
- If you’re using lemon zest, sprinkle it over the top of the strawberries for an extra zing.
- Now, take the reserved batter and crumble it over the strawberry layer, covering it evenly. Press it down lightly to help it stick.
- Place the baking pan in the oven and bake for approximately 35 to 40 minutes. You’ll want to look for a light golden brown color on top.
- Once baked, remove the pan from the oven and allow it to cool on a wire rack until it reaches room temperature. This is the perfect time to enjoy the wonderful aroma wafting through your kitchen.
- When fully cooled, use the parchment paper to lift the bars out of the pan and slice them into squares using a serrated knife. Take your time with this step for the best results!
Things Worth Knowing
- Patience is Key: Letting the bars cool completely before slicing is crucial. This will ensure they hold their shape and don’t crumble apart.
- Adjust Sweetness: You can customize the amount of sugar based on your taste preferences or the sweetness of the strawberries.
- Texture Variation: If you prefer a chewier texture, mix in some nuts or seeds into the batter.
- Even Baking: Rotate the pan halfway through baking to promote even cooking.
Recipe Variations about Strawberry Oatmeal Bars

There are so many ways to enjoy Strawberry Oatmeal Bars. This recipe is a fantastic base, allowing you to get creative. Here are some variations you might consider trying out.
- Nutty Addition: Add chopped nuts like walnuts or almonds for an extra crunch.
- Berry Medley: Substitute the strawberries with your favorite berries, such as raspberries or blueberries.
- Chocolate Drizzle: Drizzle some melted chocolate over the top after baking for a decadent touch.
- Oat-Free Version: For a gluten-free option, use gluten-free flour and oats.
- Spiced Up: Add a pinch of cinnamon to the batter for a warm, spiced flavor.
- Vegan Twist: Use coconut oil instead of butter and a plant-based milk for a vegan-friendly version.
What Complements This Strawberry Oatmeal Bars
When it comes to serving Strawberry Oatmeal Bars, there are so many delightful ways to do so! Here’s a list of ideas to elevate your experience:
- Pair with Yogurt: Serve these bars with a dollop of Greek yogurt for a delicious breakfast or snack.
- Perfect for Picnics: These bars are easy to transport, making them a perfect addition to any picnic spread.
- Great for Lunchboxes: Cut them into smaller squares for a nutritious treat that kids will love in their lunchboxes.
- Enjoy with Tea: A warm cup of tea pairs perfectly with the sweet and tart flavors of these bars.
- Seasonal Serving: Serve them fresh in spring when strawberries are in season for the best flavor.
- For Breakfast on the Go: Have them ready for a quick grab-and-go breakfast on busy mornings.
FAQ
Conclusion
These Strawberry Oatmeal Bars are not just a treat; they’re a wonderful way to enjoy wholesome ingredients in a delicious format. The combination of oats and strawberries makes them a perfect snack for any time of the day. I encourage you to give this recipe a try—you won’t regret it! Your family will love them, and you’ll feel great about serving something homemade.
Strawberry Oatmeal Bars
Ingredients
Equipment
Method
- Preheat your oven to 350 degrees Fahrenheit. While it's heating up, take an 8×8-inch baking pan and line it with parchment paper, leaving some overhang. This will make it easier to lift the bars out once they're cooled.
- In a medium bowl, combine the rolled oats, all-purpose flour, sugar, melted butter, milk, vanilla extract, and salt. Stir everything together until well combined. The mixture should be thick and hold together when pressed between your fingers.
- Set aside one cup of this batter for the topping. With the remaining batter, press it evenly into the bottom of your prepared baking pan. Make sure it's well covered.
- Now it’s time to add the filling! Spread the strawberry preserves evenly over the batter, making sure to cover it well.
- Next, sprinkle the diced strawberries over the preserves. Press them down slightly to incorporate them into the mixture.
- If you're using lemon zest, sprinkle it over the top of the strawberries for an extra zing.
- Now, take the reserved batter and crumble it over the strawberry layer, covering it evenly. Press it down lightly to help it stick.
- Place the baking pan in the oven and bake for approximately 35 to 40 minutes. You'll want to look for a light golden brown color on top.
- Once baked, remove the pan from the oven and allow it to cool on a wire rack until it reaches room temperature. This is the perfect time to enjoy the wonderful aroma wafting through your kitchen.
- When fully cooled, use the parchment paper to lift the bars out of the pan and slice them into squares using a serrated knife. Take your time with this step for the best results!
Notes
- Tip 1: Store in an airtight container at room temperature for up to 3 days or up to a week in the refrigerator.
- Tip 2: When mixing the wet ingredients into the dry, use your fingers to gently squish the dough together.
- Tip 3: Use a jam that you like the taste of since it’s a primary flavor in the recipe, either store bought or homemade.
- Tip 4: Let the bars cool fully before you lift them out of the pan and slice. Use a serrated knife to slice.
- Tip 5: Gluten-free: Use gluten-free flour instead of all-purpose flour and certified gluten-free rolled oats.
- Tip 6: Dairy-free: Use vegan butter or coconut oil for the butter and dairy-free milk.