Mummy Hand Pies
As Halloween approaches, there’s something incredibly special about making Mummy Hand Pies with my family. It’s not just about the delicious flavors; it’s about creating spooky memories together in the kitchen. I remember the first time I made these with my kids, their faces lighting up as we rolled out the dough and cut out the shapes. We laughed as we imagined what these mummies would be like if they were real, and I could see their creativity come alive. Each pie turned into a little masterpiece, and the best part? They tasted as good as they looked! With a crispy crust and a sweet berry filling, these hand pies are the perfect treat to celebrate the Halloween season.
Recipe Snapshot
35 mins
20 mins
15 mins
Medium
160 kcal
2 g
Gluten-Free, Low FODMAP
7 g
Oven, Baking Sheet, Mixing Bowl, Whisk
Why We Love This Mummy Hand Pies
Perfect for Halloween Parties
When Halloween rolls around, I love how Mummy Hand Pies become the star of our gatherings. They’re not just delicious; they look festive and fun on any table. Whether it’s for a trick-or-treat party or a cozy family night, these hand pies create a warm, inviting atmosphere.
Creative and Fun to Make
One of the things I adore about these pies is how creative you can get when making them. You can personalize the faces on the mummies or even let the kids decorate their own! It’s a fantastic way to get everyone involved, and you can guarantee they’ll have a blast while doing it.
Quick and Easy to Prepare
With store-bought pie crusts and a simple filling, Mummy Hand Pies are surprisingly easy to whip up. You don’t need to spend hours in the kitchen to create an impressive treat. In less than an hour, you can have a batch ready to feast on. This makes them an excellent choice for busy parents looking to create festive treats without the hassle.
A Sweet Surprise Inside
As you bite into these charming mummies, you’ll be greeted with a delightful burst of sweet raspberry jam. This unexpected flavor adds a lovely surprise that keeps everyone coming back for more. It’s always fun to watch as guests take that first bite and their eyes light up!
Great for Leftovers
What I love about Mummy Hand Pies is that they’re perfect for snacking later. If you have any leftovers (which is rare!), they store well in the fridge. Just pop them in the microwave for a few seconds, and you’ll have a delicious treat ready to enjoy.
Ingredients Required for Mummy Hand Pies
The beauty of the ingredients for Mummy Hand Pies lies in their simplicity and the way they come together to create something magical. Using refrigerated pie crusts saves time and makes this recipe accessible, while the sweet raspberry filling adds a burst of flavor that balances out the flaky crust. Each ingredient plays a vital role in crafting the perfect mummy pie.
- 2 boxes refrigerated rolled pie crusts – These are your time-savers! They create a flaky, delicious base without the fuss of making dough from scratch.
- 1/3 cup raspberry jam – This sweet filling brings a fruity burst that contrasts delightfully with the buttery crust.
- 1 large egg – Beaten with a splash of water, this creates a golden, shiny wash that makes your mummies look irresistible.
- 1-1/4 cups powdered sugar – The star ingredient for your frosting, adding sweetness and a beautiful finish to your mummies.
- 1-2 tablespoons milk – Adjust as needed to achieve the perfect frosting consistency.
Recipe Steps for Mummy Hand Pies
Making Mummy Hand Pies is a delightful process that fills your kitchen with sweet aromas. The steps are straightforward, and you’ll find that it’s a great activity to share with family or friends. Let’s jump into the fun!
Preheat your oven to 375 degrees F and line two large baking sheets with parchment paper. This ensures that your mummies won’t stick and will bake evenly.
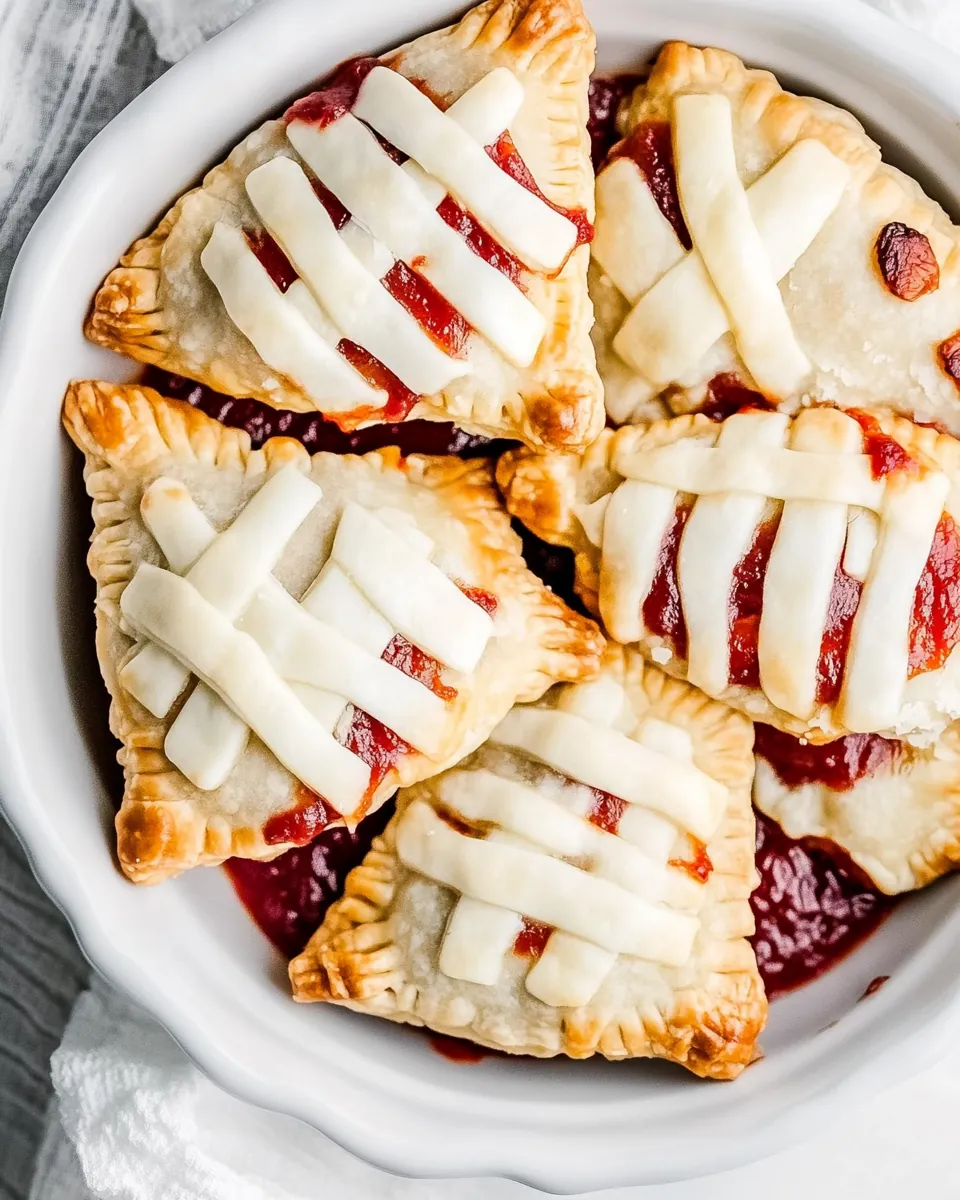
Unroll the refrigerated pie crusts onto a lightly floured surface. With a sharp knife or a pizza cutter, cut out as many mummy shapes as you can from each crust. Aim for about ten per crust, giving you a total of around 40 mummies!
If you have leftover pie crust, gather it together and roll it out into a rectangle about ⅛ inch thick. Cut out more mummy shapes, aiming for another 12 mummies.
Place the mummies on the lined baking sheets, ensuring there’s at least an inch of space between each one. This prevents them from sticking together while baking.
Using a teaspoon, fill the center of each mummy with 1 to 2 teaspoons of raspberry jam. Make sure not to overfill, as you want to seal them properly.
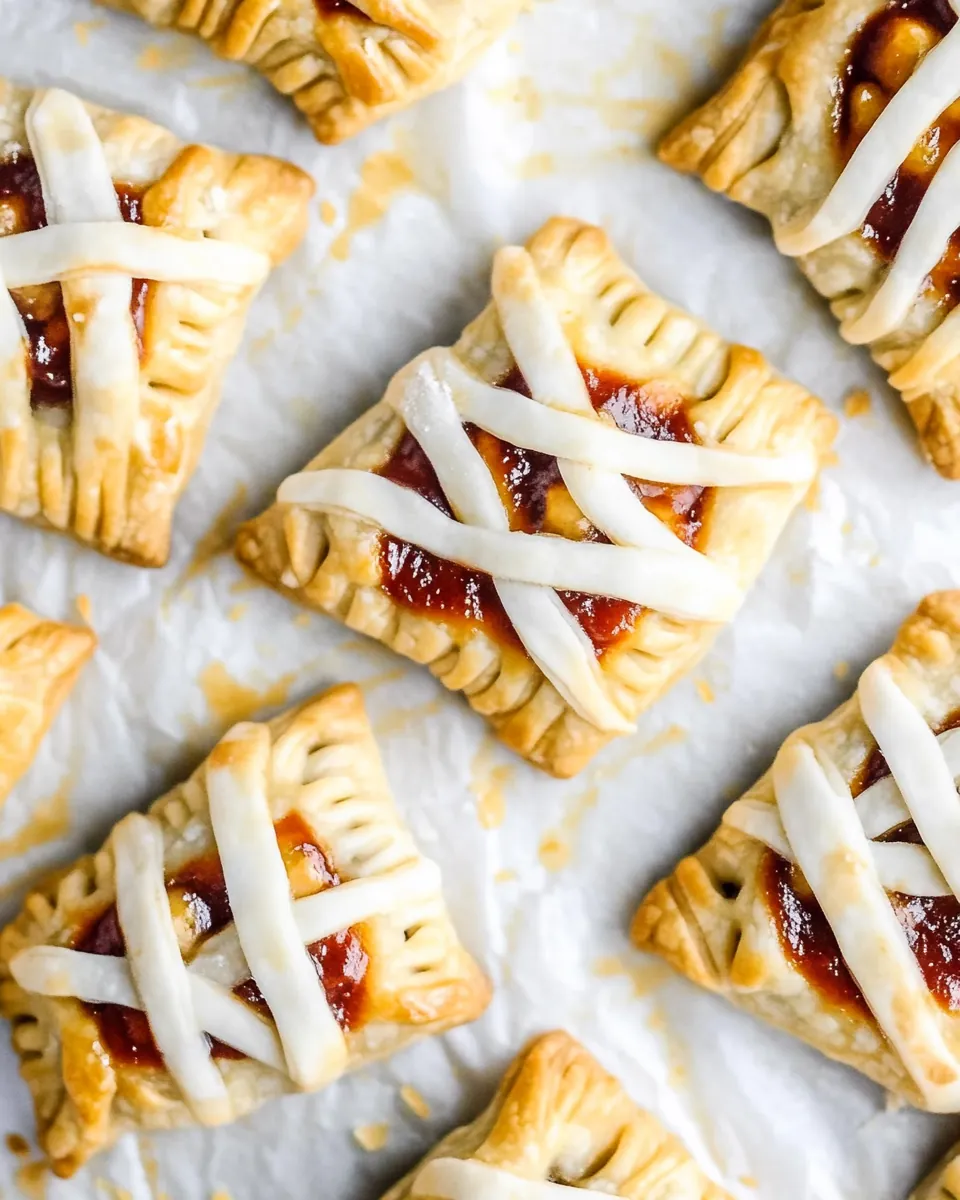
Lightly brush the edges of each mummy with the egg wash. Then, place another mummy cutout on top and press the edges together to seal in the jam. If you’d like, you can crimp the edges with a fork for extra flair.
Brush the tops of each mummy with a little more egg wash. Then, using a fork, poke a few holes in each for steam to escape during baking.
Bake the mummies in the preheated oven for about 13 to 15 minutes. You’re looking for a golden brown color on the tops, which tells you they’re ready!
Once baked, allow the mummies to cool completely on a wire rack. This step is important for the frosting to set beautifully later.
When you’re ready to decorate, whisk together the powdered sugar and milk. You want it thick but still pipeable. If it’s too thin, add more powdered sugar; if too thick, add a bit more milk.
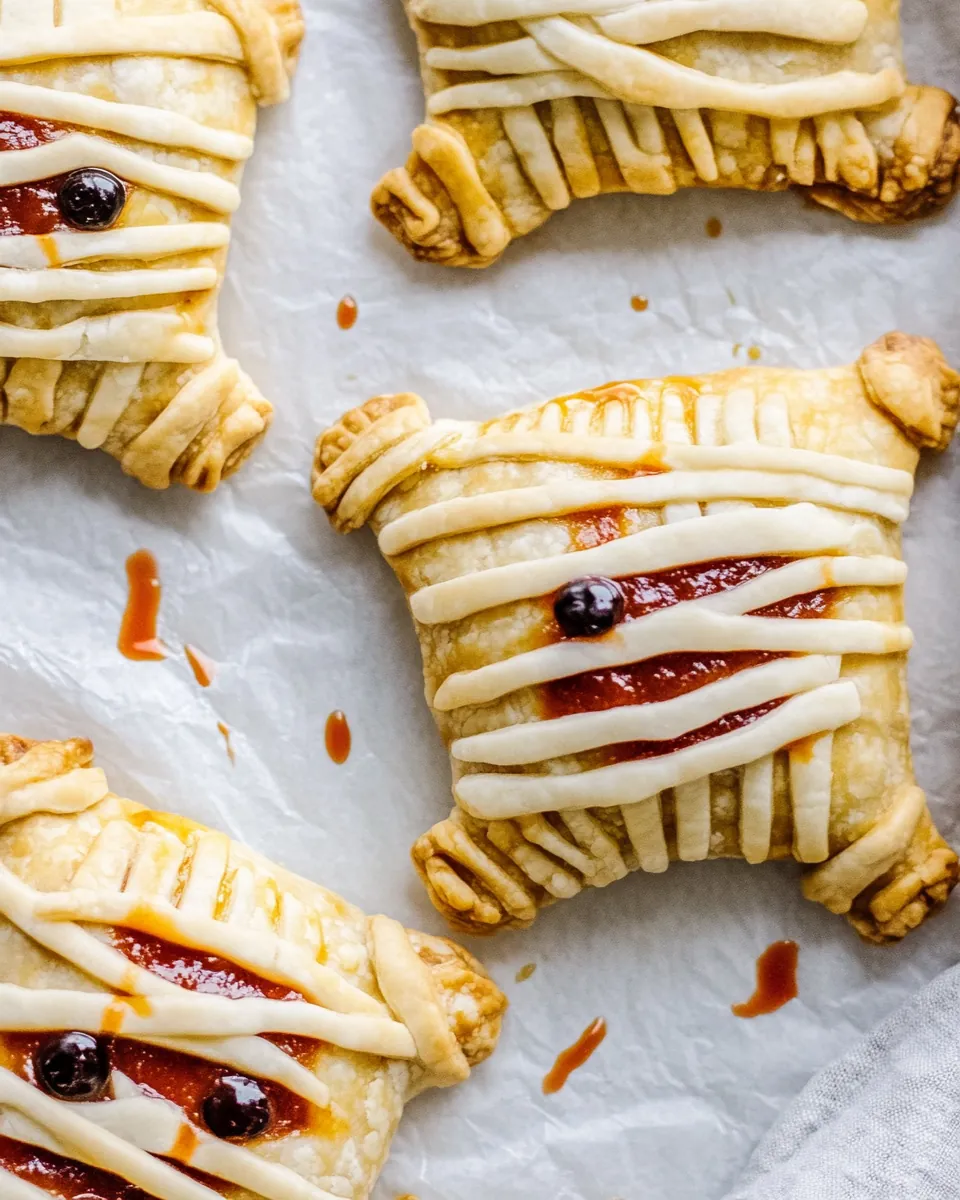
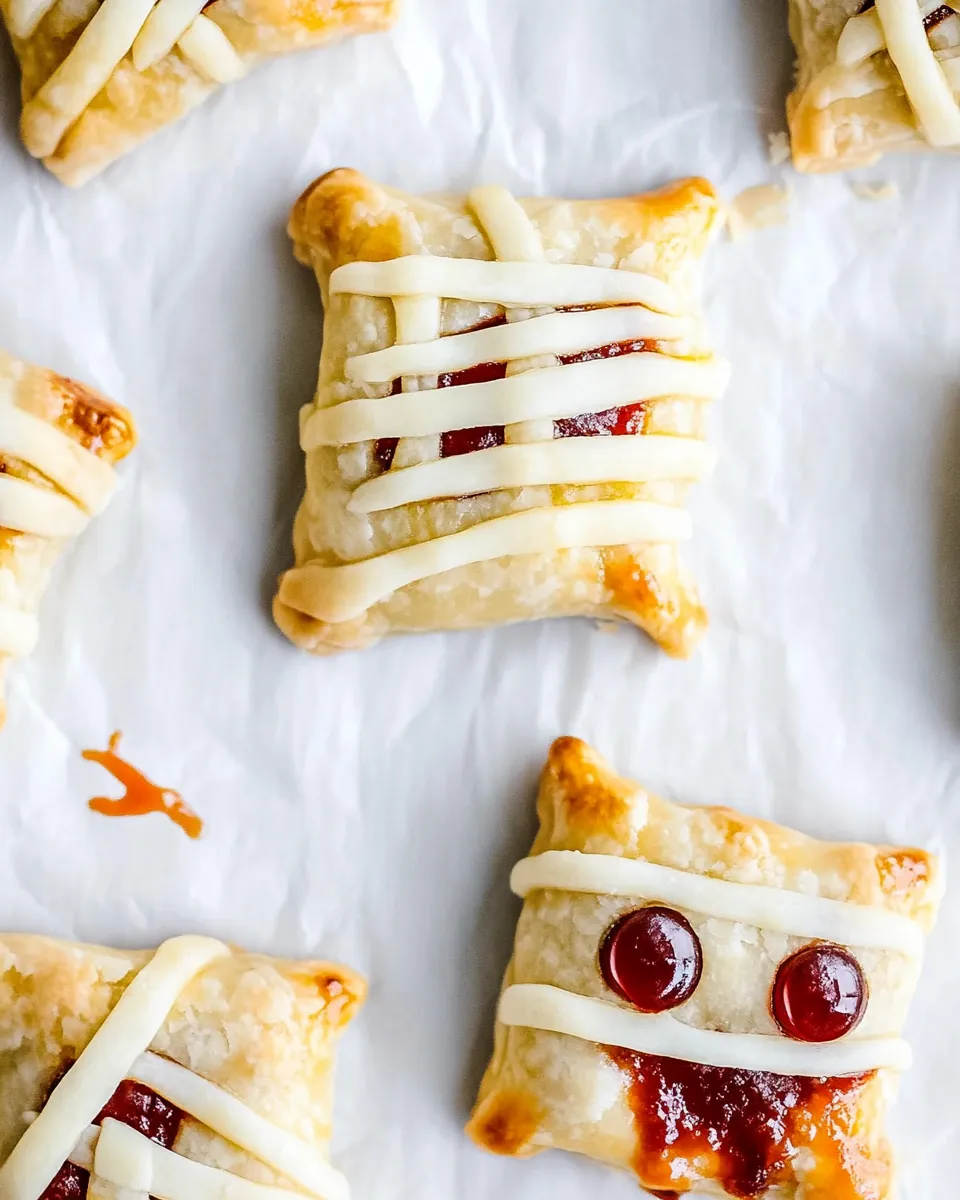
Transfer the frosting into a piping bag (or a Ziploc bag with the corner cut off) and drizzle it over each mummy.
For the eyes, take any remaining frosting and add a drop of black food coloring. Mix it well, then pipe two small eyes on each mummy for that spooky look.
Allow the frosting to set for about 20 minutes, and then enjoy your Mummy Hand Pies. Store any leftovers in an airtight container in the fridge for up to two days.
Things Worth Knowing
- Ensure an Even Bake: To achieve a golden crust, make sure your oven is preheated before placing the mummies inside. This helps them cook evenly and achieve that perfect color.
- Seal Properly: Sealing the edges well is crucial to prevent the filling from leaking out during baking. Pinching the seams or using a fork to crimp adds a nice touch.
- Experiment with Fillings: While raspberry is a classic choice, feel free to try other flavors like chocolate or apple for fun variations.
- Cooling Time: Be patient and let the mummies cool completely before frosting. This prevents the frosting from melting and losing its shape.
Recipe Variations about Mummy Hand Pies
There are countless ways to make Mummy Hand Pies your own! Here are some ideas to get you started.
- Add Spice: Consider adding a dash of cinnamon or nutmeg to the raspberry filling for a warm, spiced flavor.
- Use Different Berries: Mix it up by using blackberries, strawberries, or even a combination of your favorite jams.
- Chocolate Drizzle: Instead of a white frosting, drizzle melted chocolate on top for a decadent twist.
- Change the Shape: If you’re feeling adventurous, try cutting the crust into different shapes like ghosts or pumpkins for variety.
- Gluten-Free Option: Use gluten-free pie crusts to make this dish suitable for those with dietary restrictions.
- Mini Mummies: Make smaller versions for bite-sized treats; they’re perfect for parties!
What to Serve With Mummy Hand Pies
Pairing Mummy Hand Pies with the right sides can elevate your Halloween festivities. Here’s how I like to serve them:
- Witch’s Brew: Serve with a fun punch or themed drink to enhance the spooky atmosphere.
- Cheese Platter: Create a cheese board with assorted cheeses, crackers, and fruits for a delightful contrast to the sweetness of the pies.
- Fruit Salad: A refreshing fruit salad can balance the sweetness of the pies and add a healthy option to your spread.
- Seasonal Side Dishes: Roasted pumpkin or squash can provide a delightful autumnal touch to your meal.
- Cozy up with Hot Chocolate: For a warm touch, hot chocolate pairs beautifully with these sweet treats.
- Halloween-Themed Desserts: Consider other Halloween-themed snacks like ghost cupcakes or spider cookies to create a festive dessert table.
FAQ
Conclusion
Mummy Hand Pies are not only a fun and festive treat but also a wonderful way to create lasting memories in the kitchen. I encourage you to gather your loved ones and make these delightful mummies this Halloween season. There’s something magical about preparing festive treats together, and these hand pies will surely bring joy to your celebrations.
Mummy Hand Pies
Ingredients
Equipment
Method
- Preheat your oven to 375 degrees F and line two large baking sheets with parchment paper.
- Unroll the refrigerated pie crusts onto a lightly floured surface. Cut out as many mummy shapes as you can.
- Gather any leftover pie crust, roll it out, and cut out more mummy shapes.
- Place the mummies on the lined baking sheets, ensuring there’s space between each.
- Fill the center of each mummy with 1 to 2 teaspoons of raspberry jam.
- Brush the edges with egg wash, place another mummy cutout on top, and seal.
- Brush the tops with egg wash and poke holes for steam to escape.
- Bake for 13 to 15 minutes or until golden brown.
- Allow the mummies to cool completely on a wire rack.
- Whisk together powdered sugar and milk for frosting.
- Drizzle frosting over each mummy.
- Use remaining frosting to add eyes to each mummy.
- Let the frosting set for 20 minutes, then enjoy!
Notes
- Storage: Store leftovers in an airtight container in the fridge for up to two days.
- Freezing: These can be frozen before baking for a fun treat later!
- Pairing: Serve with a festive punch or themed snacks for a complete Halloween vibe.
- Variations: Experiment with different fillings like chocolate or apple for a unique twist.
- Mini Mummies: Create bite-sized versions for parties!