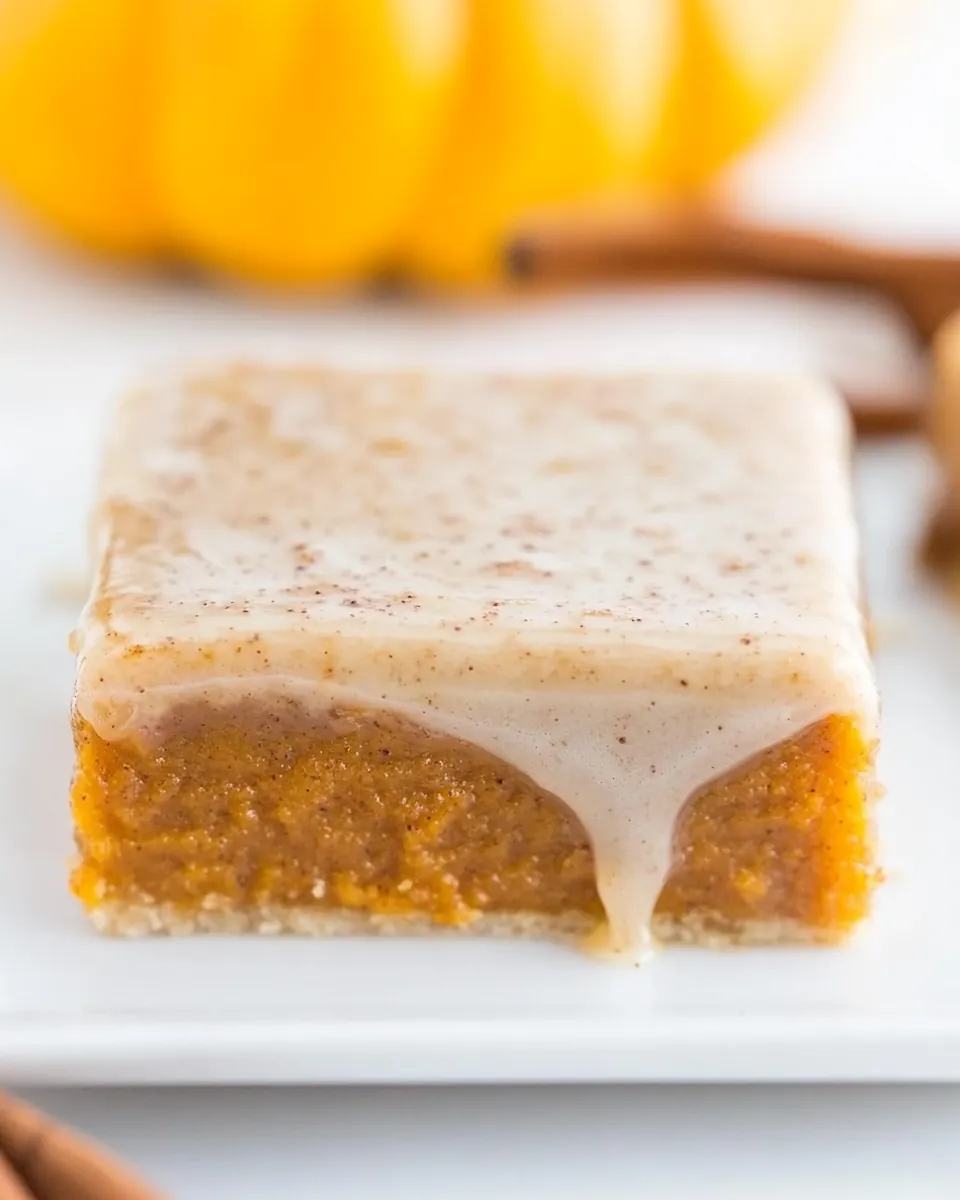
Fudgy Pumpkin Bars
There’s something special about the comforting aroma of fall spices filling the kitchen, and the moment I baked these Fudgy Pumpkin Bars, I was transported to my childhood. The leaves were turning golden, and my family would gather around the kitchen, eager for a sweet treat. These bars are soft, fudgy, and bursting with pumpkin flavor, making them perfect for any autumn gathering or cozy evening at home. Every bite offers a delightful combination of spices and sweetness, topped with a luscious glaze that takes them over the top. Whether you’re celebrating Thanksgiving or simply enjoying a quiet evening, these Fudgy Pumpkin Bars bring warmth and joy to any occasion.
Recipe Snapshot
45 mins
15 mins
30 mins
Medium
230 kcal
3 g
Gluten-Free, Low FODMAP
10 g
Oven, Baking Sheet, Frying Pan, Wooden Spoon, Whisk, Mixing Bowl
The Beauty of This Fudgy Pumpkin Bars
Rich and Decadent Flavor
What I love most about these Fudgy Pumpkin Bars is how rich and satisfying they are. The combination of pumpkin puree and spices creates a deep, inviting flavor profile that is hard to resist. Each bite is a perfect harmony of sweetness and warmth, making it a standout dessert during the cooler months.
Perfect for a Crowd
These bars are ideal for sharing with friends and family. The recipe yields a generous batch, making it perfect for potlucks, holiday gatherings, or simply enjoying with loved ones. You can easily slice them into squares for serving, and they hold up well, so you can take them on the go!
Simple Preparation
Even if you’re not an expert baker, these Fudgy Pumpkin Bars are straightforward to make. Most ingredients are pantry staples, and the steps are simple to follow. You’ll find that the ease of preparation doesn’t compromise the quality of taste.
Deliciously Versatile
What I adore about these bars is their versatility. They can be enjoyed warm straight from the oven, or you can let them cool before glazing. You can even experiment with different toppings like nuts or chocolate chips for added texture and flavor.
Rich Browned Butter Glaze
The pièce de résistance of this recipe is the browned butter glaze. It elevates the bars to a whole new level, adding a nutty richness that beautifully complements the pumpkin. Drizzling this glaze over the warm bars makes for a delectable finish that you won’t forget.
What to Gather for Fudgy Pumpkin Bars

Gathering fresh, quality ingredients is key to creating delicious Fudgy Pumpkin Bars. Each component plays a vital role in enhancing the flavor and texture. The star of the show is, of course, the pumpkin puree, which provides moisture and richness. The white chocolate adds a creamy sweetness that balances the spices beautifully. Together, these ingredients work in harmony to create a dessert that is both comforting and indulgent.
- ¾ cup white chocolate chips: Adds creamy sweetness that harmonizes with the pumpkin.
- ½ cup unsalted butter: Provides richness; melted for easy incorporation.
- 1 large egg: Binds the ingredients and adds moisture.
- ½ cup granulated sugar: Sweetens the bars to perfection.
- 2 teaspoons vanilla extract: Enhances overall flavor.
- 1 cup pumpkin puree: The star ingredient, providing moisture and flavor.
- 1 tablespoon pumpkin pie spice: Adds warm, cozy spices.
- 1 teaspoon cinnamon: A classic autumn spice that complements the pumpkin.
- 1 ¾ cups all-purpose flour: Provides structure to the bars.
- pinch salt: Enhances flavors; optional and to taste.
- ¼ cup unsalted butter, browned: Adds a nutty flavor to the glaze.
- 1 heaping cup confectioners’ sugar: Sweetens and thickens the glaze.
- 1 teaspoon vanilla bean paste: Adds a rich vanilla flavor to the glaze.
- pinch salt: Optional for balance in the glaze.
- about ¼ cup cream or milk: Adjusts glaze consistency.
Step by Step Guide for Fudgy Pumpkin Bars

Making Fudgy Pumpkin Bars is a delightful experience that fills your kitchen with amazing aromas. Follow these simple steps to create something truly special. You’ll be amazed at how easy it is to whip up this decadent dessert!
Preheat your oven to 350°F (175°C). This initial step ensures that your Fudgy Pumpkin Bars bake evenly. While the oven heats, line an 8-by-8-inch baking pan with aluminum foil and spray it with cooking spray to prevent sticking. This preparation is crucial for easy removal later on.
In a large, microwave-safe bowl, combine the white chocolate chips and unsalted butter. Heat the mixture in the microwave for about 2 minutes on high power. Be sure to stir after the first minute, then continue heating in 20-second intervals, stirring frequently. The goal is to achieve a smooth consistency without scorching the chocolate, which can happen easily.
Once melted, let the mixture cool slightly before adding the egg. This step is essential to avoid scrambling the egg. After allowing it to cool for a moment, whisk in the egg, granulated sugar, and vanilla extract until fully combined.
Next, add the pumpkin puree, pumpkin pie spice, and cinnamon to the mixture. Whisk these ingredients together until they’re well incorporated. The spices will fill your kitchen with a wonderful aroma, reminiscent of fall.
Now, it’s time to add the dry ingredients. Gently fold in the all-purpose flour and a pinch of salt until just combined. Be cautious not to overmix; you want a tender texture.
Pour the batter into your prepared baking pan, smoothing the top with a spatula for an even bake. This step is important for achieving that characteristic fudgy texture. The batter should be thick and luscious, promising a delightful treat.
Bake the bars in your preheated oven for about 30 minutes, or until a toothpick inserted into the center comes out mostly clean. You might want to check at around 25 minutes to ensure they don’t overbake. The edges should look set, with a slight jiggle in the center.
While the bars are baking, prepare the glaze. In a small saucepan, melt another ¼ cup of unsalted butter over medium-high heat. Watch closely as it turns a deep amber color, which takes about 5 minutes. The butter should bubble and foam; stir occasionally to monitor the browning process. This nutty aroma is what you’re aiming for!
Once browned, immediately transfer the butter, including the flavorful brown bits, to a mixing bowl. Add the confectioners’ sugar, vanilla bean paste, and a pinch of salt. Slowly mix in the cream or milk until the glaze reaches your desired consistency. It should be smooth and pourable.
After your bars have cooled for about 10 minutes, pour the glaze over them while they’re still warm. Use a spatula to spread it evenly, allowing it to flow into every nook and cranny. Let the bars cool completely in the pan, uncovered, for at least 2 to 3 hours, or overnight if you can resist the temptation!
Things Worth Knowing
- Use quality ingredients: High-quality pumpkin puree and white chocolate can significantly enhance the flavor of your bars.
- Don’t rush the browning: Take your time when browning butter to develop its rich, nutty flavor. It can go from perfect to burnt quickly.
- Cooling is crucial: Allowing the bars to cool completely ensures that they set appropriately and the glaze adheres nicely.
- Watch the baking time: Ovens vary, so start checking your bars a few minutes earlier to prevent overbaking.
How to Switch It Up

There are plenty of ways to customize your Fudgy Pumpkin Bars to suit your taste or occasion. Here are some fun variations you can try!
- Add nuts: Chopped pecans or walnuts can add a nice crunch to the fudgy texture.
- Incorporate chocolate: Swirl in some chocolate chips or chunks for extra decadence.
- Spice it up: Enhance the spice profile by adding a touch more cinnamon or a pinch of nutmeg for warmth.
- Different toppings: Try a cream cheese frosting instead of glaze for a tangy twist.
- Make it gluten-free: Substitute all-purpose flour with a gluten-free blend for a gluten-free version.
- Experiment with flavors: Add a splash of orange or maple syrup for a unique twist.
Best Served With
Fudgy Pumpkin Bars make an excellent centerpiece for any fall gathering or cozy night in. Here are some lovely ideas on how to serve them:- With a hot beverage: Pair your bars with a warm cup of coffee, tea, or spiced cider, perfect for autumn.
- At festive gatherings: They are ideal for Thanksgiving desserts or fall celebrations, bringing joy to the table.
- With ice cream: Serve warm bars with a scoop of vanilla or caramel ice cream for a decadent dessert.
- For brunch: They make a delightful addition to a brunch spread, alongside muffins and pastries.
- As a snack: These bars are perfect for an afternoon pick-me-up or a sweet treat in lunchboxes.
- Seasonal decorations: Serve them on a platter with autumn leaves or pumpkins to celebrate the season.
FAQ
Conclusion
In conclusion, these Fudgy Pumpkin Bars are a delightful treat that combines the rich flavors of pumpkin and spices, topped with a decadent glaze. They’re perfect for sharing with loved ones or enjoying on a quiet evening at home. I encourage you to try this recipe; your taste buds will thank you!
Fudgy Pumpkin Bars
Ingredients
Equipment
Method
- Preheat your oven to 350°F (175°C). This initial step ensures that your Fudgy Pumpkin Bars bake evenly. While the oven heats, line an 8-by-8-inch baking pan with aluminum foil and spray it with cooking spray to prevent sticking. This preparation is crucial for easy removal later on.
- In a large, microwave-safe bowl, combine the white chocolate chips and unsalted butter. Heat the mixture in the microwave for about 2 minutes on high power. Be sure to stir after the first minute, then continue heating in 20-second intervals, stirring frequently. The goal is to achieve a smooth consistency without scorching the chocolate, which can happen easily.
- Once melted, let the mixture cool slightly before adding the egg. This step is essential to avoid scrambling the egg. After allowing it to cool for a moment, whisk in the egg, granulated sugar, and vanilla extract until fully combined.
- Next, add the pumpkin puree, pumpkin pie spice, and cinnamon to the mixture. Whisk these ingredients together until they're well incorporated. The spices will fill your kitchen with a wonderful aroma, reminiscent of fall.
- Now, it's time to add the dry ingredients. Gently fold in the all-purpose flour and a pinch of salt until just combined. Be cautious not to overmix; you want a tender texture.
- Pour the batter into your prepared baking pan, smoothing the top with a spatula for an even bake. This step is important for achieving that characteristic fudgy texture. The batter should be thick and luscious, promising a delightful treat.
- Bake the bars in your preheated oven for about 30 minutes, or until a toothpick inserted into the center comes out mostly clean. You might want to check at around 25 minutes to ensure they don’t overbake. The edges should look set, with a slight jiggle in the center.
- While the bars are baking, prepare the glaze. In a small saucepan, melt another ¼ cup of unsalted butter over medium-high heat. Watch closely as it turns a deep amber color, which takes about 5 minutes. The butter should bubble and foam; stir occasionally to monitor the browning process. This nutty aroma is what you're aiming for!
- Once browned, immediately transfer the butter, including the flavorful brown bits, to a mixing bowl. Add the confectioners’ sugar, vanilla bean paste, and a pinch of salt. Slowly mix in the cream or milk until the glaze reaches your desired consistency. It should be smooth and pourable.
- After your bars have cooled for about 10 minutes, pour the glaze over them while they're still warm. Use a spatula to spread it evenly, allowing it to flow into every nook and cranny. Let the bars cool completely in the pan, uncovered, for at least 2 to 3 hours, or overnight if you can resist the temptation!
Notes
- Storage: Bars will keep airtight at room temperature for up to 1 week, or in the freezer for up to 6 months.