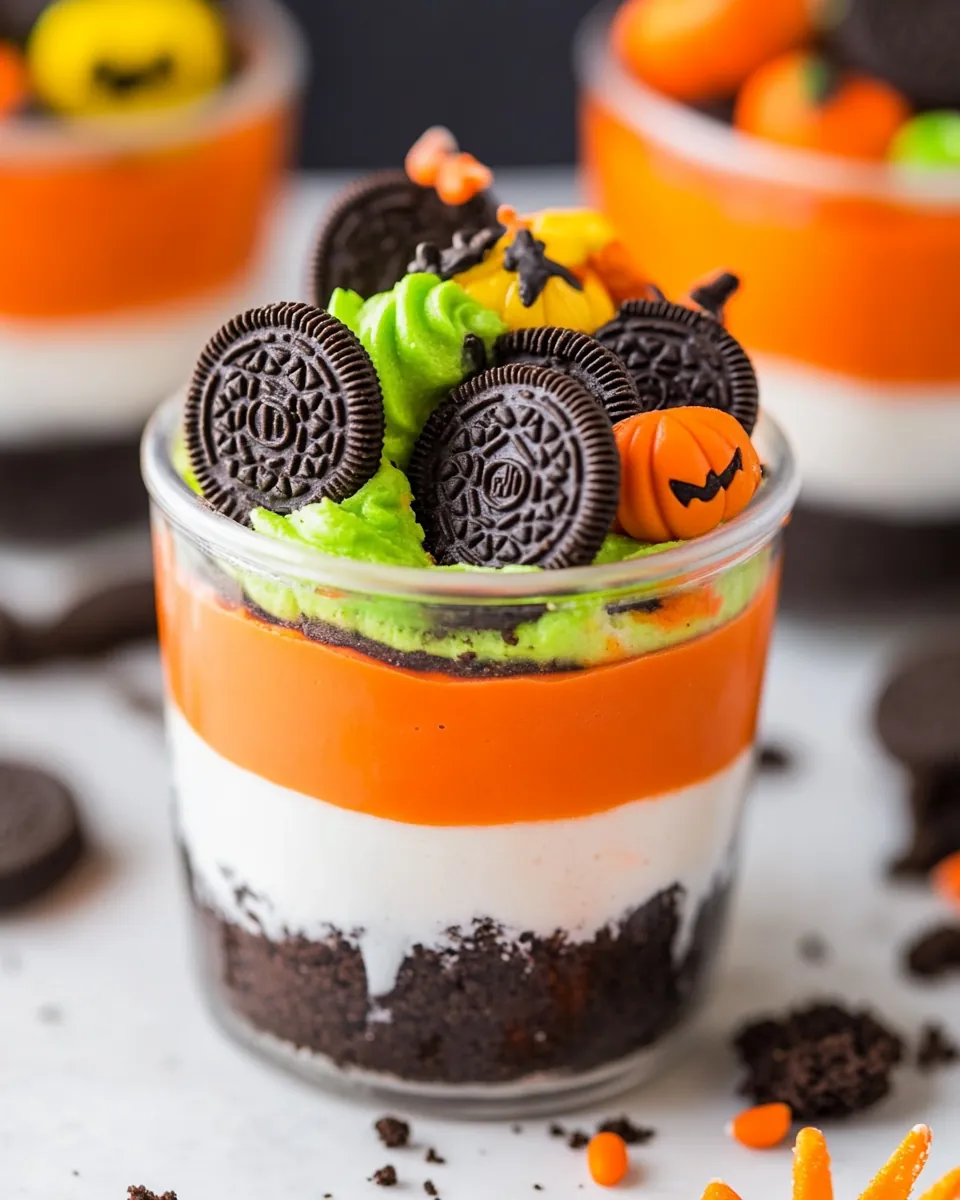
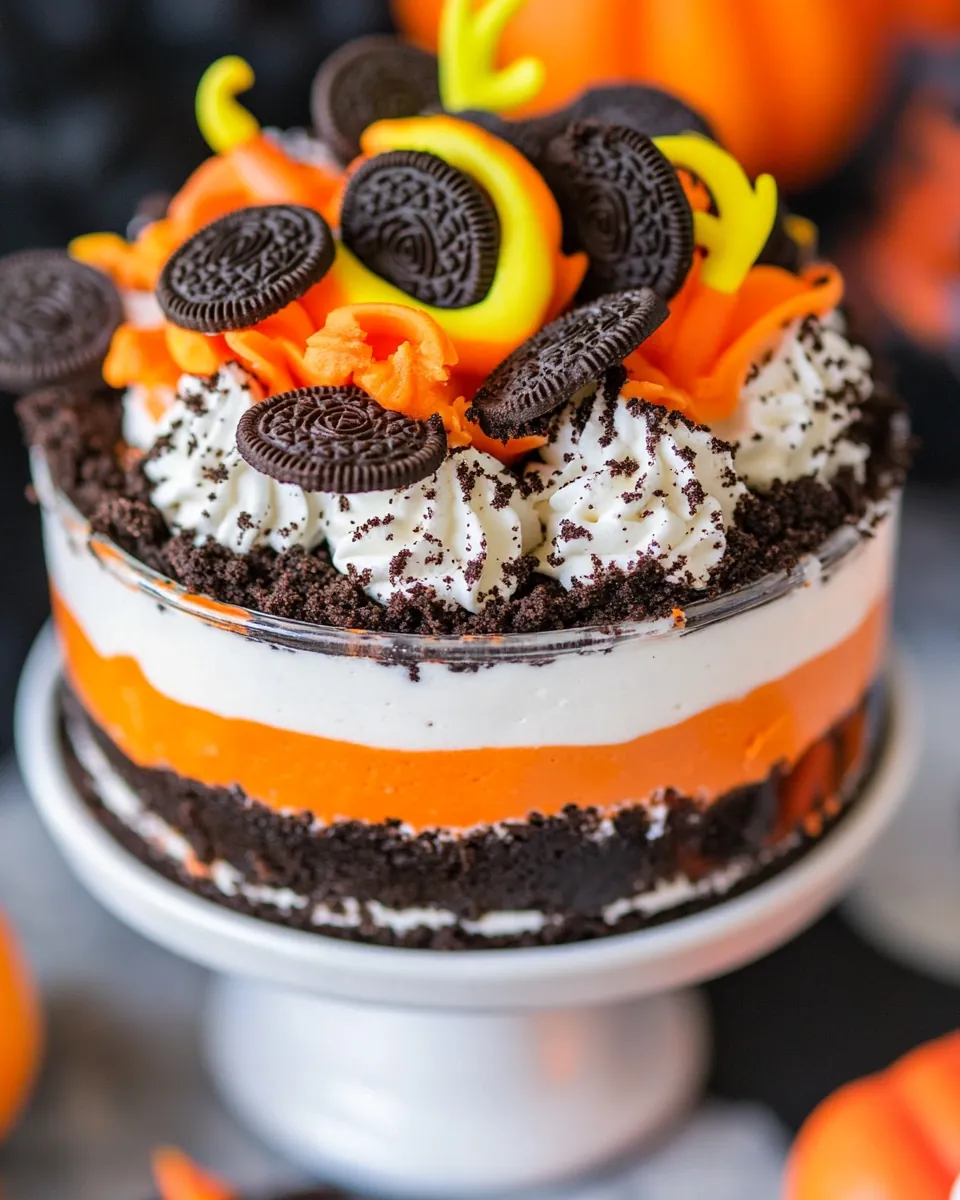
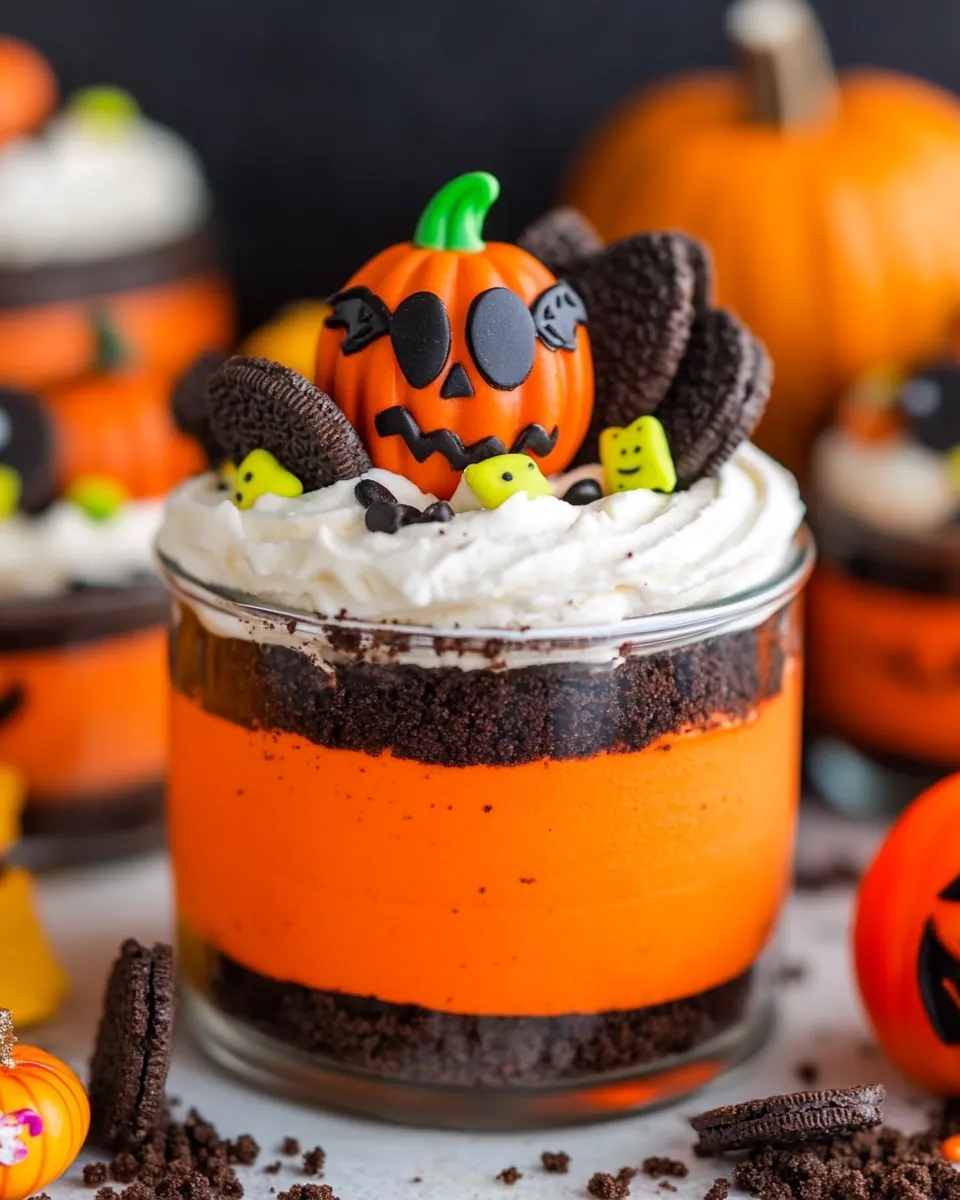
Halloween Oreo Dirt Cake
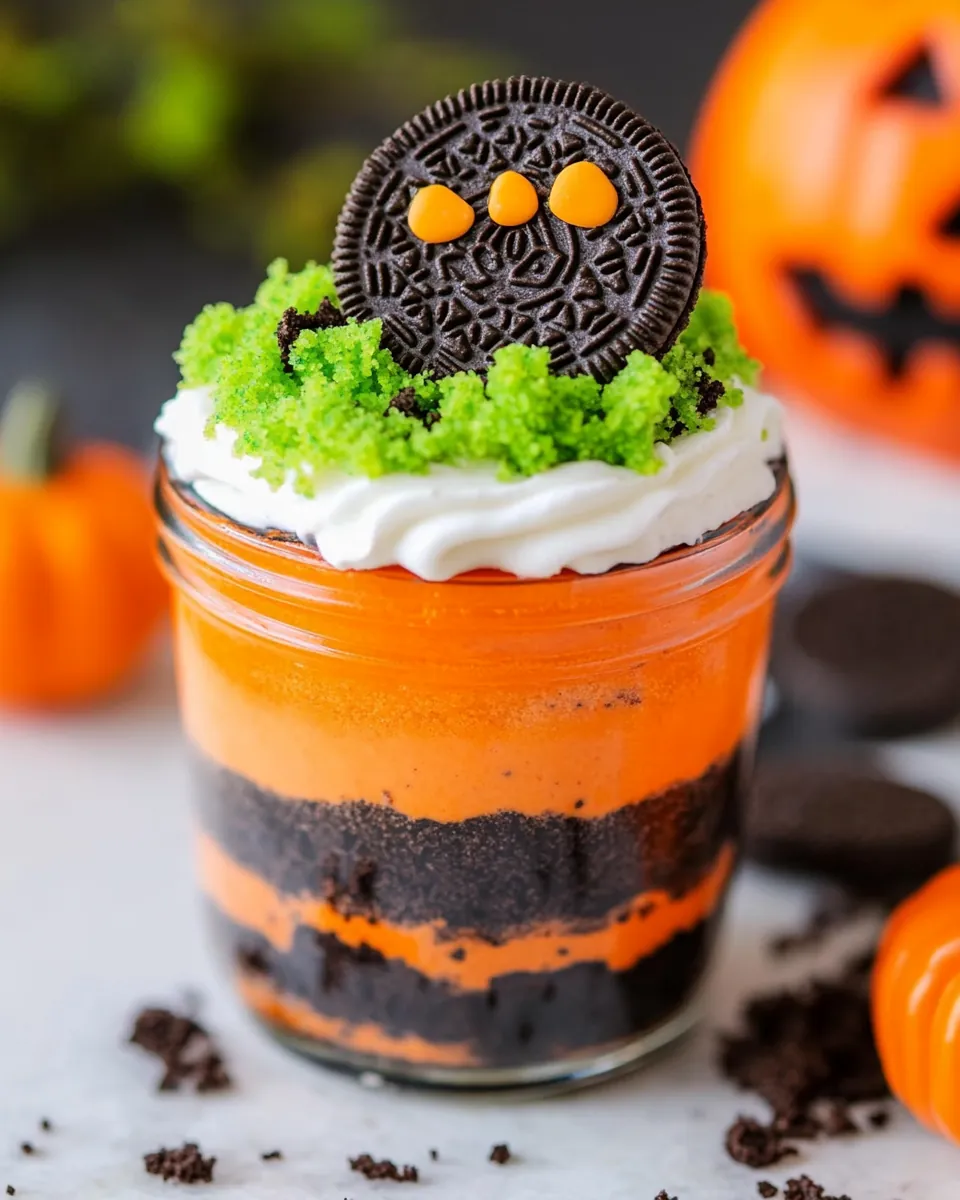
There’s something truly magical about Halloween, and what better way to celebrate than with a fun and spooky dessert? Every year, I look forward to making Halloween Oreo Dirt Cake for my family and friends. With its rich layers of creamy goodness and crunchy surprises, this dessert is always a showstopper at any gathering. The vibrant orange color, reminiscent of autumn leaves, and the crunchy Oreo crumbles make it visually appealing and deliciously nostalgic. I remember the first time I made it; the excitement in the room was palpable as the kids eagerly awaited the first bite. It’s a tradition that’s quickly become one of my favorites, and I love how it never fails to bring smiles to everyone’s faces.
Recipe Snapshot
20 mins
20 mins
0 mins
Medium
320 kcal
3 g
Gluten-Free, Low FODMAP
18 g
Food Processor, Mixing Bowl, Whisk, Wooden Spoon
What’s Great About This Halloween Oreo Dirt Cake
1. It’s a Crowd-Pleaser
One of the best things about Halloween Oreo Dirt Cake is that it caters to all ages. Kids and adults alike can’t resist the pull of this creamy, chocolatey dessert. It’s always a hit at parties, making it a fantastic choice for Halloween celebrations.
2. Easy to Prepare
You don’t need to be a master baker to whip up this dessert. The steps are straightforward, making it a fun activity to involve the kids or whip together on a busy day. Just gather your ingredients and let the magic happen!
3. Customizable
The Halloween Oreo Dirt Cake is also highly customizable. Want to add some green for a spooky effect? Go ahead! You can easily adjust the colors or even the flavors to make it unique to your gathering.
4. Make Ahead Option
This dessert can be prepped the day before, which is perfect for busy schedules. I often find that it tastes even better after chilling overnight, allowing the flavors to meld beautifully.
5. Perfect for All Occasions
While it shines during Halloween, you can adapt this dessert to fit any occasion. Change the colors for holidays or special events, and it will always be a delightful treat.
Halloween Oreo Dirt Cake Ingredients
Creating a delicious Halloween Oreo Dirt Cake begins with selecting the right ingredients. This dish relies on a few key components that work harmoniously to create a creamy and crunchy texture. The star of the show, of course, is the Halloween Oreos, which provide that iconic chocolatey flavor and a delightful crunch. Each ingredient contributes to making this dessert a festive and fun experience.
- 1 – 1 ½ packages Halloween Oreos (20 oz.): These iconic cookies are essential for creating the base and topping of the cake. Their rich chocolate flavor adds depth.
- 2 packages instant vanilla pudding (3.4 oz.): This adds creaminess and a lovely vanilla flavor to balance the chocolate.
- 3 1/4 cups milk: The liquid that brings the pudding to life, creating the perfect texture.
- 1/2 cup butter (softened): Adds richness and helps bind everything together.
- 8 oz. cream cheese (softened): This ingredient adds a delightful tanginess and creaminess that elevates the flavor.
- 1 cup powdered sugar: For sweetness and to help stabilize the cream cheese mixture.
- 1 tsp vanilla extract: A splash of this brings out all the other flavors beautifully.
- 8 oz. Cool Whip (thawed): This lightens up the mixture and makes it fluffy.
- Orange food coloring: To give the dessert that iconic Halloween color.
- Halloween sprinkles: For decoration and to add a festive touch.
Step by Step Guide for Halloween Oreo Dirt Cake
Making the Halloween Oreo Dirt Cake is a fun process that will have you excited from start to finish. You’ll be mixing, layering, and decorating your way to a spooky delight. Let’s dive into the steps to create this incredible dessert!
Begin by taking about three-quarters of the Halloween Oreos and placing them into a food processor. Pulse them until they resemble fine crumbs, similar to the texture of sand. Transfer these crumbs into a medium bowl.
Add the remaining Oreos into the food processor. Pulse them gently until they break into smaller chunks, not as fine as the first batch. Combine these with the fine crumbs in the bowl and set aside.
In a separate bowl, whisk together the milk and the two packages of instant vanilla pudding. Whisk vigorously for around two minutes until the mixture becomes smooth and thick. Once mixed, place it in the refrigerator to chill for about five minutes.
While the pudding chills, bring out an electric mixer. In a large mixing bowl, combine the softened cream cheese, butter, and powdered sugar. Beat them together until the mixture turns smooth and creamy. This step is crucial as it forms the base of the pudding mixture.
After the pudding has chilled, add it to the cream cheese mixture. Beat everything together until fully combined, ensuring the textures blend perfectly.
Next, gently fold in the Cool Whip and orange food coloring. Be careful not to deflate the mixture; you want it to remain light and fluffy. Continue to fold until the color is evenly distributed throughout the mixture. If you desire a more vibrant orange, feel free to add more food coloring.
Now it’s time to layer the dessert! Start with one-third of the crushed Oreos at the bottom of a trifle bowl or a large glass dish. Spread them out evenly to create a solid base.
Using a ladle, pour half of the orange pudding mixture over the Oreos. Gently spread it to ensure even coverage. This layer should be smooth and inviting.
Repeat the process by adding another third of the crushed Oreos on top of the pudding layer, followed by the remaining orange pudding mixture. Spread it evenly, ensuring you reach all edges.
Finish the layers with the remaining crushed Oreos as the topping. Spread them generously to create a delightful crunch.
Finally, decorate your cake with Halloween sprinkles, candies, or any other desired toppings. If you’re adding gummy candies, wait until just before serving to place them on top for the best texture.
For optimal flavor and texture, cover the dessert and chill it in the refrigerator for at least two hours, although it can be kept up to twenty-four hours if needed. When you’re ready to serve, enjoy the delighted faces as you unveil your Halloween Oreo Dirt Cake!
Things Worth Knowing
- Chill Time: Allowing the cake to chill for a couple of hours helps the flavors meld and enhances the texture.
- Layering Technique: Ensure that each layer is evenly spread to give a beautiful presentation when sliced.
- Color Variation: Feel free to experiment with colors for different occasions, adapting the cake for birthdays or holidays.
- Serving Size: Cutting into the cake can be messy; use a sharp knife to get clean slices.
Tips for Success
To ensure your Halloween Oreo Dirt Cake turns out perfectly every time, here are some essential tips:
- Storage: Store leftovers in an airtight container in the refrigerator for up to five days.
- Freezing: This dessert isn’t ideal for freezing due to the whipped topping’s texture; it’s best enjoyed fresh.
- Serving Temperature: Let the dessert sit at room temperature for a few minutes before serving to soften it slightly.
- Mixing Thoroughness: Make sure to mix the pudding and cream cheese mixture well to avoid lumps.
- Garnishes: Get creative with garnishes; add themed decorations that reflect the season or festivities.
Perfect Matches for Halloween Oreo Dirt Cake
When it comes to serving Halloween Oreo Dirt Cake, the options are plentiful. Here’s how to make the most of this delightful dessert:
- Pair with Fall Beverages: Enjoy your dessert with warm apple cider or pumpkin spice lattes to enhance the seasonal vibe.
- Perfect for Parties: This cake is a hit at Halloween parties, potlucks, or any themed gatherings where you want to impress.
- Serve as a Snack: It makes for a fun after-school snack for kids, providing a sweet treat to break up their day.
- Storage Tips: Keep any leftovers covered in the fridge. Serve within five days for the best taste.
- Fun for Kids: Let the kids help with the decoration part, allowing them to sprinkle on the Halloween sprinkles for added fun.
FAQ
Conclusion
The Halloween Oreo Dirt Cake is a treat that captures the spirit of the holiday with its delicious flavors and vibrant presentation. It’s easy to make and always a favorite among guests, making it a perfect addition to your Halloween festivities. I encourage you to give it a try this season and share the joy it brings!
Halloween Oreo Dirt Cake
Ingredients
Equipment
Method
- Begin by taking about three-quarters of the Halloween Oreos and placing them into a food processor. Pulse them until they resemble fine crumbs, similar to the texture of sand. Transfer these crumbs into a medium bowl.
- Add the remaining Oreos into the food processor. Pulse them gently until they break into smaller chunks, not as fine as the first batch. Combine these with the fine crumbs in the bowl and set aside.
- In a separate bowl, whisk together the milk and the two packages of instant vanilla pudding. Whisk vigorously for around two minutes until the mixture becomes smooth and thick. Once mixed, place it in the refrigerator to chill for about five minutes.
- While the pudding chills, bring out an electric mixer. In a large mixing bowl, combine the softened cream cheese, butter, and powdered sugar. Beat them together until the mixture turns smooth and creamy. This step is crucial as it forms the base of the pudding mixture.
- After the pudding has chilled, add it to the cream cheese mixture. Beat everything together until fully combined, ensuring the textures blend perfectly.
- Next, gently fold in the Cool Whip and orange food coloring. Be careful not to deflate the mixture; you want it to remain light and fluffy. Continue to fold until the color is evenly distributed throughout the mixture. If you desire a more vibrant orange, feel free to add more food coloring.
- Now it’s time to layer the dessert! Start with one-third of the crushed Oreos at the bottom of a trifle bowl or a large glass dish. Spread them out evenly to create a solid base.
- Using a ladle, pour half of the orange pudding mixture over the Oreos. Gently spread it to ensure even coverage. This layer should be smooth and inviting.
- Repeat the process by adding another third of the crushed Oreos on top of the pudding layer, followed by the remaining orange pudding mixture. Spread it evenly, ensuring you reach all edges.
- Finish the layers with the remaining crushed Oreos as the topping. Spread them generously to create a delightful crunch.
- Finally, decorate your cake with Halloween sprinkles, candies, or any other desired toppings. If you're adding gummy candies, wait until just before serving to place them on top for the best texture.
- For optimal flavor and texture, cover the dessert and chill it in the refrigerator for at least two hours, although it can be kept up to twenty-four hours if needed. When you’re ready to serve, enjoy the delighted faces as you unveil your Halloween Oreo Dirt Cake!
Notes
- Tip 1: You can prep this Halloween Oreo Dirt Cake 24 hours before serving. It’s better after chilling overnight.
- Tip 2: Adjust the colors to fit your favorite theme. For Christmas, try red and green!
- Tip 3: Regular Oreos work if you can't find the holiday ones.
- Tip 4: Adding orange food coloring is optional, but it adds a lovely touch!