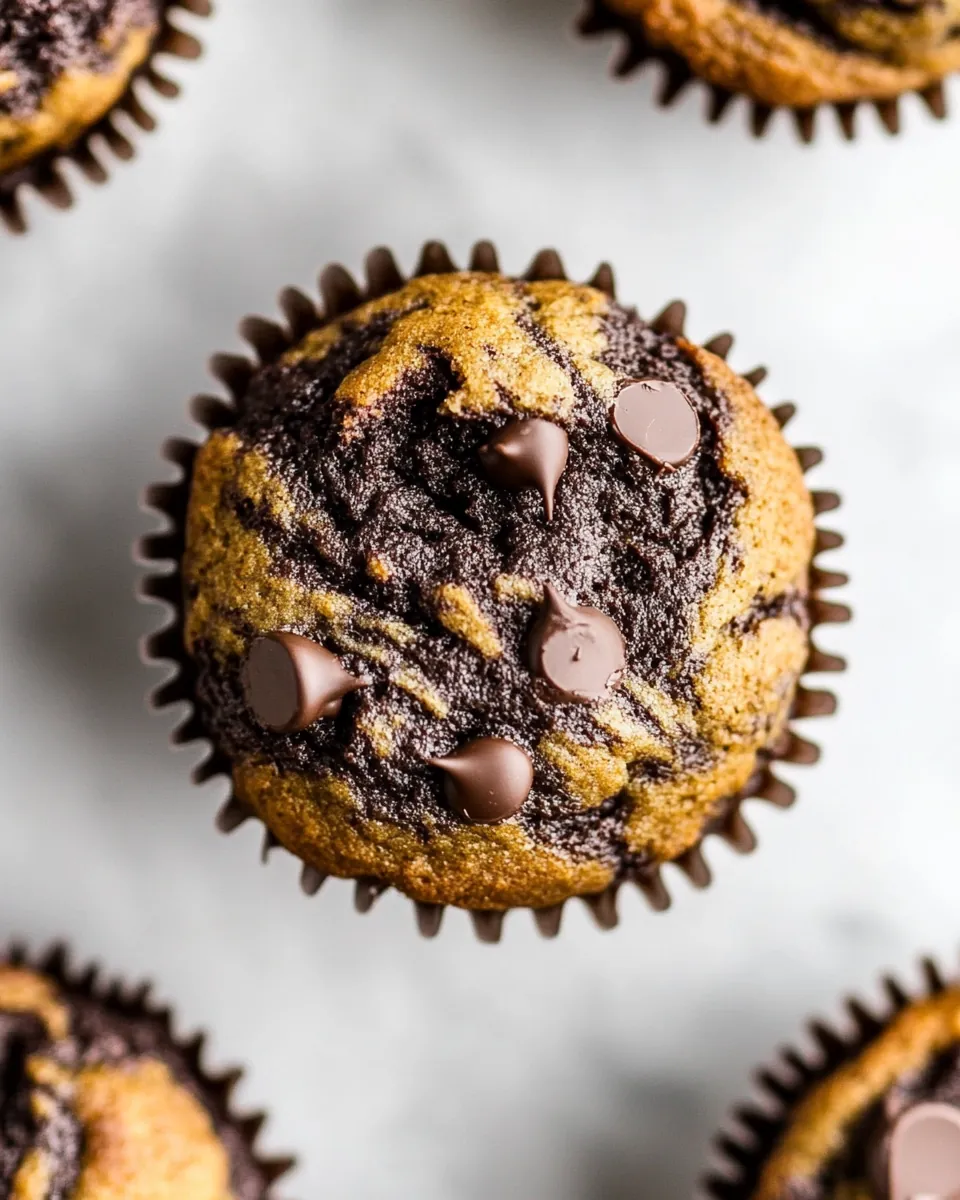
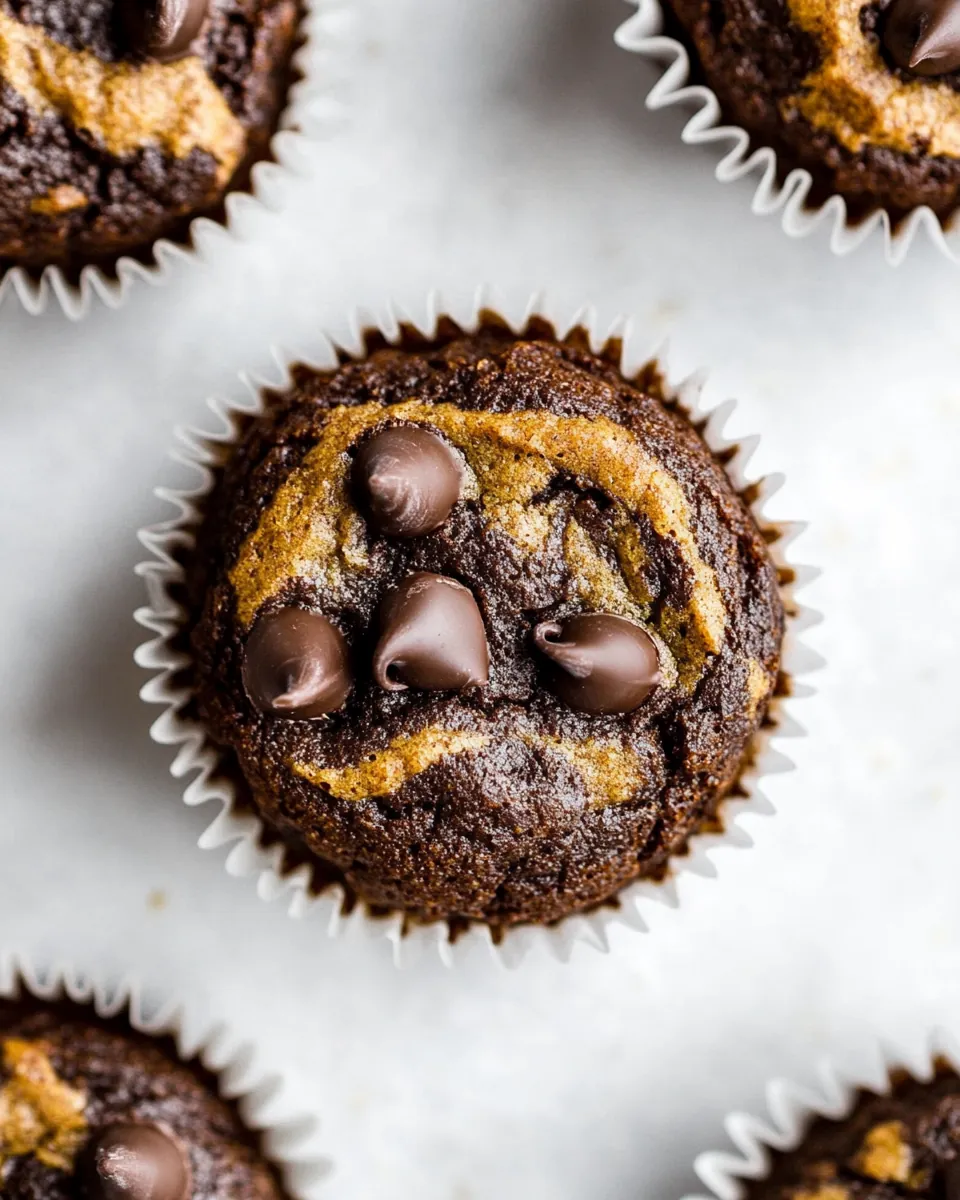
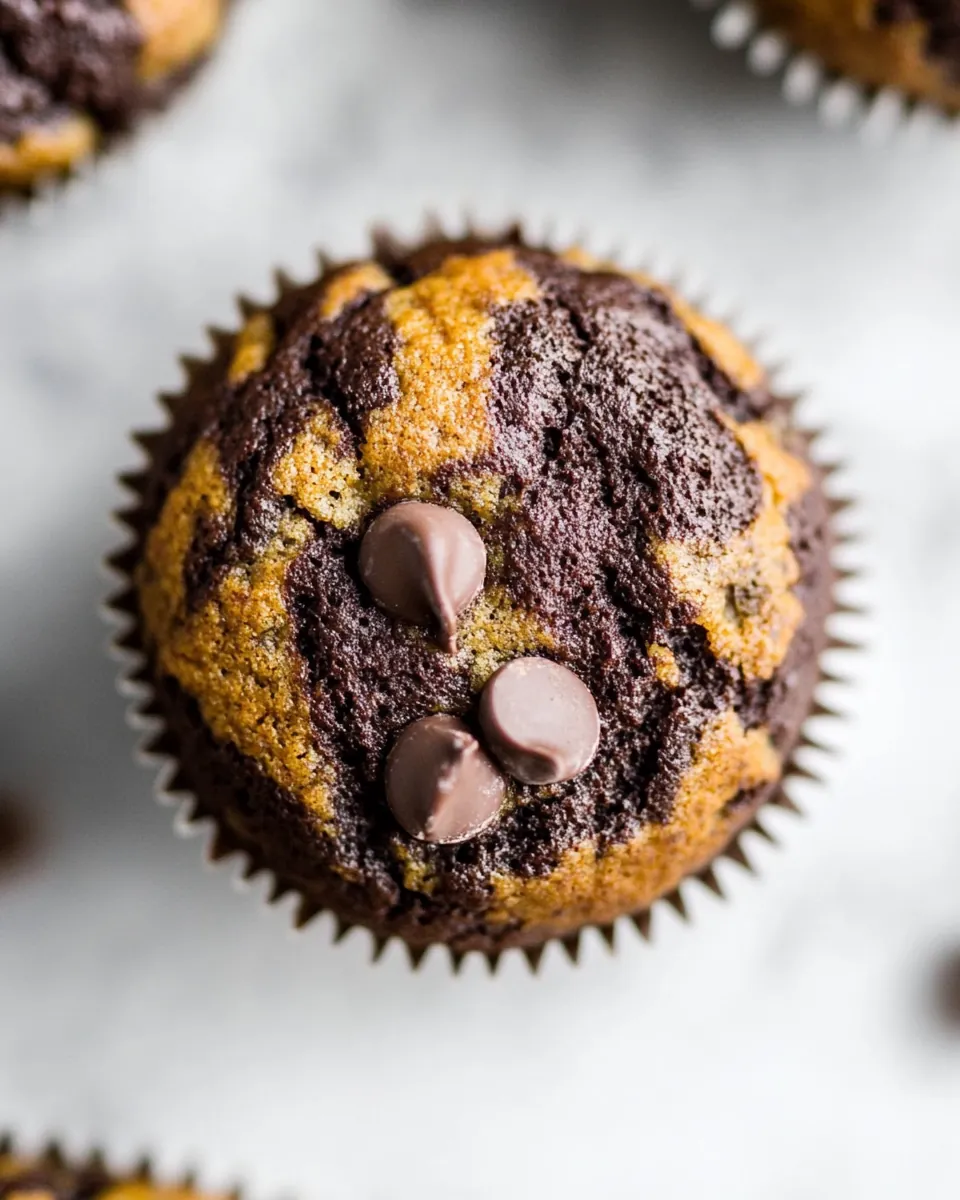
Healthy Marbled Chocolate Pumpkin Muffins
There’s something about a cool fall morning that beckons for a sweet treat, and that’s where my Healthy Marbled Chocolate Pumpkin Muffins come into play. As the leaves begin to change, I find myself craving the rich, warm flavors of pumpkin and chocolate. These muffins are not just delicious; they’re a perfect blend of healthy ingredients that make them an ideal snack or breakfast option. I remember the first time I baked these; the kitchen filled with an irresistible aroma of cinnamon and nutmeg. It was a delightful chaos of mixing batters and swirling them together. The moment my family took their first bites, I knew I had created something truly special. Each muffin is a little piece of fall, a celebration of flavors that brings warmth and comfort. So grab your mixing bowls and let’s dive into this scrumptious recipe!
Recipe Snapshot
35 mins
15 mins
20 mins
Medium
150 kcal
3 g
Standard
7 g
Oven, Baking Sheet, Frying Pan, Wooden Spoon, Whisk, Mixing Bowl
Why This Healthy Marbled Chocolate Pumpkin Muffins Shines
Perfect for Fall
These muffins are the ultimate treat for the fall season. The combination of pumpkin and chocolate captures the essence of autumn, making them perfect for cozy gatherings or just to enjoy at home. Every bite feels like a warm hug!
Healthier Indulgence
Unlike traditional muffins, my Healthy Marbled Chocolate Pumpkin Muffins are made with whole food ingredients that add nutritional value. The use of whole wheat pastry flour and natural sweeteners like maple syrup means you can indulge without the guilt. It’s a wonderful way to treat yourself while still being mindful of your health.
Versatile Recipe
This recipe is incredibly versatile. Whether you’re making them for a brunch, as an afternoon snack, or even as a dessert, they fit the bill perfectly. Plus, they can easily be transformed into a loaf if you’re in the mood for something different!
Kid-Friendly
Kids love these muffins! The marbling of pumpkin and chocolate is visually appealing, and they’re a sneaky way to get some veggies into their diet. They’re perfect for lunch boxes or as an after-school snack.
Easy to Make
If you’re looking for a hassle-free recipe, this is it. The steps are simple and straightforward, making it easy for even novice bakers to whip up a batch in no time!
Great for Meal Prep
These muffins store beautifully, so you can make a large batch ahead of time. They freeze well too, which means you can always have a healthy snack ready to go. Just pop them in the microwave or let them thaw at room temperature, and they’re good to go!
What Goes Into Healthy Marbled Chocolate Pumpkin Muffins

The ingredients for these muffins are as wholesome as they are delicious. Each element plays a crucial role in creating the perfect blend of flavors and textures. The star of the dish is the pumpkin puree, which not only adds a delightful moisture but also a subtle sweetness. Pairing it with maple syrup provides a natural sweetness that complements the rich cocoa powder, resulting in a marbled effect that’s as pleasing to the eyes as it is to the palate. Let’s take a closer look at what you’ll need:
- 1 cup pumpkin puree: Adds moisture and a healthy touch.
- ½ cup maple syrup: A natural sweetener that enhances the flavor.
- 2 large eggs: For binding and richness.
- ¼ cup unsweetened almond milk: Keeps the batter moist.
- 1 teaspoon vanilla extract: Adds depth of flavor.
- 1 ½ cups whole wheat pastry flour: Gives structure while keeping it light.
- 1 teaspoon baking soda: Helps the muffins rise.
- 1 teaspoon cinnamon: Adds warmth and spice.
- ½ teaspoon nutmeg: Enhances the fall flavor profile.
- ½ teaspoon ground ginger: For a hint of spice.
- ¼ teaspoon allspice: Complements the other spices beautifully.
- ½ teaspoon salt: Balances the sweetness.
- ¼ cup coconut oil: Adds moisture and richness.
- ¼ cup unsweetened cocoa powder: For that chocolatey goodness.
- ½ cup chocolate chips, divided: For bursts of chocolate in every bite.
Recipe Directions for Healthy Marbled Chocolate Pumpkin Muffins
Making these muffins is a joyful process that fills your kitchen with delightful aromas. Follow my steps carefully for the best results, and don’t forget to admire the beautiful marbling that makes these muffins truly special.
Preheat your oven to 350 degrees F. This is an essential step to ensure your muffins rise properly. While the oven is heating, line a 12-cup muffin tin with liners and spray the inside of the liners with nonstick cooking spray to prevent sticking.
In a large mixing bowl, combine pumpkin puree, maple syrup, eggs, almond milk, and vanilla extract. Mix them together until you have a smooth and creamy texture. This mixture is your wet ingredients, and it should smell wonderfully fragrant already!
In a separate large bowl, whisk together the dry ingredients: whole wheat pastry flour, baking soda, cinnamon, nutmeg, ginger, allspice, and salt. Whisking well is important to ensure that the leavening agent is evenly distributed throughout the flour.
Once combined, add the dry ingredients to the wet ingredients and mix until just combined. Be careful not to overmix; a few lumps are perfectly fine! Next, gently stir in the melted coconut oil, which adds richness to your muffins.
Now, divide the batter in half. Transfer half of the batter to a separate medium bowl. In this bowl, stir in the cocoa powder and ¼ cup of chocolate chips. Mix until just combined, creating your chocolate batter.
Take your prepared muffin tin and start by spooning less than 1 tablespoon of the pumpkin batter into each muffin liner. Then, add 1 tablespoon of the chocolate batter on top of the pumpkin batter. Repeat this process until all of your batter is used. The goal is to create lovely layers!
With a knife, gently swirl the batters together about 3 to 4 times to create a marbled effect. Don’t overdo it; you want to maintain that beautiful swirled look!
Give your muffin pan a gentle shake back and forth to even out the batter in each cup. Then, sprinkle the remaining chocolate chips on top of the batter for extra chocolatey goodness.
Pop the muffin tin into the oven and bake for 20 to 25 minutes. Keep an eye on them; I find that 22 minutes usually does the trick! They’re done when a tester inserted into the center comes out clean.
Once baked, allow the muffins to cool in the pan for 10 minutes before transferring them to a wire rack. This allows them to firm up nicely before you dig in!
Things Worth Knowing
- Mixing Technique: Be careful not to overmix your batter. Overmixing can lead to dense muffins instead of light and fluffy ones.
- Swirling: When swirling the batters, a few gentle strokes are all you need. The more you mix, the less defined your marbling will be.
- Cooling: Allowing muffins to cool in the pan for a few minutes helps them set and makes them easier to remove without sticking.
- Testing Doneness: Use a toothpick to check for doneness. If it comes out clean, your muffins are ready!
Customization Ideas
If you’re looking to make these muffins your own, there are plenty of ways to customize them to suit your taste. These ideas will help you add your own flair!
- Storage: After they’ve cooled completely, store the muffins in an airtight container at room temperature for up to 3 days. For longer storage, refrigerate them for up to a week.
- Freezing: These muffins freeze beautifully! Place them in a zip-top bag, and they can last for up to 3 months. Just thaw at room temperature or microwave them for a quick snack.
- Flavor Variations: Try adding chopped nuts, dried fruits, or even seeds for added texture and flavor.
- Gluten-Free Option: Substitute the whole wheat pastry flour with a gluten-free flour blend to make these muffins gluten-free.
- Vegan Adaptation: Replace the eggs with flax eggs for a vegan-friendly version. Use plant-based milk as needed.
- Extra Chocolate: If you’re a chocolate lover, increase the amount of cocoa powder or add mini chocolate chips to the batter.
Side Dish Ideas for Healthy Marbled Chocolate Pumpkin Muffins
Serving these muffins can be as creative as making them! Here are some delightful ideas for enjoying your Healthy Marbled Chocolate Pumpkin Muffins.
- Breakfast Delight: Pair these muffins with a warm cup of tea or coffee. They make for a perfect breakfast option that’s both satisfying and nutritious.
- Brunch Option: Serve them alongside a fruit salad or yogurt for a well-rounded brunch spread. They pair wonderfully with the freshness of fruits.
- Lunch Box Treat: These muffins are a great addition to kids’ lunchboxes. They’re nutritious enough to be a snack or dessert option.
- Hosting a Gathering: If you’re having friends over, serve these muffins on a platter with a variety of dips like nut butter or cream cheese for a fun twist.
- Seasonal Celebrations: Perfect for Thanksgiving, these muffins can be a delightful treat at your holiday table, perhaps even enjoyed warm!
- Easy Dessert: Drizzle with a bit of melted chocolate or serve with a scoop of vanilla ice cream for a simple yet delicious dessert option.
FAQ
Conclusion
The Healthy Marbled Chocolate Pumpkin Muffins truly encapsulate the essence of fall with their delightful flavors and moist texture. They’re not only delicious but also packed with wholesome ingredients that make them a guilt-free indulgence. I encourage you to give this recipe a try; your taste buds will thank you, and you’ll find yourself reaching for these muffins time and time again!
Healthy Marbled Chocolate Pumpkin Muffins
Ingredients
Equipment
Method
- Preheat your oven to 350 degrees F. This is an essential step to ensure your muffins rise properly. While the oven is heating, line a 12-cup muffin tin with liners and spray the inside of the liners with nonstick cooking spray to prevent sticking.
- In a large mixing bowl, combine pumpkin puree, maple syrup, eggs, almond milk, and vanilla extract. Mix them together until you have a smooth and creamy texture. This mixture is your wet ingredients, and it should smell wonderfully fragrant already!
- In a separate large bowl, whisk together the dry ingredients: whole wheat pastry flour, baking soda, cinnamon, nutmeg, ginger, allspice, and salt. Whisking well is important to ensure that the leavening agent is evenly distributed throughout the flour.
- Once combined, add the dry ingredients to the wet ingredients and mix until just combined. Be careful not to overmix; a few lumps are perfectly fine! Next, gently stir in the melted coconut oil, which adds richness to your muffins.
- Now, divide the batter in half. Transfer half of the batter to a separate medium bowl. In this bowl, stir in the cocoa powder and ¼ cup of chocolate chips. Mix until just combined, creating your chocolate batter.
- Take your prepared muffin tin and start by spooning less than 1 tablespoon of the pumpkin batter into each muffin liner. Then, add 1 tablespoon of the chocolate batter on top of the pumpkin batter. Repeat this process until all of your batter is used. The goal is to create lovely layers!
- With a knife, gently swirl the batters together about 3 to 4 times to create a marbled effect. Don’t overdo it; you want to maintain that beautiful swirled look!
- Give your muffin pan a gentle shake back and forth to even out the batter in each cup. Then, sprinkle the remaining chocolate chips on top of the batter for extra chocolatey goodness.
- Pop the muffin tin into the oven and bake for 20 to 25 minutes. Keep an eye on them; I find that 22 minutes usually does the trick! They’re done when a tester inserted into the center comes out clean.
- Once baked, allow the muffins to cool in the pan for 10 minutes before transferring them to a wire rack. This allows them to firm up nicely before you dig in!
Notes
- Tip 1: Feel free to make this recipe into bread! Just layer the batter in a greased 8x4 inch loaf pan. Bake for 45-55 minutes or until tester comes out clean.
- Tip 2: To make gluten free: I suggest using a 1:1 gluten free all purpose flour.