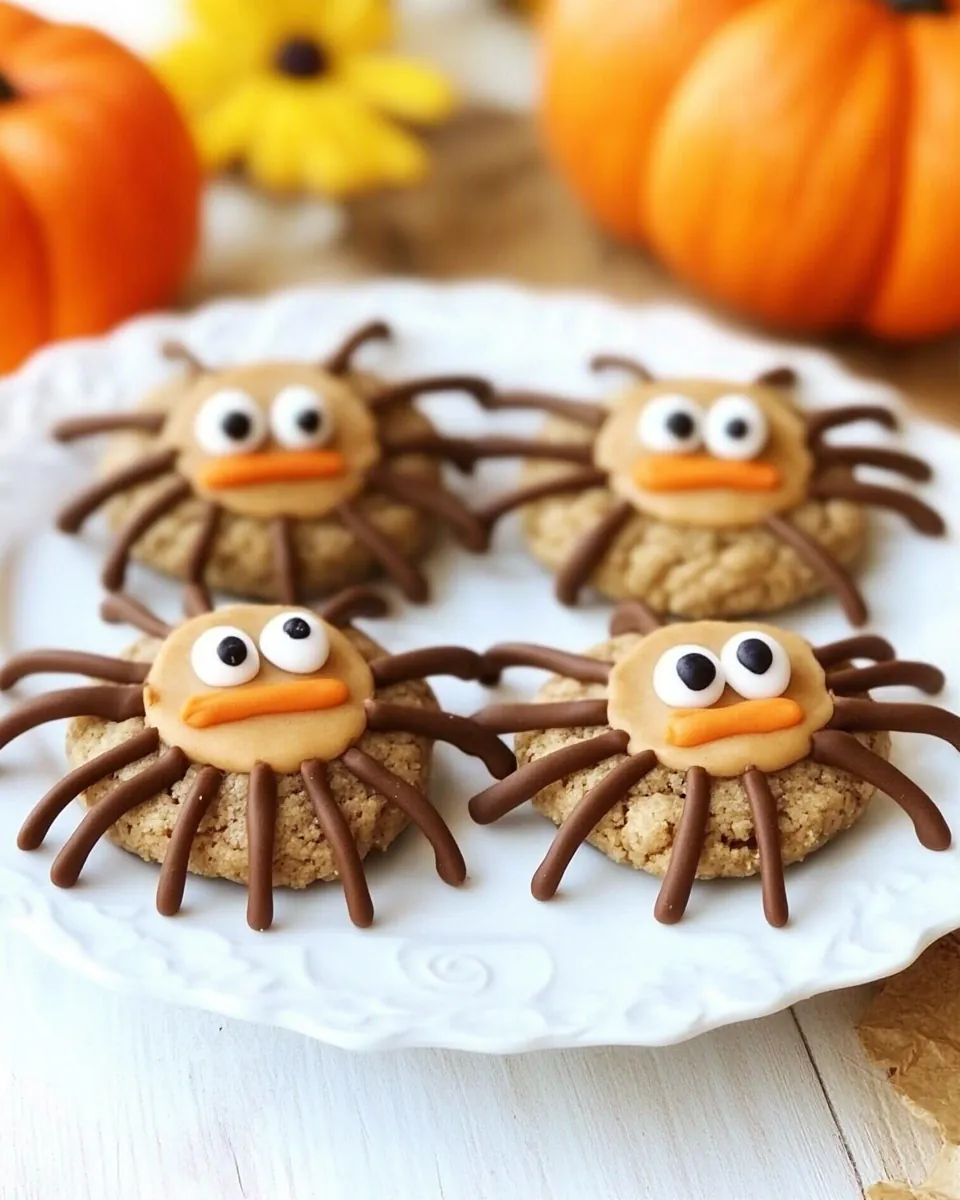
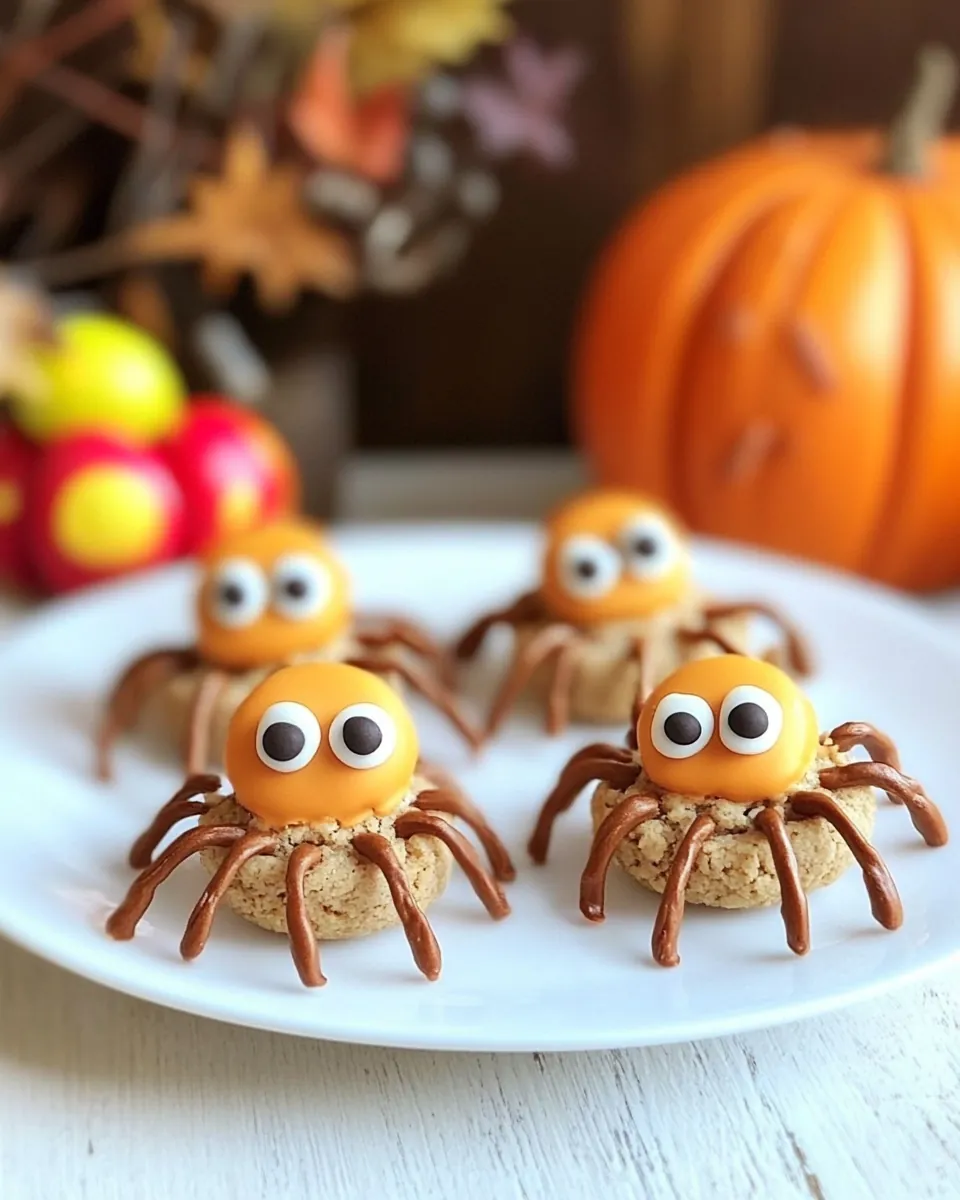
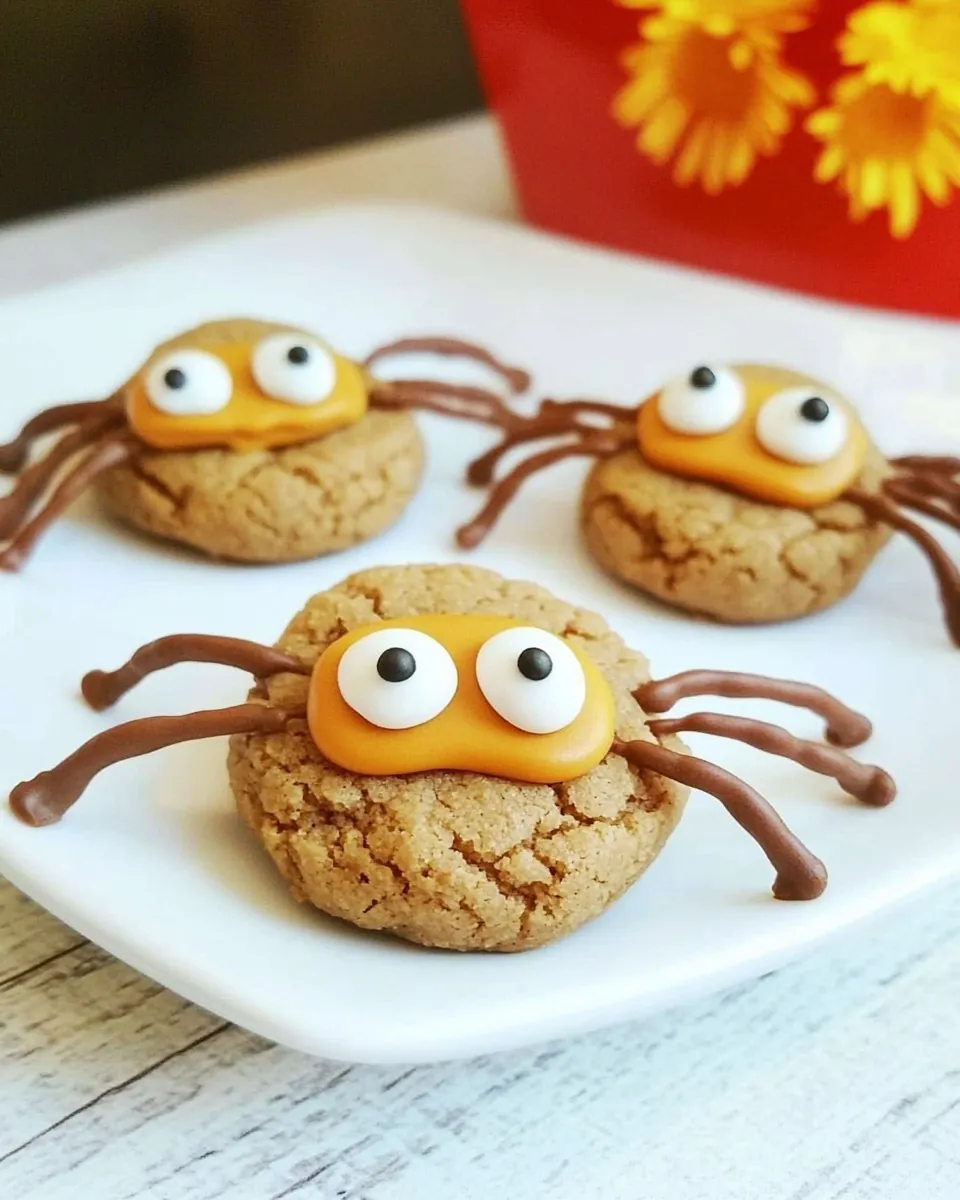
Peanut Butter Cookie Spiders
Halloween is just around the corner, and what better way to celebrate than with some fun and creative treats? The Peanut Butter Cookie Spiders are the perfect blend of spooky and delicious, making them a hit for both kids and adults alike. I remember the first time I made these with my children; the excitement in their eyes as they transformed simple cookies into creepy crawlers was unforgettable. Each cookie is not just a sweet treat but an edible art project that brings the family together in the kitchen. The rich flavor of peanut butter combined with the sweetness of chocolate creates an irresistible combination. Plus, they’re a fantastic way to get into the spirit of Halloween while having fun with your loved ones!
Recipe Snapshot
30 mins
20 mins
10 mins
Medium
150 kcal
3 g
Gluten-Free, Low FODMAP
6 g
Oven, Baking Sheet, Mixing Bowl, Wooden Spoon
Why You’ll Love This Peanut Butter Cookie Spiders
Fun for All Ages
One of the standout features of the Peanut Butter Cookie Spiders is how engaging they are for all ages. Kids love getting involved, from mixing the dough to decorating the cookies. It’s a fantastic way to spark their creativity and encourage them to take part in the cooking process.
Delicious Flavor Profile
The combination of butter, creamy peanut butter, and brown sugar creates a cookie that is not only moist but also packed with flavor. Each bite offers a delightful sweetness balanced perfectly by the salty notes of the peanut butter, making them absolutely addictive!
Edible Decorations
What makes these cookies exceptionally special is their decoration. Using mini peanut butter cups and chocolate chips for eyes and legs turns a simple cookie into a fun, edible spider. It’s an imaginative way to engage the kids and turn a simple baking session into a memorable Halloween experience.
Perfect for Parties
These cookies are not just for Halloween; they’re a great addition to any gathering or party. The Peanut Butter Cookie Spiders can be a centerpiece on your dessert table, drawing attention with their unique appearance. They also make for great conversation starters among guests!
Easy to Make
Even for novice bakers, the Peanut Butter Cookie Spiders are straightforward. The recipe doesn’t require any advanced baking skills, which means anyone can whip up a batch in no time. Plus, they store well, so you can make them ahead of time and enjoy them fresh for your Halloween celebrations.
Allergy-Friendly Options
While the traditional recipe is a hit, you can also adapt it for allergy-friendly needs. Using alternatives for peanut butter or chocolate opens up possibilities for everyone to enjoy these treats. Whether you have nut allergies or are looking for dairy-free options, there are plenty of substitutes available!
Key Ingredients for Peanut Butter Cookie Spiders
Creating the perfect Peanut Butter Cookie Spiders requires a mix of rich and flavorful ingredients. Each component plays a crucial role in achieving that delightful cookie texture and taste. From the creamy peanut butter to the sweetness of brown sugar, these ingredients come together to create a treat that’s not only fun to make but even more enjoyable to eat!
- 1/2 cup Butter softened: The butter brings moisture and richness to the cookie.
- 1/2 cup Creamy Peanut Butter: Essential for flavor and texture, it’s the star of the show!
- 1/2 cup brown sugar: Adds sweetness and a hint of caramel flavor.
- 1/2 cup sugar: Balances the richness of peanut butter.
- 1 large egg: Binds the ingredients together and adds moisture.
- 2 tablespoons milk: Enhances the dough consistency.
- 1 teaspoon vanilla: Adds a warm, sweet note to the cookies.
- 1 3/4 cups All Purpose Flour: Provides structure to the cookies.
- 1 teaspoon Baking soda: Helps the cookies rise.
- 1/2 teaspoon Salt: Balances the sweetness.
- 1/2 cup Chocolate Chips: Adds pockets of melted chocolate goodness.
- 30-40 mini peanut butter cups unwrapped: Used for the spider bodies.
- 60-80 Candy eyes: Necessary for the spooky look.
- 1 inch Black candy rope cut into legs: For creating the spider legs.
- 3/4 cup Chocolate Chips melted: Used for assembling the spiders.
Step by Step Guide for Peanut Butter Cookie Spiders
Ready to make some spooky treats? The Peanut Butter Cookie Spiders are a breeze to whip up, and I’m excited to share the process with you! This guide will walk you through each step in detail to ensure your cookies turn out perfect every time. So, grab your apron, and let’s get started!
- Preheat your oven to 375 degrees F. Getting the oven warm before baking is crucial for ensuring your Peanut Butter Cookie Spiders bake evenly and rise properly.
- In a large mixing bowl, cream together butter, peanut butter, brown sugar, and sugar. Mix on medium speed until the mixture is light and fluffy. This will take about 2 to 3 minutes. The fluffiness is key for a chewy texture.
- Add the egg, milk, and vanilla to the bowl. Beat well until fully combined. You want to ensure that everything is incorporated smoothly.
- In another bowl, mix together the flour, baking soda, and salt. This step helps distribute the leavening agent evenly throughout the dough.
- Gradually add the dry ingredients to the creamed mixture while mixing on low speed. Continue mixing until a stiff dough forms. Don’t overmix; just combine until you don’t see any dry flour.
- Fold in the 1/2 cup of chocolate chips gently using a spatula or wooden spoon. This ensures that the chips are evenly distributed without overworking the dough.
- Shape the dough into 1-inch balls. Place each ball on an ungreased cookie sheet, ensuring they are about 2 inches apart to allow for spreading during baking.
- Bake in the preheated oven for about 10 minutes, or until golden brown. The cookies will look slightly undercooked; that’s okay as they’ll firm up while cooling.
- Once baked, remove them from the oven and immediately top each cookie with an upside-down peanut butter cup. This will create the body of the spider.
- Transfer the cookies to a wire rack to cool completely. While the cookies are cooling, it’s time to prepare the melted chocolate.
- In a microwave-safe bowl, melt the remaining chocolate chips, stirring every 15 seconds until smooth. Be careful not to overheat!
- Once the cookies are cooled, cut the black candy rope into 1-inch pieces for the legs. Using the melted chocolate, attach 4 legs to each side of the peanut butter cup on the cookie. Then, stick two candy eyes on top to bring your spider to life!
- Let the chocolate set until firm. This usually takes about 10 to 15 minutes, depending on the temperature of your kitchen. And there you have it, your Peanut Butter Cookie Spiders!
Things Worth Knowing
- Cookie Structure: The balance between butter and flour is essential for creating a chewy texture. Too much flour leads to dry cookies.
- Chilling the Dough: If you find the dough too sticky, consider chilling it in the fridge for about 30 minutes. This will make rolling the balls easier.
- Baking Time: Keep an eye on the cookies as they bake. They should be lightly browned around the edges but still soft in the center.
- Decorating Tips: Use a toothpick dipped in melted chocolate for precision when attaching the legs and eyes. This helps prevent a messy application.
- Storage: Store the cookies in an airtight container at room temperature. They can last for about a week, although they rarely last that long!
- Flavor Enhancements: You can add a pinch of cinnamon or nutmeg to the dough for a warm spice flavor that complements the peanut butter.
Expert Tips about Peanut Butter Cookie Spiders

To ensure you get the most out of your baking experience with Peanut Butter Cookie Spiders, here are some expert tips to keep in mind. Whether you’re a beginner or seasoned baker, these suggestions can enhance your outcome!
- Storage: Store leftover cookies in an airtight container at room temperature to maintain their freshness. They can usually stay good for about one week.
- Freezing: You can freeze the cookie dough for up to three months. Just shape the balls and freeze them on a baking sheet before transferring them to a freezer bag. Thaw in the refrigerator before baking.
- Pairing: These cookies are fantastic with a glass of milk or a warm cup of tea. They make a perfect after-school snack!
- Variations: Experiment with different kinds of chocolate chips or even add chopped nuts for extra crunch. You could also use white chocolate for a different look.
- Decorative Ideas: If you want to get extra creative, consider using different candies for the eyes or legs. Anything colorful can make your spiders even more fun!
- Batch Size: If you’re making these for a larger gathering, you can easily double the recipe. Just ensure you have enough baking sheets!
Serving Options for Peanut Butter Cookie Spiders
When it comes to serving your Peanut Butter Cookie Spiders, the options are as exciting as the cookies themselves! Here are some fun ideas for how to present them:
- Halloween Parties: These cookies are a must-have for any Halloween gathering. Place them on a spooky platter with faux spider webs for a themed touch.
- School Events: If your child’s school has a bake sale or Halloween party, these cookies are sure to be a hit among peers and teachers alike.
- Creative Displays: Arrange the cookies in a fun way, such as stacking them or placing them on a cupcake tower, to create an attractive display.
- Picnics: They’re perfect for outdoor gatherings! Pack them in a container, and they make for tasty, portable treats.
- Gift Giving: Consider packaging these cookies in a clear bag tied with a festive ribbon. They make a sweet and thoughtful gift for friends and family!
- Seasonal Celebrations: While perfect for Halloween, these cookies can also be enjoyed at fall gatherings, Thanksgiving, or even cozy family nights at home.
FAQ
Conclusion
The Peanut Butter Cookie Spiders are not just cookies; they are a creative outlet and a delicious treat rolled into one. With their fun design and delightful flavors, they’re bound to be a hit at any gathering. I encourage you to try making them yourself; you’ll love the experience of creating something so fun and tasty! Happy baking!
Peanut Butter Cookie Spiders
Ingredients
Equipment
Method
- Preheat oven to 375 degrees F.
- Cream together butter, peanut butter, brown sugar and sugar. Add egg, milk and vanilla. Beat well.
- In a medium sized bowl, mix together flour, baking soda and salt. Add to creamed mixture. Beat on low speed until stiff dough forms.
- Fold in 1/2 cup of chocolate chips.
- Shape into 1-inch balls. Place 2 inches apart on ungreased cookie sheet. Bake until golden brown, about 10 minutes.
- Top each cookie immediately with a peanut butter cup, placed upside down. Remove to wire rack to cool.
- While the cookies are cooling melt the rest of the chocolate chips in the microwave stirring every 15 seconds until melted.
- Once the cookies have cooled, cut liquorice into 1 inch pieces. Using melted candy, attach 4 legs to each side of the peanut butter cup near the bottom, and stick two eyes on top. Let set until chocolate is firm.
Notes
- If you can’t find candy eyes or black rope, M&M's or small round candies work well for the eyes, and you can cut up black licorice or use chocolate-covered pretzel sticks for the legs.