Prune Honey Cake
There’s something truly special about a homemade cake, and my Prune Honey Cake is no exception. I remember the first time I tasted this delightful creation at my grandmother’s house during a cozy fall afternoon. The rich aroma of honey wafting through the kitchen instantly brought comfort, as the warmth of freshly baked cake filled the air. The combination of sweet prunes and honey creates a unique taste that’s not just delicious but also reminiscent of cherished family moments. Each bite is a soft embrace of nostalgia, reminding me of gatherings filled with laughter and joy.
Recipe Snapshot
1 hr 28 mins
60 mins
28 mins
Medium
350 kcal
5 g
Gluten-Free, Low FODMAP
15 g
Large Pot, Oven, Baking Sheet, Blender, Frying Pan, Wooden Spoon, Whisk, Chef’s Knife, Mixing Bowl
The Best Thing About This Prune Honey Cake
Unique Flavor Profile
The Prune Honey Cake boasts a remarkable blend of flavors. The moisture from prunes infuses the cake with a rich, deep sweetness, while honey adds a floral note that enhances the overall taste. This cake isn’t just sweet; it’s a flavor adventure that will make your taste buds dance with delight!
Perfect for Fall Gatherings
As the leaves change color and the air gets crisp, this cake emerges as the perfect dessert for fall gatherings. It’s an ideal centerpiece for your holiday table or a warm treat to share with friends during a cozy evening. No matter the occasion, this cake brings a comforting charm that will leave everyone asking for seconds.
Easy to Make
Don’t worry if you’re not a seasoned baker. The Prune Honey Cake is surprisingly easy to prepare. With simple ingredients and straightforward steps, even novice bakers can create this show-stopping dessert. The process is enjoyable, and the final result is nothing short of impressive.
Versatile Layering Options
This cake also offers fun opportunities for creativity. You can layer it with different fillings or frostings to suit your personal taste. Whether you prefer a simple whipped cream or a rich frosting, each variation adds its own twist to the beloved classic. This flexibility makes it a wonderful canvas for your baking imagination.
Store and Enjoy Later
One of the best parts of the Prune Honey Cake is its ability to hold up well over time. It actually tastes even better the day after you bake it, as the flavors meld beautifully while resting. You can easily prepare it in advance for gatherings, freeing up your time to enjoy the company of friends and family.
Healthier Dessert Option
With wholesome ingredients like prunes and honey, this cake stands out as a healthier dessert choice. Prunes are rich in fiber and essential nutrients, making this cake not just a treat, but a more nourishing option for those who want to indulge without the guilt. It’s a dessert you can feel good about serving.
Key Ingredients for Prune Honey Cake
The beauty of the Prune Honey Cake lies in its simple yet effective ingredients. Each element contributes to the cake’s flavor, texture, and moisture, creating a perfect harmony. It’s amazing how these basic components can transform into something so delightful!
- 6 large eggs – Room temperature eggs ensure better mixing and a fluffier cake.
- 1 cup white granulated sugar – Sweetness that balances the flavors beautifully.
- 2 cups unbleached all-purpose flour – The backbone of the cake, giving it structure.
- 5 tbsp honey – Adds natural sweetness and moisture.
- 2 tsp baking soda – Leavening agent that helps the cake rise.
- 32 oz sour cream – Imparts creaminess and a slight tang.
- 2 cups powdered sugar – For delicious frosting that adds sweetness.
- 1 cup heavy whipping cream – Used to create a light and creamy frosting.
- 1 1/2 cups chopped prunes – The star ingredient providing sweetness and moisture.
- Melting chocolate or chocolate chips – For decoration, offering a beautiful finish.
- Chocolate block – Great for shavings to add texture and elegance.
Cooking Instructions for Prune Honey Cake
Making the Prune Honey Cake is a delightful process that fills your kitchen with wonderful aromas. Follow these steps, and you’ll have a beautiful cake to impress your loved ones.
- Start by buttering and lining the bottoms of two 9-inch cake pans with parchment paper. This will help prevent sticking and ensure a smooth release.
- Preheat your oven to 325°F (about 163°C), creating the perfect environment for your cake to rise.
- In a mixing bowl, beat 6 large eggs with 1 cup white granulated sugar on high speed for about five minutes. You want the mixture to become light and fluffy.
- In a saucepan, heat 5 tbsp honey over medium heat until it’s hot but not boiling, around 125°F (51°C). Stir often to avoid burning.
- Once you see faint bubbling around the edges, quickly stir in 2 tsp baking soda. Keep stirring until the mixture turns a yellow/light caramel color, about 30 to 45 seconds. Remove from heat immediately.
- With the mixer still running on high speed, slowly add the hot honey mixture to the egg-sugar mixture, one tablespoon at a time. Don’t let the egg mixture cook!
- Next, reduce the speed to medium-low and gradually blend in 2 cups unbleached all-purpose flour, one cup at a time. Scrape down the mixing bowl to ensure everything is well incorporated.
- Once the flour is fully blended in, divide the batter evenly between your prepared cake pans.
- Bake in your preheated oven for 25 to 28 minutes, or until the top is golden brown and a toothpick inserted into the center comes out clean.
- After baking, allow the cakes to cool in the pans for a few minutes before transferring them to a wire rack to cool completely.
- While the cakes are cooling, prepare your frosting by beating 1 cup heavy whipping cream on high speed until it firms up and becomes spreadable.
- In another bowl, whisk together 32 oz sour cream with 2 cups powdered sugar. Gently fold the whipped cream into this mixture until you have a smooth frosting.
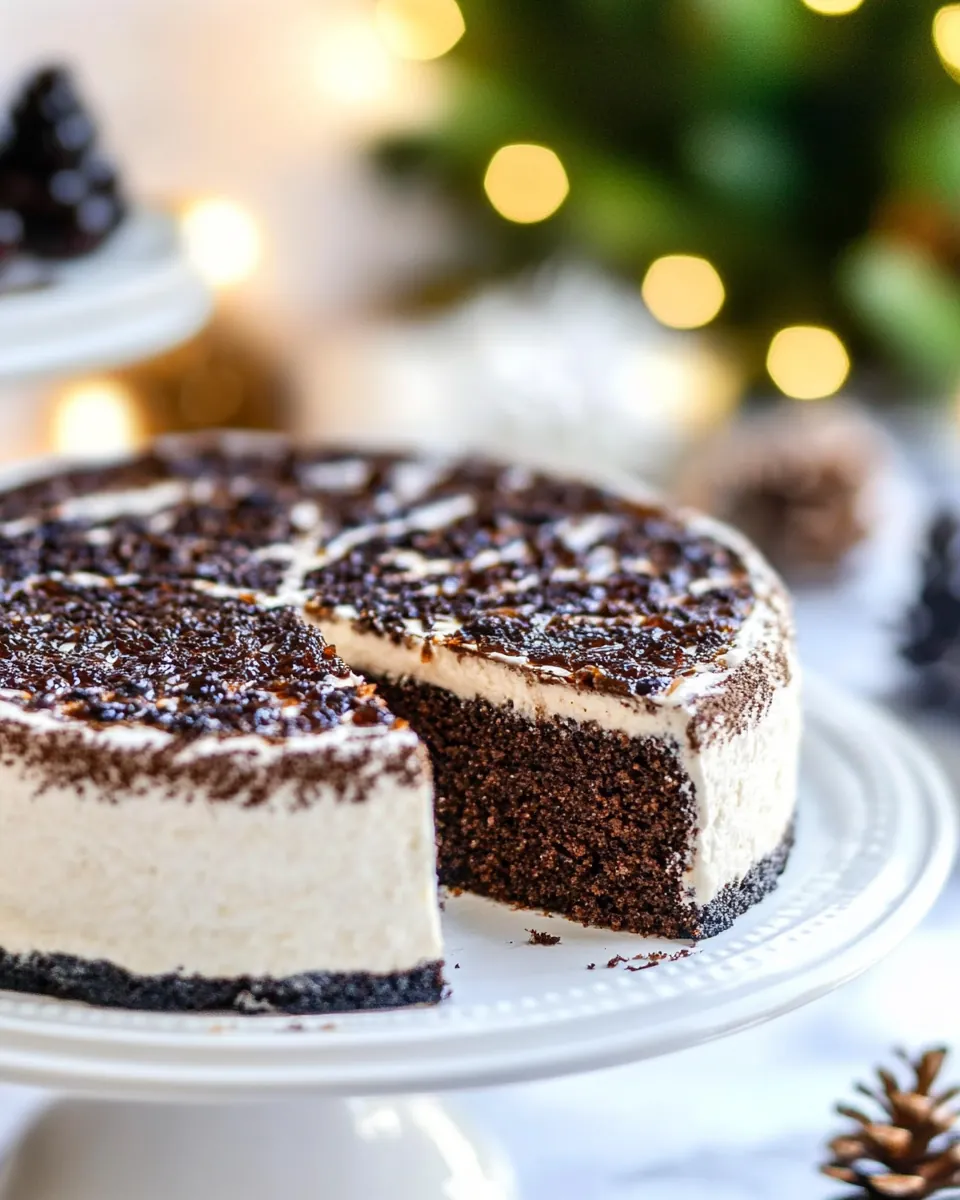
- Once the cakes are completely cool, slice each layer in half horizontally to create four cake layers.
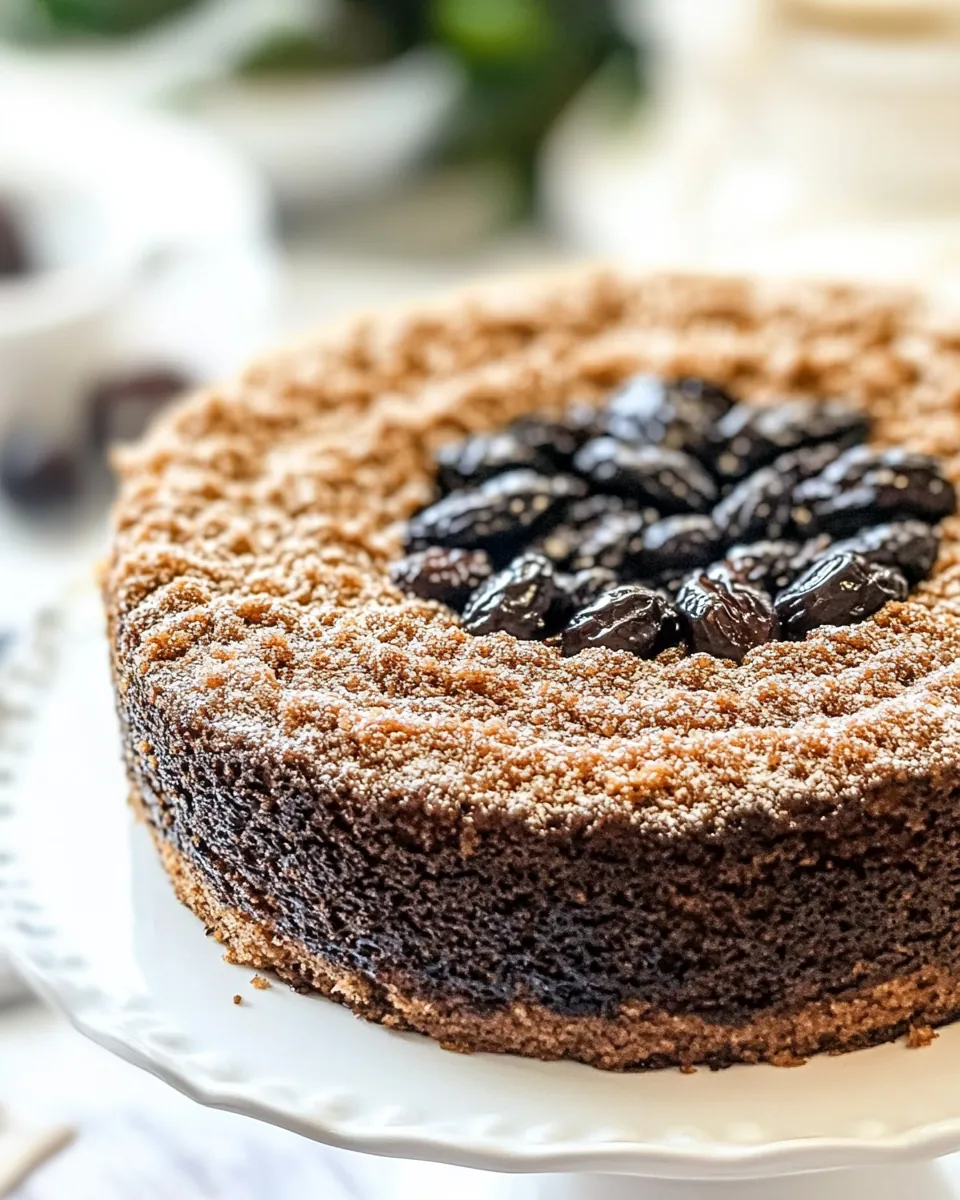
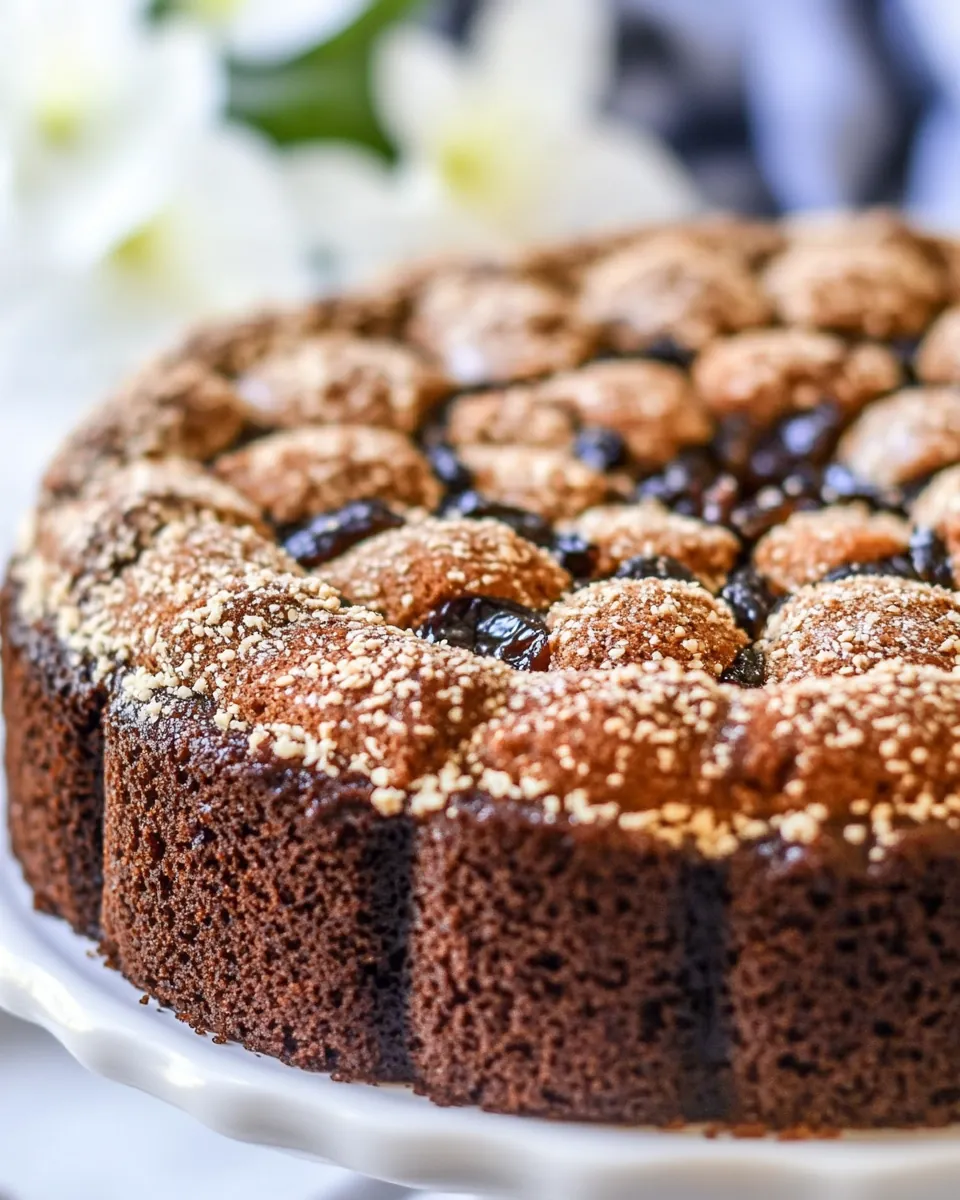
- To assemble, place the first layer on your serving platter, spread enough frosting to cover it, and sprinkle with 1/3 of your chopped prunes. Repeat this process for the next layers.
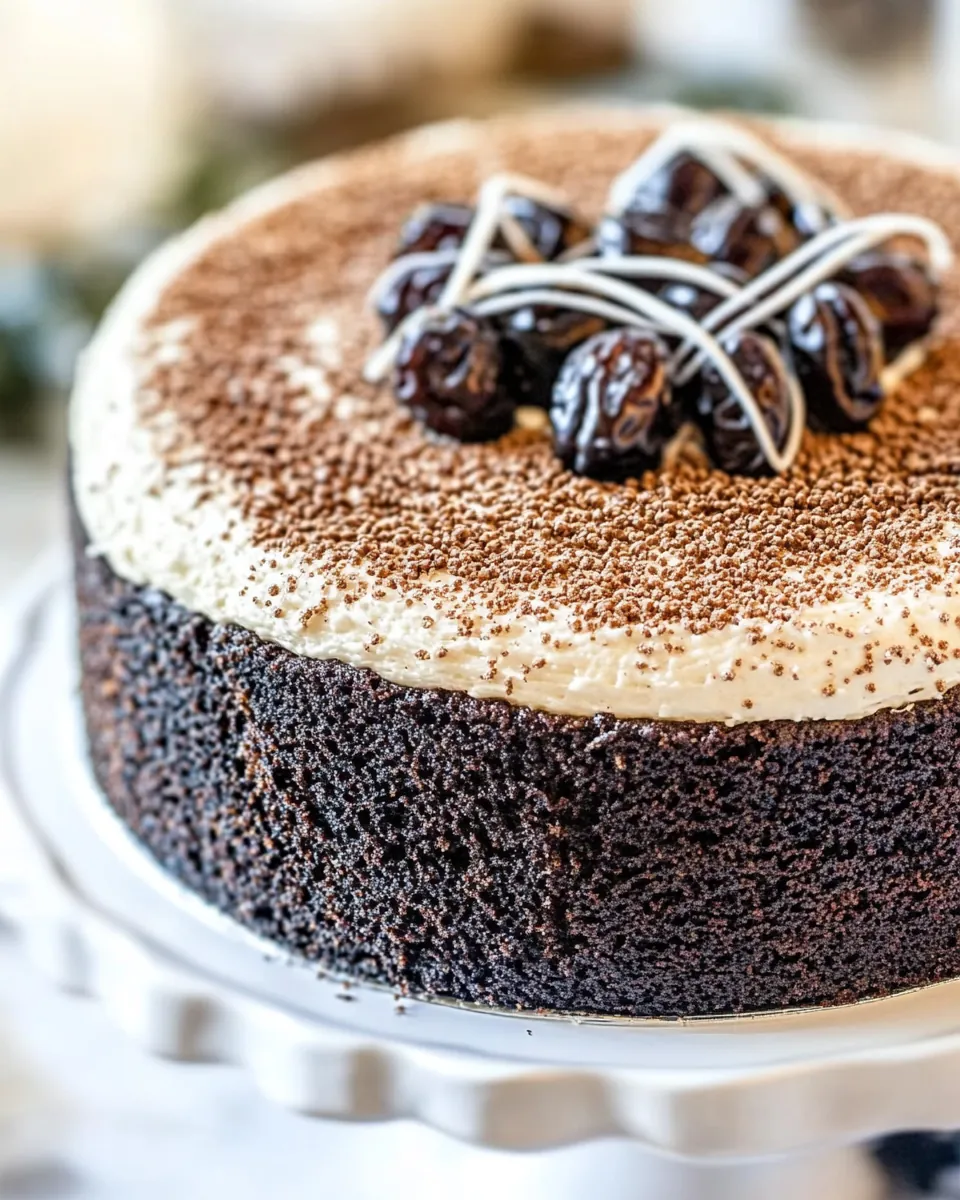
- After stacking all layers, frost the outside of the cake and decorate with melted chocolate, chocolate shavings, and additional prunes for a stunning finish.
- This cake tastes best the next day, allowing the flavors to meld and deepen.
Things Worth Knowing
- Room Temperature Ingredients: Using room temperature eggs and sour cream helps create a smoother batter and a fluffier cake.
- Testing for Doneness: Always check your cake a few minutes before the recommended time to avoid overbaking.
- Cooling Time: Allow your cake to cool completely in the pan before removing; this prevents breakage.
- Layering with Care: When assembling your cake, be gentle to avoid squishing the layers together too much.
Ways to Adapt This Recipe
Adaptability is one of the best features of the Prune Honey Cake. Here are some ways to make it truly yours!
- Storage: Store any leftovers in an airtight container in the refrigerator. It keeps well for about three days.
- Freezing: This cake freezes well! Wrap it tightly in plastic wrap and store in the freezer for up to three months. Thaw overnight in the refrigerator before serving.
- Variations: Try adding spices like cinnamon or nutmeg to the batter for a warm flavor boost.
- Frosting Options: Experiment with different frostings such as cream cheese or chocolate ganache for a delicious twist.
- Serving Ideas: Serve warm with a scoop of vanilla ice cream for an indulgent dessert.
What to Serve With Prune Honey Cake
When it comes to enjoying your Prune Honey Cake, the right pairings can elevate the experience even further. Here are some ideas:
- Warm Beverages: Serve with a cup of spiced chai or hot apple cider during the fall season for a cozy treat.
- Fruit Compote: A side of warm fruit compote complements the sweetness of the cake perfectly.
- Seasonal Salads: Pair with a light salad featuring greens, nuts, and dried fruits for a well-rounded meal.
- Cheese Plate: A selection of cheeses can provide a savory contrast to the sweet cake.
- Picnics: This cake is perfect for outdoor gatherings; it travels well and is a crowd-pleaser.
FAQ
Conclusion
The Prune Honey Cake stands out with its unique flavors and comforting textures, all while being easy to make. I encourage you to try this recipe and share in the joy of baking with your loved ones. It’s a beautiful way to create lasting memories and delicious moments at your table.
Prune Honey Cake
Ingredients
Equipment
Method
- Butter and line the bottoms of two 9-inch cake pans with parchment paper. Preheat your oven to 325°F (about 163°C).
- In a mixing bowl, beat 6 large eggs with 1 cup white granulated sugar on high speed for about five minutes until light and fluffy.
- In a saucepan, heat 5 tbsp honey over medium heat until hot but not boiling (about 125°F), stirring often.
- Just as the honey starts faint bubbling, stir in 2 tsp baking soda continuously for about 30 to 45 seconds until it turns a yellow/light caramel color. Remove from heat immediately.
- With the mixer on high speed, slowly add the hot honey mixture to the egg-sugar mixture, one tablespoon at a time.
- Reduce mixer speed and blend in 2 cups unbleached all-purpose flour, one cup at a time, scraping down the mixing bowl as needed.
- Divide the batter evenly between your prepared pans and bake for 25 to 28 minutes or until golden brown and a toothpick comes out clean.
- Allow cakes to cool in the pans, then transfer to a wire rack to cool completely.
- Beat 1 cup heavy whipping cream until stiff and spreadable.
- In another bowl, whisk 32 oz sour cream with 2 cups powdered sugar. Fold in the whipped cream.
- Slice each cake in half horizontally to create four layers.
- Assemble the cake on your serving platter by layering the cakes with frosting and chopped prunes, repeating the process.
- Frost the outside and decorate with melted chocolate and chocolate shavings.
- This cake is best enjoyed the next day to allow the flavors to meld.
Notes
- Tip 1: Store leftovers in an airtight container in the refrigerator for up to three days.
- Tip 2: This cake freezes well. Wrap it in plastic wrap and store in the freezer for up to three months.
- Tip 3: Add spices like cinnamon or nutmeg for added warmth.
- Tip 4: Experiment with different frostings such as cream cheese or chocolate ganache.
- Tip 5: Serve with a scoop of ice cream for an indulgent dessert.