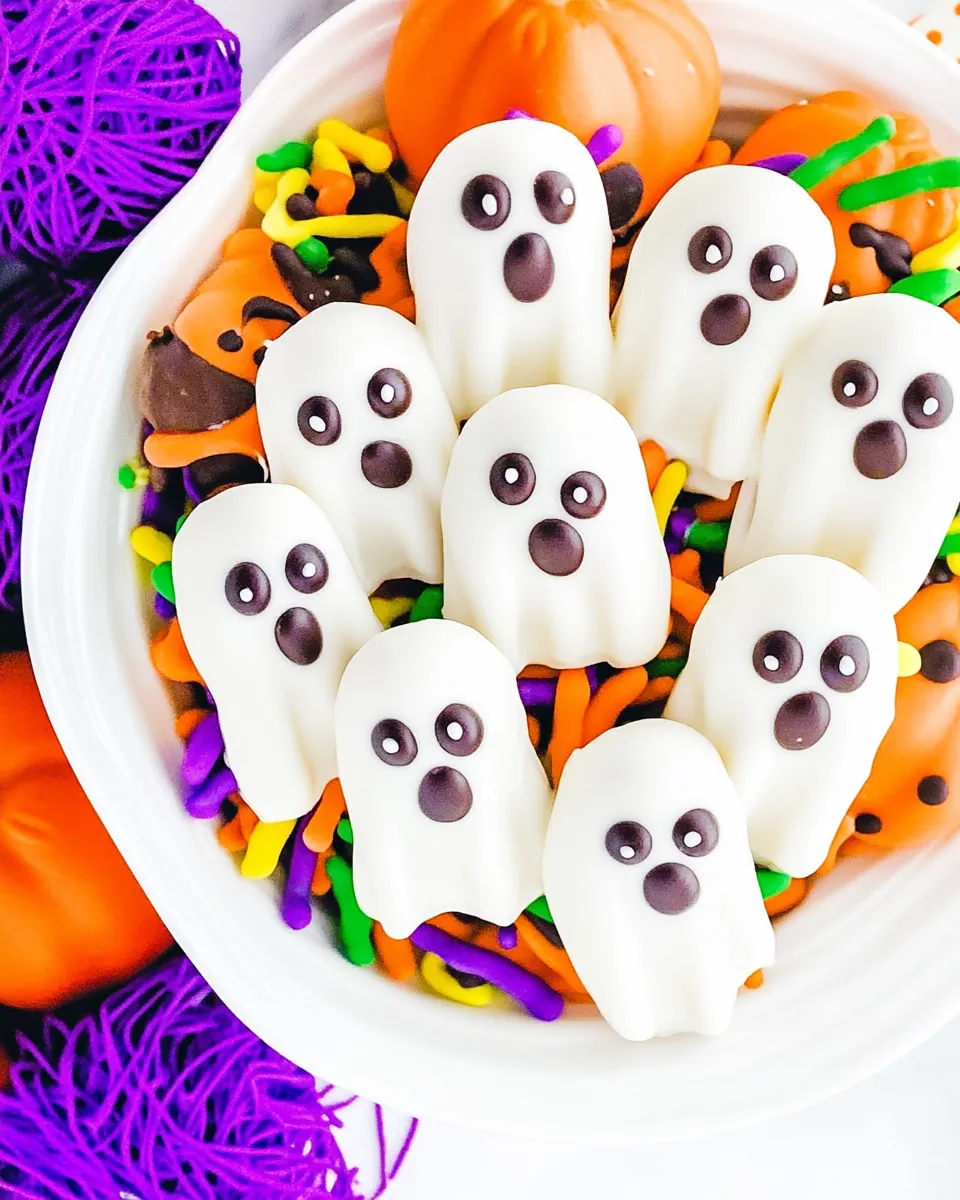
Nutter Butter Ghosts
There’s something magical about Halloween treats, and Nutter Butter Ghosts are at the top of that list. I remember the first time I made these delightful little creatures; it was a crisp fall day, and the air was filled with the scent of pumpkin spice. As the leaves began to change color, my family gathered around the kitchen, excited to create something festive. The best part? These treats are not only adorable but incredibly easy to whip up! You don’t need to be a baking expert to impress your friends and family with these ghostly delights. Each bite captures the creamy sweetness of the Nutter Butter cookies paired with the smoothness of the almond bark, making them an instant favorite. Whether you’re hosting a Halloween party or just looking to add a spooky touch to your fall festivities, Nutter Butter Ghosts are sure to bring a smile to everyone’s face.
Recipe Snapshot
15 mins
15 mins
0 mins
Easy
120 kcal
1 g
Keto, Gluten-Free, Low FODMAP
6 g
Frying Pan
What Makes This Nutter Butter Ghosts Special
Perfect for Halloween Fun
There’s no denying that Halloween is all about creativity and fun, and what better way to showcase that than with Nutter Butter Ghosts? These treats are not only visually appealing, but they also provide a delightful crunch and creamy taste that kids and adults alike will enjoy.
Easy to Make
If you’re looking for a quick and easy recipe, this is it! With just a few ingredients and simple steps, anyone can make these spooky snacks. You don’t need fancy equipment or advanced baking skills—just your hands and a bit of creativity.
Customization Galore
One of the best aspects of Nutter Butter Ghosts is that you can customize them to fit your personality or party theme. Want to add more spooky decorations? Feel free to get creative with the chocolate chips or add other edible decorations!
Kid-Friendly Activity
These little ghost cookies are a fantastic way to involve kids in the kitchen. They’ll love dipping the cookies into the melted almond bark and adding their own chocolate chip eyes and mouths. It’s a great bonding activity that makes for wonderful memories.
Perfect for Parties
Planning a Halloween get-together? Nutter Butter Ghosts are a perfect addition to your dessert table. They’re sure to grab attention and spark conversations among guests, making them a hit at any party.
Ingredients for Nutter Butter Ghosts
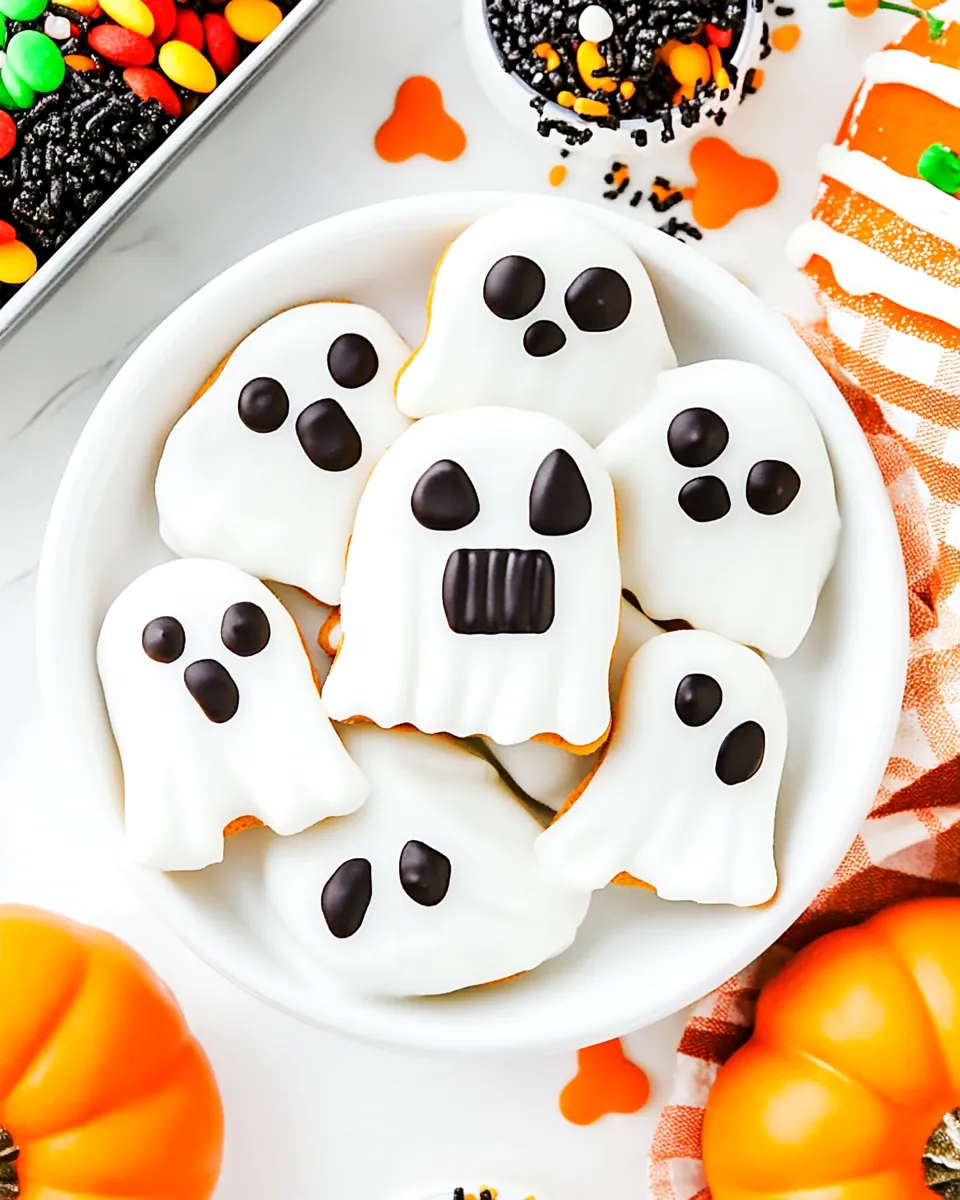
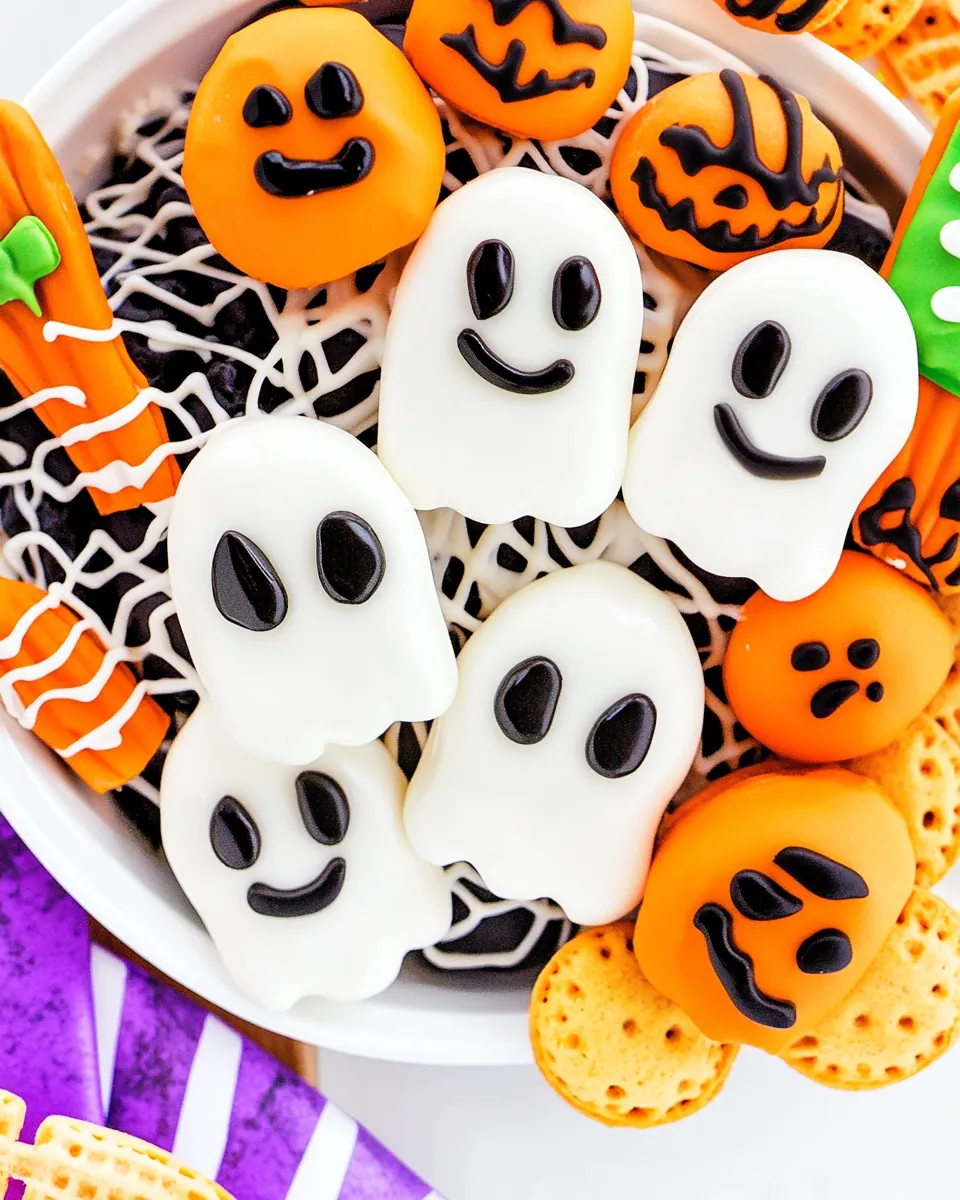
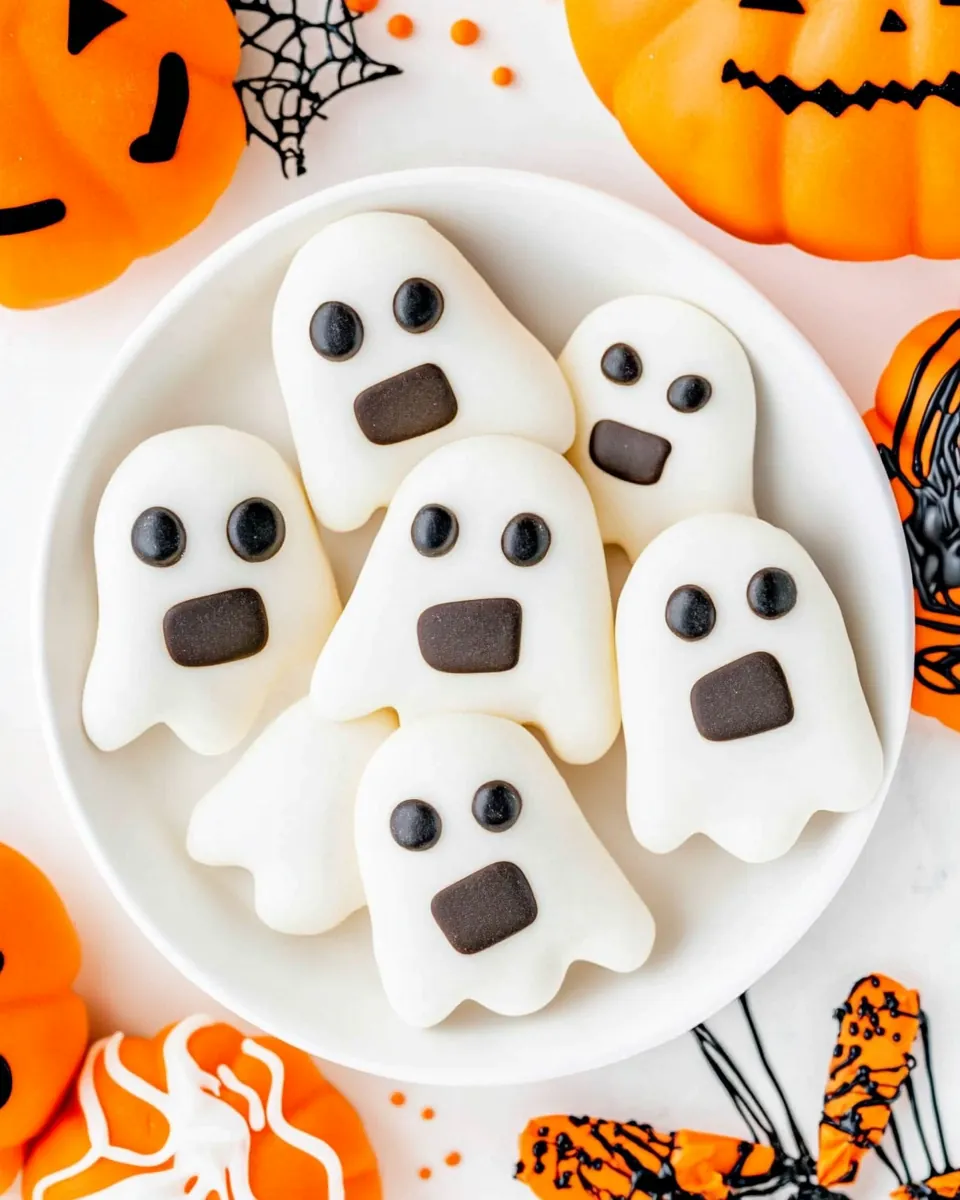
The ingredients for Nutter Butter Ghosts are simple yet effective. Each component plays a critical role in achieving that perfect ghostly look and taste. The star of the show is, of course, the Nutter Butter cookies, which provide a rich, peanut buttery flavor. The almond bark adds a sweet, smooth coating, while the mini chocolate chips give these ghosts their charming eyes and mouth.
- 1 family-sized package of Nutter Butter cookies: These cookies are the base of our ghosts, offering a delightful peanut butter flavor and perfect shape for decorating.
- 12 oz white almond bark: This creamy coating provides sweetness and a beautiful ghostly look when melted and dipped.
- Mini chocolate chips: These tiny treats are essential for creating the ghost’s eyes and mouth, adding a fun and spooky touch.
Step by Step Guide for Nutter Butter Ghosts
Making Nutter Butter Ghosts is a simple process that will have you creating these spooky snacks in no time. Follow these detailed steps for a flawless treat!
- Start by melting the almond bark according to package instructions. Make sure it’s completely smooth and creamy, as this will be the coating for your ghosts. Look for a glossy finish—this means it’s ready!
- Once melted, dip each Nutter Butter cookie partway into the almond bark. If you prefer a more covered cookie, you can dip the whole cookie and use a fork to lift it out. Allow the excess almond bark to drip off—it will create a nice coating.
- Next, place the coated cookie onto a baking sheet lined with wax or parchment paper. This step is crucial to prevent sticking. You’ll want to make sure the cookies don’t touch each other.
- Now comes the fun part! For the eyes, place two mini chocolate chips on each cookie. For the mouth, turn one chip upside down and place it at the bottom for a spooky expression. Get creative with the placement!
- After decorating, allow the cookies to sit at room temperature until they harden. If you want to speed up the process, you can chill them in the refrigerator. This will ensure that the almond bark sets well and the cookies are easy to handle.
- Once set, transfer your Nutter Butter Ghosts to a festive plate and display them proudly. They make for a perfect Halloween treat!
Things Worth Knowing
- Experiment with Coatings: You can use different colors of candy melts to create a variety of ghostly creatures.
- Storage Tips: Store your Nutter Butter Ghosts in an airtight container to keep them fresh. They can last up to a week!
- Chilling the Bark: If your almond bark isn’t setting properly, place the cookies in the fridge for a few minutes after decorating.
- Use Quality Chocolate: For the best flavor, opt for high-quality chocolate chips for the eyes and mouth.
Helpful Notes about Nutter Butter Ghosts
While making Nutter Butter Ghosts is straightforward, here are some tips to ensure your treats turn out perfectly!
- Storage: Store your Nutter Butter Ghosts in an airtight container at room temperature. They’ll stay fresh for up to a week, making them ideal for parties.
- Freezing: You can freeze these cookies! Just make sure they are completely hardened, then place them in a single layer in a freezer-safe container.
- Pairing: These ghosts pair wonderfully with a spooky punch or hot apple cider for a festive touch.
- Variations: Feel free to swap out the mini chocolate chips for different types of candies to create unique faces on your ghosts.
- Decorating Tips: Use edible markers to draw additional facial features on your ghosts for some extra fun!
Best Served With
When it comes to serving your Nutter Butter Ghosts, the possibilities are endless. Here are some suggestions to make your Halloween gathering even more festive:
- Spooky Beverages: Pair these ghostly treats with fun Halloween-themed drinks, such as witch’s brew punch or blood orange soda.
- Fall Parties: They make a great addition to any Halloween party, perfect for impressing guests of all ages.
- Classroom Treats: These cookies are excellent for sharing during school parties or festive classroom celebrations.
- Seasonal Dishes: Serve them alongside other fall-themed desserts, such as pumpkin pie or caramel apples.
- Gifts: Wrap them up in clear bags tied with a ribbon to give as treats to friends and family.
FAQ
Conclusion
Nutter Butter Ghosts are not just a treat; they’re a celebration of creativity and fun in the kitchen. The delightful combination of flavors and the joy of decorating make them a must-try this Halloween. I encourage you to gather your family or friends and whip up a batch of these adorable treats. You won’t regret it, and I can promise they’ll be a hit!
Nutter Butter Ghosts
Ingredients
Equipment
Method
- Melt the almond bark per package instructions.
- Dip the Nutter Butter cookie part way into the melted almond bark. Or place the whole cookie into the melted almond bark and use a fork to lift the cookie out allowing the almond bark to drip off.
- Place the coated cookie onto a baking sheet pan lined with wax paper or parchment paper.
- For the eyes, place two mini chocolate chips. For the mouth, place one chip turned upside down onto the front of the cookie.
- Sit at room temperature or chill in the refrigerator to allow the almond bark to harden.
Notes
- Tip 1: Store your Nutter Butter Ghosts in an airtight container at room temperature. They’ll stay fresh for up to a week!
- Tip 2: You can freeze these cookies! Just make sure they are completely hardened, then place them in a single layer in a freezer-safe container.
- Tip 3: These ghosts pair wonderfully with a spooky punch or hot apple cider for a festive touch.
- Tip 4: Feel free to swap out the mini chocolate chips for different types of candies to create unique faces on your ghosts.
- Tip 5: Use edible markers to draw additional facial features on your ghosts for some extra fun!