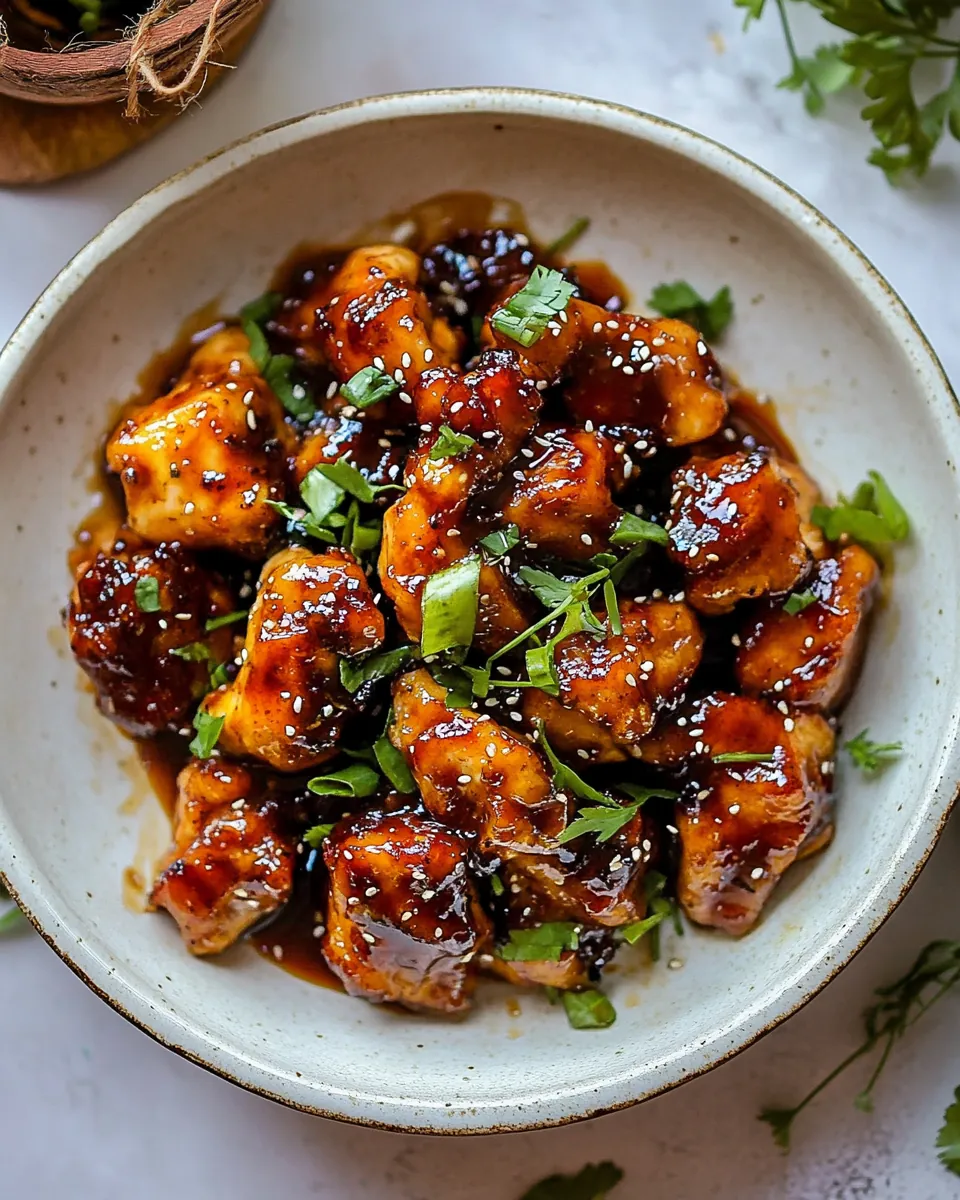
Sheet Pan Sticky Sweet and Sour Chicken
When I think of weeknight dinners that bring the family together, nothing beats Sheet Pan Sticky Sweet and Sour Chicken. It’s one of those recipes that transform a simple evening into something special, filled with aromatic flavors and vibrant colors. Picture yourself bustling in the kitchen, the smell of chicken wafting through the air, while your family gathers around the table, eager to dig in. This dish holds a special place in my heart; it reminds me of the times spent with my loved ones, sharing stories and laughter over a delicious meal. Plus, the ease of cooking everything on one sheet pan means less cleanup and more time to enjoy each other’s company. So, let’s dive into creating this delightful meal that’s sure to become a family favorite!
Recipe Snapshot
35 mins
15 mins
20 mins
Easy
430 kcal
30 g
Whole30, Low FODMAP
15 g
Large Pot, Grater, Oven, Baking Sheet, Frying Pan, Chef’s Knife
What’s Great About This Sheet Pan Sticky Sweet and Sour Chicken
It’s All About the Flavor
What I love most about Sheet Pan Sticky Sweet and Sour Chicken is the wonderful contrast of flavors. The sweetness from the Thai chili sauce pairs perfectly with the freshness of the vegetables, creating a well-rounded dish that pleases every palate. You’ll find the combination of ingredients creates a taste sensation that is both comforting and exciting.
Easy Preparation
This recipe is incredibly simple to prepare. With just a few steps, you can have a delightful meal on the table. You mix the chicken and vegetables on one pan, toss them with the sauce, and let the oven do the rest. It’s a no-fuss way to get dinner ready, especially on those busy weeknights.
Colorful and Nutritious
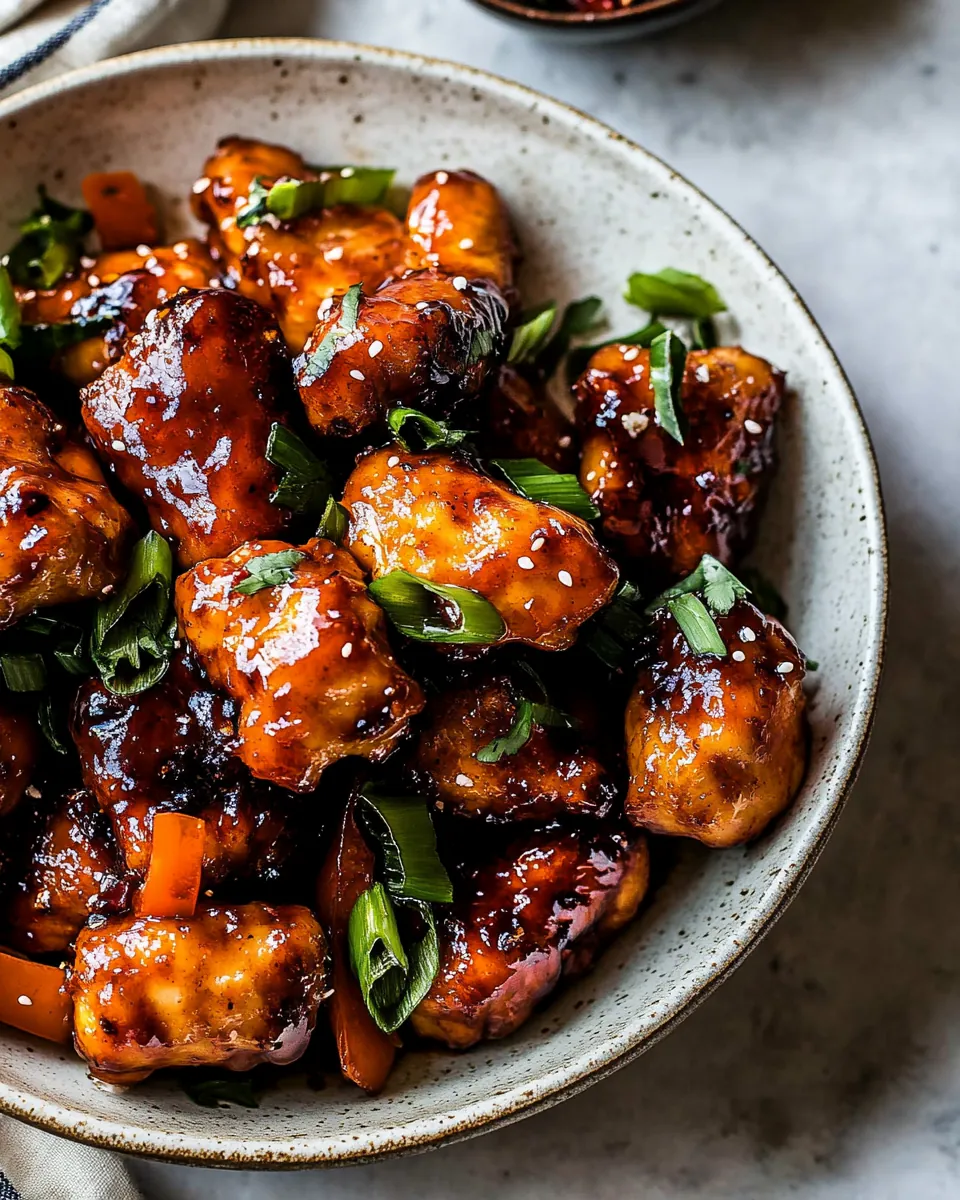
The vibrant colors of the veggies not only make the dish more appealing but also pack in the nutrition. The broccoli florets, bell peppers, and shallots lend a beautiful medley of hues while providing essential vitamins and minerals. It’s a great way to ensure your family is eating healthy without sacrificing flavor.
Customizable to Your Taste
One of the best aspects of Sheet Pan Sticky Sweet and Sour Chicken is its versatility. Feel free to swap in different vegetables or adjust the sauce to suit your taste. You can easily make it spicier by adding more jalapeño or play around with the sweetness. The possibilities are endless, making this dish a staple in your kitchen.
Makes Great Leftovers
If there are any leftovers (which is rare in my house), they make for a fantastic lunch the next day. The flavors continue to develop, and the chicken stays juicy. Just reheat it and you’ll have a delicious meal ready in minutes!
Main Ingredients for Sheet Pan Sticky Sweet and Sour Chicken
The ingredients for Sheet Pan Sticky Sweet and Sour Chicken are a perfect blend of flavors and textures. Each component plays a vital role, working together harmoniously to create a dish that’s both satisfying and hearty. The star of the show is undoubtedly the chicken, which absorbs the delicious sauce beautifully. Meanwhile, the vegetables provide crunch, color, and nutrition, making it a well-rounded meal.
- 1 1/2 pounds boneless chicken breasts, cut into 2 inch cubes: This lean protein is the foundation of the dish, providing substance and flavor.
- 1 egg, beaten: Helps to bind the flour to the chicken, creating a deliciously crispy coating.
- 1/4 cup all-purpose flour: Used to dredge the chicken, adding a nice texture when baked.
- 1 teaspoon ground ginger: Provides a warm, aromatic flavor that complements the sweetness of the sauce.
- 1 pinch each kosher salt and black pepper: Essential for seasoning and enhancing the flavors.
- 1 cup broccoli florets: Adds a nutritious crunch and a pop of color to the dish.
- 2 bell peppers, sliced: Sweet and colorful, these peppers brighten up the dish.
- 2 shallots, quartered: Their mild onion flavor sweetens when roasted.
- 4 tablespoons extra virgin olive oil or sesame oil: Helps to crisp the chicken and vegetables in the oven.
- 1 cup sweet Thai chili sauce: The star of the sauce, providing a sticky sweetness.
- 1/3 cup low sodium soy sauce: Adds depth and umami flavor to the sauce.
- 1/2 cup apple juice: Introduces natural sweetness and fruitiness.
- 1/4 cup rice vinegar: Balances the sweetness with tanginess.
- 1 tablespoon ketchup: Adds a touch of sweetness and flavor.
- 1 tablespoon creamy peanut butter: Provides creaminess and richness to the sauce.
- 1 jalapeño, sliced, and seeded if desired: Introduces optional heat to the dish.
- 2 cloves garlic, grated: Imparts a savory depth to the overall flavor profile.
- rice and cilantro, for serving: Complements the dish and adds freshness.
Putting Together Sheet Pan Sticky Sweet and Sour Chicken
Creating Sheet Pan Sticky Sweet and Sour Chicken is a straightforward process that yields amazing results. You’ll love how everything comes together in one pan, making cleanup a breeze while you savor the delicious flavors. Let’s get started!
- Preheat your oven to 475° F. It’s essential to have the oven hot to achieve that perfect crisp on the chicken. Line a baking sheet with parchment paper or grease it with oil to prevent sticking.
- In a mixing bowl, add the chicken, egg, and a pinch of pepper. Toss to combine well, ensuring the chicken is coated. In another bowl, add the flour and ginger. Dredge the chicken in batches through this mixture, ensuring each piece is well coated.
- Place the coated chicken on one side of the prepared baking sheet. Drizzle with 2 tablespoons of olive oil. On the other side of the pan, add the broccoli, peppers, and shallots, tossing them with the remaining olive oil until coated. Bake everything for 15 minutes, allowing the chicken to brown and the vegetables to soften.
- After 15 minutes, reduce the oven temperature to 400° F to finish cooking. Meanwhile, in a medium saucepan, combine the sweet Thai chili sauce, soy sauce, apple juice, rice vinegar, ketchup, creamy peanut butter, jalapeño, and garlic. Set the saucepan over medium-high heat and bring the sauce to a boil.
- Let the sauce boil for about 5 to 8 minutes, stirring occasionally, until it thickens and reduces by about one-third. Once thickened, remove the saucepan from the heat.
- Now, pour half of the sauce over the chicken, tossing gently to combine and coat the pieces fully. Toss the vegetables separately in the remaining sauce. Return everything to the oven for an additional 3 minutes, allowing the sauce to coat the chicken beautifully. Keep an eye on it, as the sauce can burn easily.
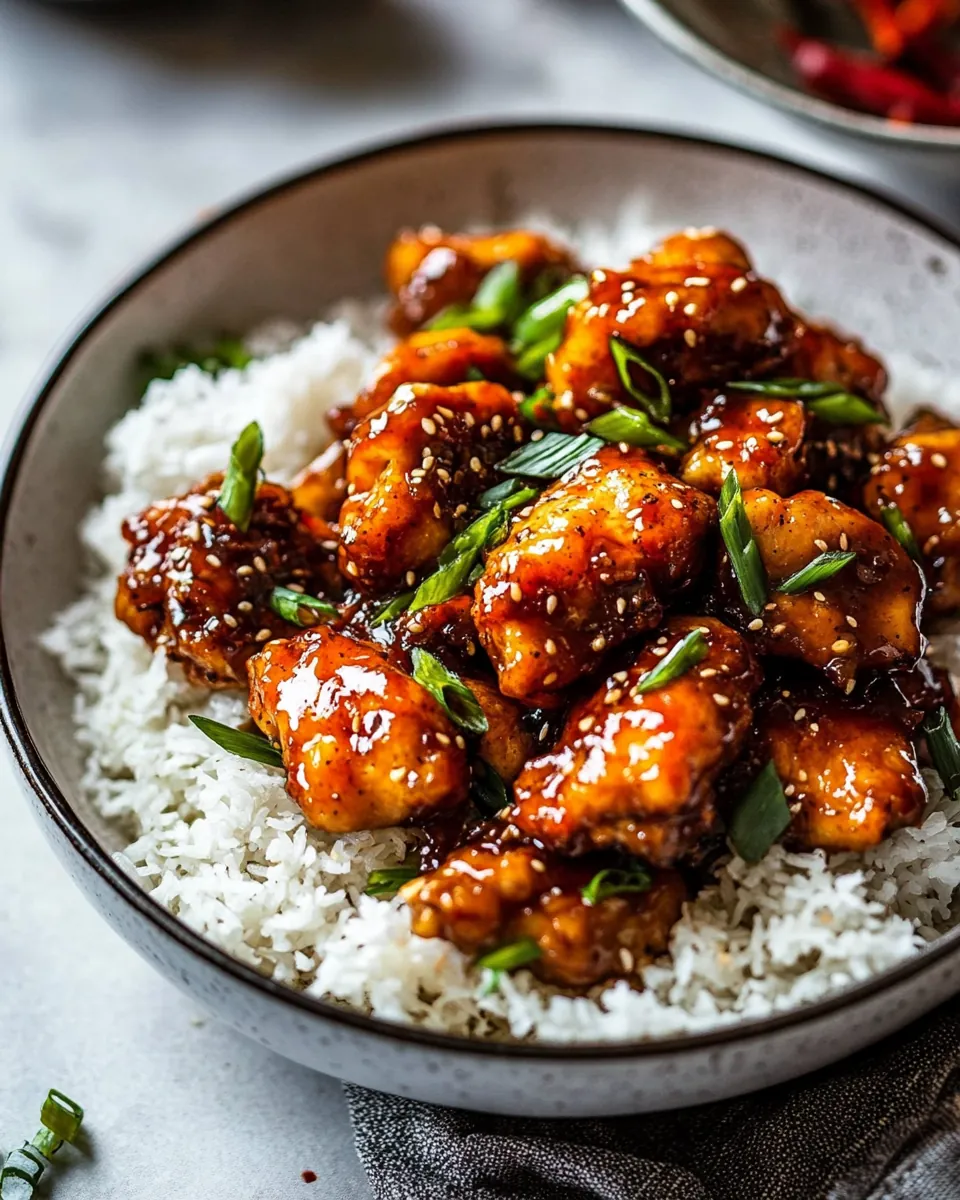
- When ready, take out the pan and serve the chicken over bowls of cooked rice, drizzling the remaining sauce on top. Garnish with fresh cilantro and serve the roasted vegetables on the side. Enjoy your delicious Sheet Pan Sticky Sweet and Sour Chicken!
Things Worth Knowing
- Use parchment paper: Helps prevent sticking and makes cleanup easy.
- Monitor the sauce: Watch closely while the sauce is in the oven to avoid burning.
- Uniform pieces: Cut the chicken and vegetables evenly for consistent cooking.
- Adjust the heat: You can control the spice level by adjusting the amount of jalapeño included.
Change It Up
Every cook has their signature style, and Sheet Pan Sticky Sweet and Sour Chicken can be customized to suit your preferences. Here are some tips to consider for your next cooking adventure:
- Swap out the protein: You can easily substitute the chicken for tofu or shrimp to create a vegetarian or seafood version.
- Add different vegetables: Feel free to incorporate other veggies such as snap peas or carrots to enhance the dish.
- Adjust the sweetness: If you like it spicier, add more jalapeño or even sriracha to the sauce.
- Experiment with sides: Serve it with quinoa or cauliflower rice for a healthier twist.
- Make it ahead: Prep the ingredients the night before to save time during busy weeknights.
- Storage: Store leftovers in an airtight container in the fridge and enjoy them within three days.
- Freezing: You can freeze the unbaked chicken and vegetables in the marinade for up to three months; just thaw before cooking.
How to Serve Sheet Pan Sticky Sweet and Sour Chicken
Serving Sheet Pan Sticky Sweet and Sour Chicken is as enjoyable as preparing it. Here are some great ideas to enhance your dining experience:
- Family Style: Serve the chicken and vegetables on a large platter for everyone to help themselves.
- Pair with Rice: Steamed rice is an excellent base for this dish, soaking up the delicious sauce.
- Garnish with Fresh Herbs: Adding chopped cilantro on top gives a refreshing touch and elevates the dish.
- Ideal for Gatherings: This dish is perfect for family dinners, gatherings, or even potlucks where you want to impress without a lot of hassle.
- Make it a Meal Prep: Portion it out for meal prep containers to enjoy during the week.
- Seasonal Serving: This dish works well in any season, making it a versatile choice year-round, whether enjoyed indoors or outdoors.
- Comfort Food: This dish is a cozy and satisfying option for a relaxed dinner after a long day or week.
FAQ
Conclusion
The Sheet Pan Sticky Sweet and Sour Chicken is truly a standout dish that combines delicious flavors and the convenience of one-pan cooking. It’s a wonderful way to gather family and friends around the table, enjoying a meal that is as satisfying to prepare as it is to eat. I encourage you to try this recipe tonight; it just might become a new family favorite!
Sheet Pan Sticky Sweet and Sour Chicken
Ingredients
Equipment
Method
- 1. Preheat the oven to 475° F. Line a baking sheet with parchment paper or grease with oil.
- 2. Add the chicken, egg, and a pinch of pepper to a bowl. Toss to combine. Add the flour and ginger to another bowl. Dredge the chicken in batches through the flour, tossing to coat. Place the chicken on one side of the prepared baking sheet. Drizzle with 2 tablespoons oil. Add the broccoli, peppers, and shallots to the other side of the pan and toss with 2 tablespoons oil. Bake 15 minutes.
- 3. Reduce the oven temp to 400° F.
- 4. Meanwhile, combine the sweet Thai chili sauce, soy sauce, apple juice, rice vinegar, ketchup, peanut butter, jalapeño, and garlic in a medium saucepan. Set over medium-high heat and bring the sauce to a boil. Boil 5-8 minutes, until the sauce thickens and reduces by about 1/3. Remove from the heat.
- 5. Pour half the sauce over the chicken, tossing to combine. Toss the vegetables. Return everything to the oven for 3 minutes, until the sauce coats the chicken. Watch closely, the sauce can burn easily.
- 6. Serve the chicken and the remaining sauce over bowls of rice topped with cilantro. Serve the vegetables on the side.
Notes
- Storage: Store leftovers in an airtight container in the fridge and enjoy them within three days.
- Freezing: You can freeze the unbaked chicken and vegetables in the marinade for up to three months; just thaw before cooking.
- Pairing: Serve with steamed rice or quinoa for a complete meal.
- Garnish: Fresh cilantro adds a lovely touch to the final presentation.
- Serving Styles: This dish is perfect for family dinners, gatherings, or even potlucks.