Red Velvet Lava Cakes
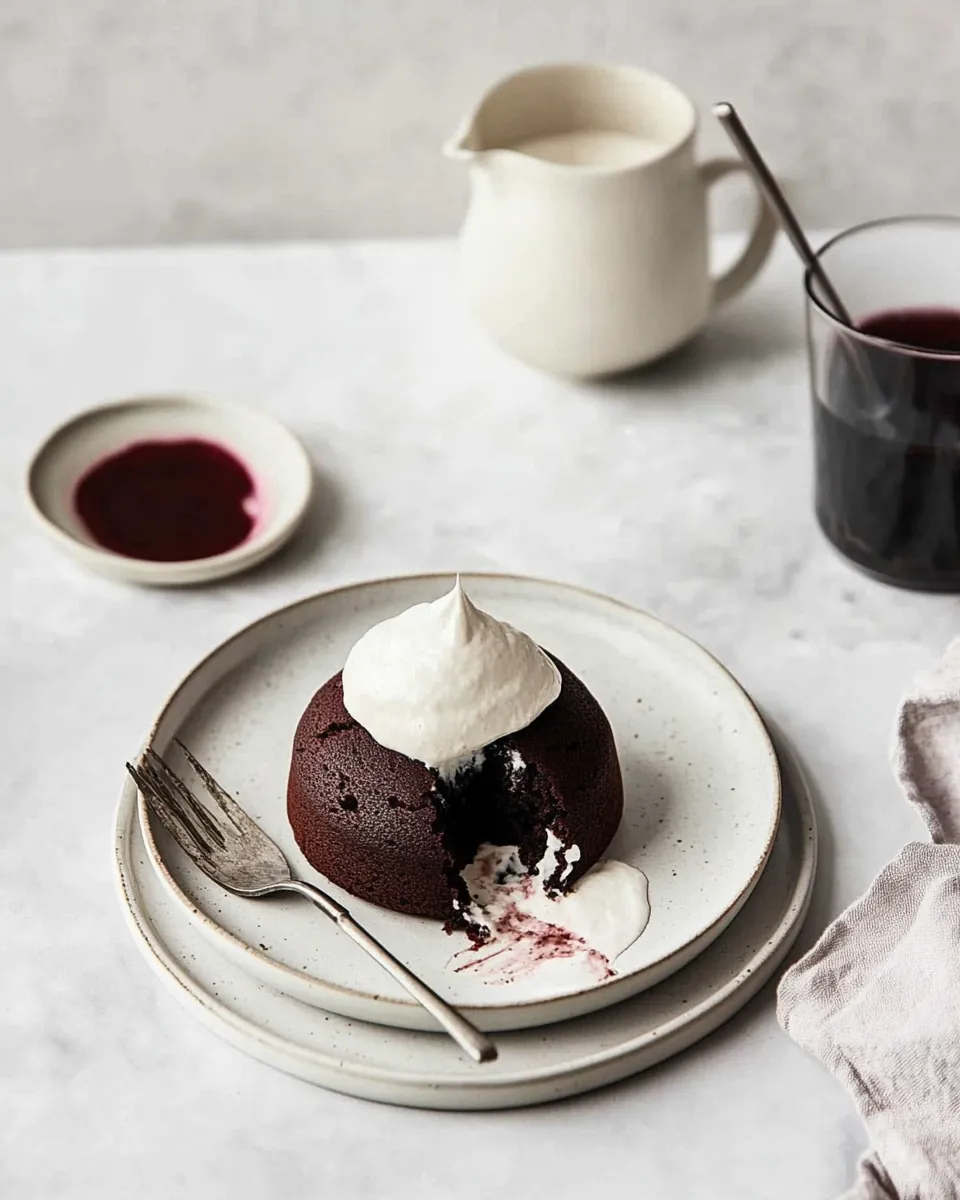
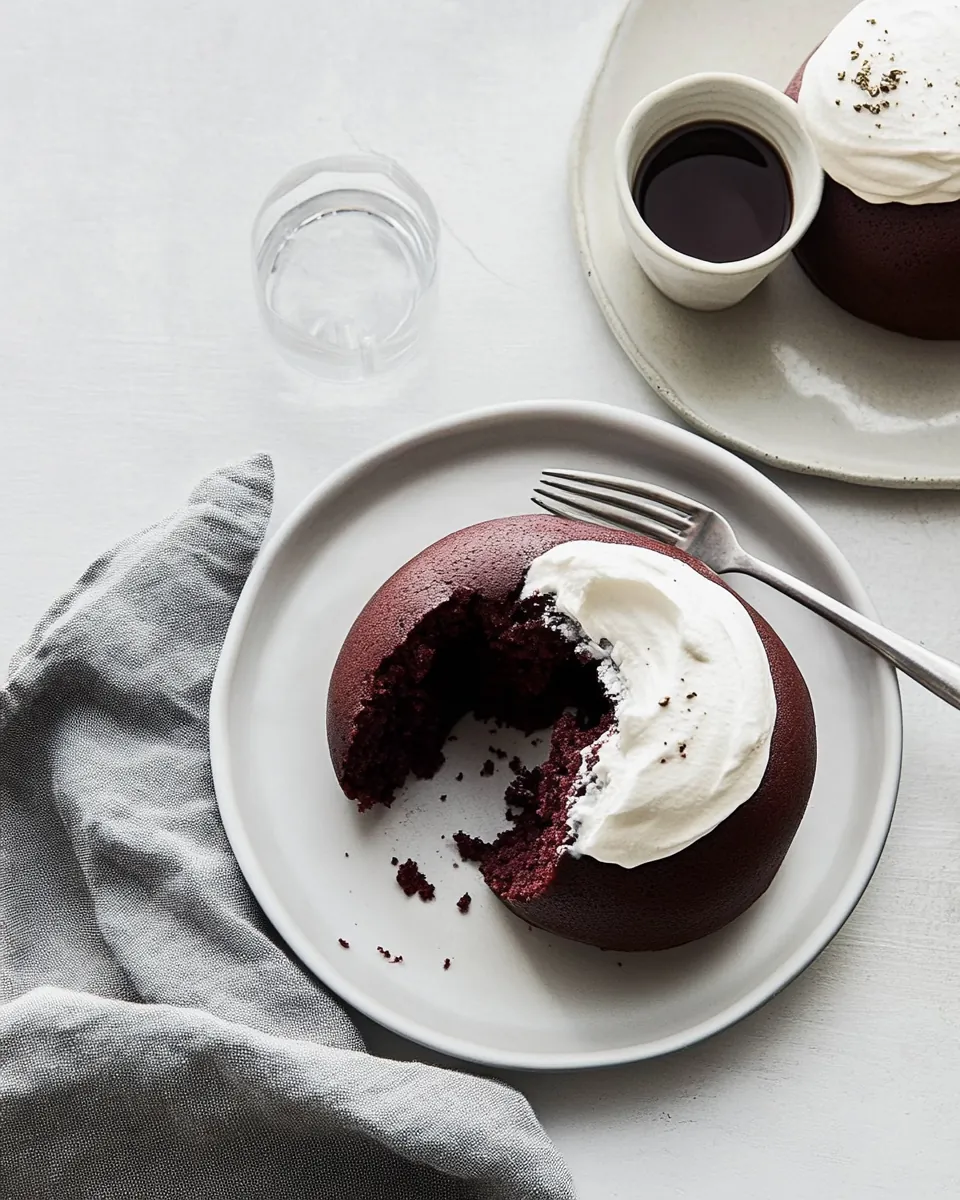
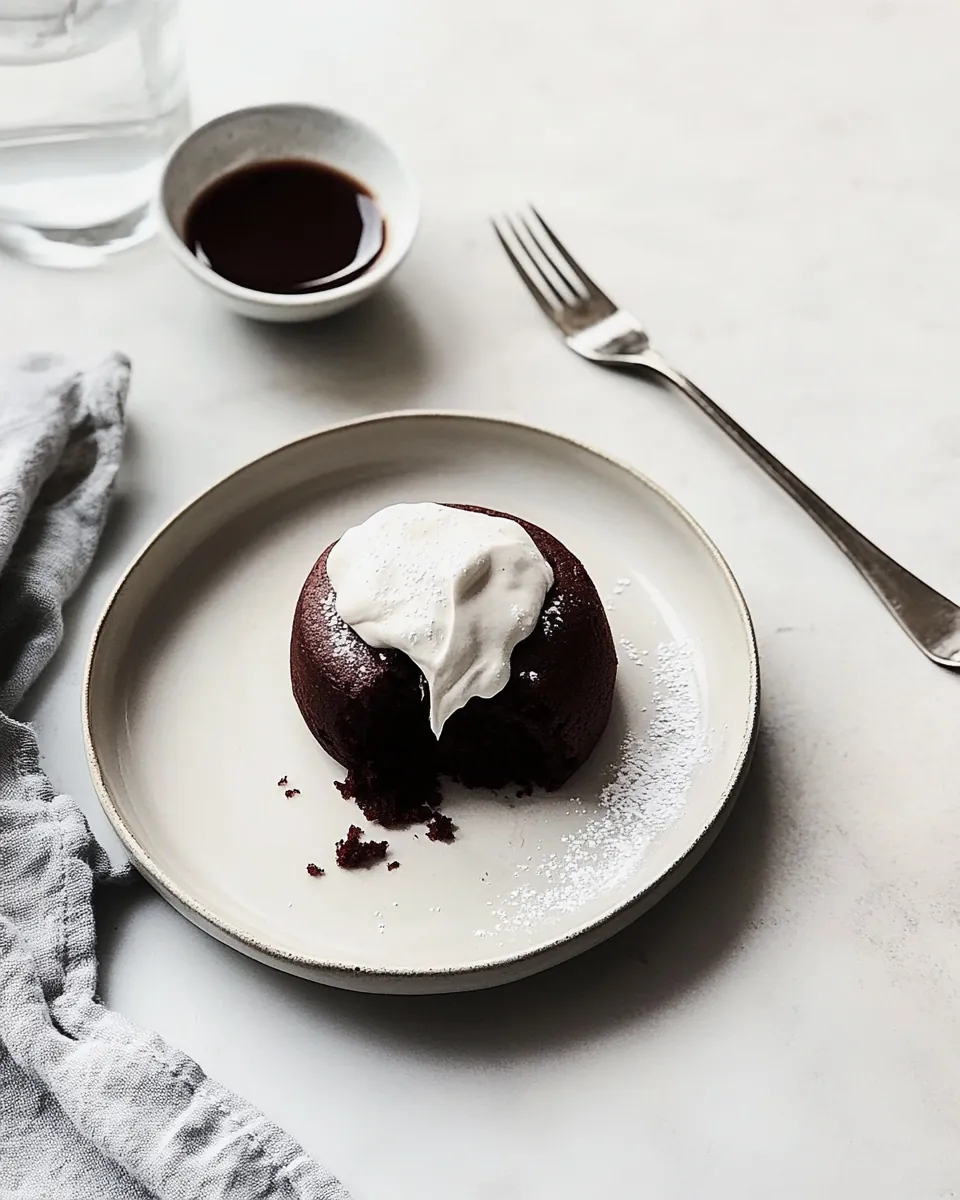
There’s something magical about the rich and decadent Red Velvet Lava Cakes that brings back fond memories of special occasions. I remember the first time I made these delightful desserts for a romantic dinner. As I pulled the cakes from the oven, the sweet aroma of chocolate filled my kitchen, setting the perfect mood. When I cut into the cake, a luscious stream of molten chocolate flowed out, and I couldn’t help but smile. These cakes are not just a treat for the taste buds; they’re a visual delight that can impress anyone you serve them to. Whether it’s Valentine’s Day or just a cozy evening at home, Red Velvet Lava Cakes are sure to create unforgettable moments.
Recipe Snapshot
30 mins
15 mins
15 mins
Medium
320 kcal
4 g
Keto, Paleo, Gluten-Free
24 g
4-inch ramekins, large bowl, saucepan, stand-up mixer, paring knife
What’s Great About This Red Velvet Lava Cakes
Decadent Indulgence
One of the reasons I adore Red Velvet Lava Cakes is their ability to deliver a rich chocolate flavor with a beautiful color. The combination of semi-sweet chocolate and buttery goodness creates a luxurious experience that can satisfy any sweet tooth.
Perfect for Sharing
These cakes are perfect for sharing. Each lava cake presents an individual serving, making it ideal for a romantic dinner or a festive get-together. Watching someone’s eyes light up when they crack open the cake to reveal the gooey center is priceless!
Easy to Prepare
Despite their elegance, Red Velvet Lava Cakes are surprisingly easy to prepare. You don’t need to be a professional chef to whip these up. With just a few simple ingredients and straightforward steps, you’ll have a stunning dessert that looks like it came from a fancy restaurant.
Versatile Occasions
These cakes can fit any occasion, from intimate dinners to festive occasions. With their striking red color, they are especially fitting for Valentine’s Day and other romantic celebrations, but they can also brighten up any dessert table.
Customizable Flavors
What I love about Red Velvet Lava Cakes is their versatility. You can play around with the flavors and add unique twists. For instance, using different types of chocolate can adjust the sweetness to your preference, making it a truly personalized dish!
Impressive Presentation
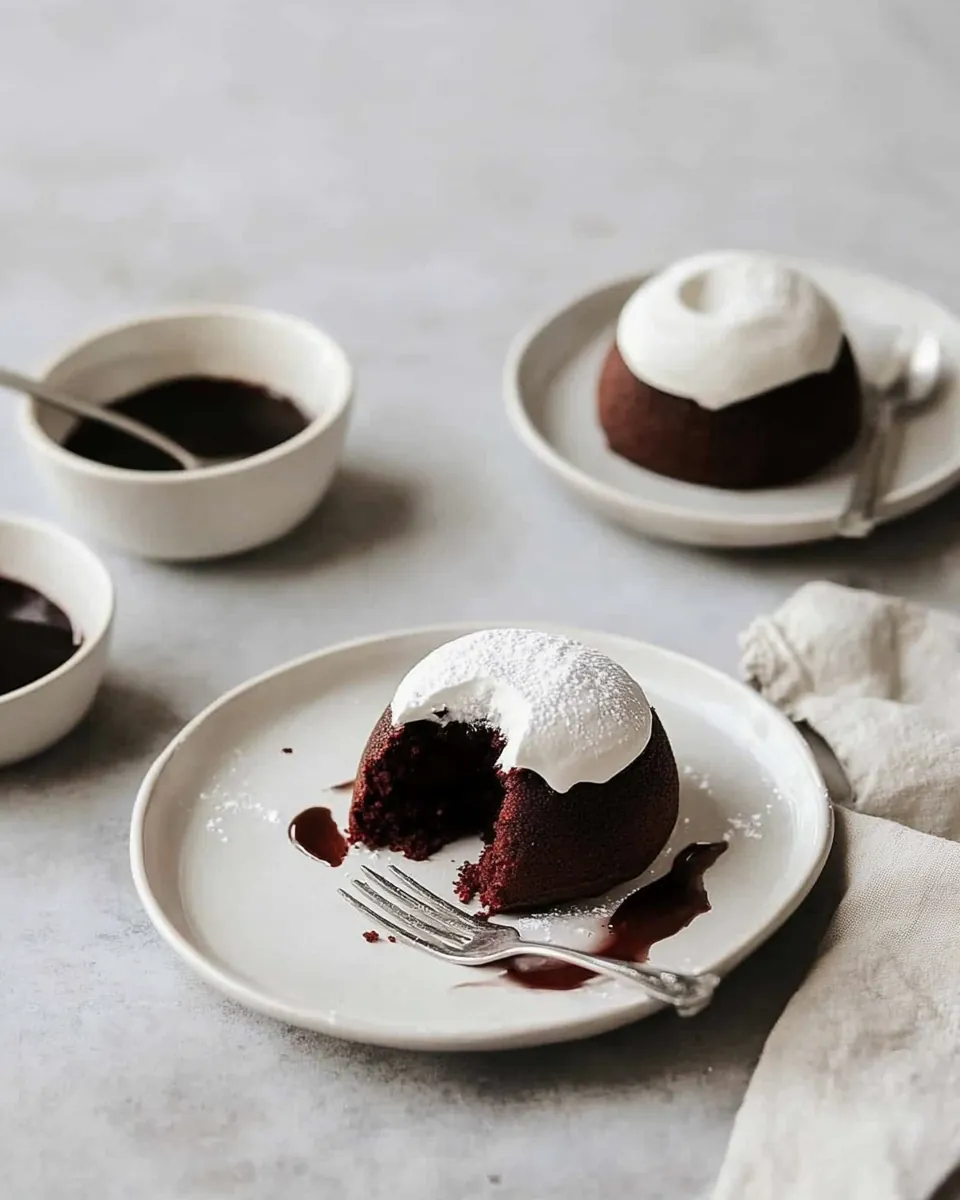
Lastly, the presentation of these cakes is simply stunning. When you plate them with a dollop of whipped cream and a sprinkle of flaky sea salt, they become a show-stopping dessert that is as beautiful as it is delicious.
What to Buy for Red Velvet Lava Cakes
When it comes to creating delicious Red Velvet Lava Cakes, the ingredients you choose matter a lot. Each element plays a crucial role in achieving that perfect combination of flavors and textures. The key players, like the high-quality semi-sweet chocolate and unsalted butter, bring richness, while the almond flour adds a delightful texture. Together, these ingredients create a dessert that is truly unforgettable.
- 2 ounces high-quality semi-sweet chocolate: The star of the show, providing a rich, luscious flavor that’s essential for the molten center.
- 1/2 cup unsalted butter: Adds moisture and richness, helping to create that gooey chocolate texture.
- 1/2 cup almond flour: Contributes a nutty flavor and keeps the cakes light and airy.
- 1/2 cup powdered sugar: Sweetens the batter while ensuring a smooth consistency.
- 1 tablespoon baking cocoa: Enhances the chocolate flavor and adds depth.
- 2 large egg yolks: Provide richness and help bind the ingredients together.
- 2 large eggs: Contribute structure and moisture to the cakes.
- 3 drops red food coloring gel: Adds a vibrant, festive color typical of red velvet desserts.
- 1 tablespoon sour cream: Adds tanginess and enhances the moisture of the cakes.
- 2 tablespoons powdered sugar: For dusting, adding a touch of sweetness on top.
- 1 cup heavy cream: Used to whip up a luscious topping that complements the cakes perfectly.
Recipe Steps for Red Velvet Lava Cakes
Making Red Velvet Lava Cakes is a delightful process that, when broken down, is quite easy and fulfilling. Each step brings you closer to that moment of indulgence when you slice into the cakes and watch the molten chocolate ooze out. Let’s dive right into the step-by-step process of crafting these delicious treats!
- Preheat your oven to 400 degrees F. Make sure the oven is hot enough to bake the cakes evenly. It’s essential for achieving that perfect lava effect.
- Grease two 4-inch ramekins with cooking spray and set aside. This step is crucial to ensure that your cakes come out effortlessly.
- Fill a small saucepan with a few inches of water. Nestle a heatproof bowl atop the saucepan and turn the heat to medium-high. This creates a double boiler which is great for melting chocolate.
- To the bowl, add the chocolate and butter. Stir occasionally, allowing the mixture to melt completely and combine into a smooth consistency. You should see it turn glossy and rich.
- Once melted, remove from heat and set aside to cool slightly. This step prevents the eggs from cooking when combined.
- Meanwhile, in a medium bowl, whisk together the almond flour, powdered sugar, baking cocoa, and a pinch of salt. This mixture will provide the cake’s structure and flavor.
- Next, add the egg yolks, eggs, and red food coloring to the dry ingredients. Whisk everything together until fully combined and smooth.
- Pour in the warm chocolate and butter mixture. Stir gently until the batter is homogeneous and beautifully rich. This is where it all comes together!
- Divide the batter between the prepared ramekins. Fill them to about three-quarters full to allow space for the lava to form.
- Place the ramekins on a baking sheet and transfer them to the oven. Bake for 15 minutes, rotating them at the 7-minute mark to ensure even baking. Look for the edges to be set while the center remains slightly jiggly.
- Once baked, remove them from the oven and let them cool for a couple of minutes. This brief resting period will help the cakes stabilize.
- Using a stand-up mixer with the whisk attachment or a bowl with an electric hand-mixer, prepare the whipped cream. Add the sour cream and powdered sugar, beating until smooth.
- Pour in the heavy cream and whip until medium peaks form, about 2 minutes. This light and airy cream will perfectly complement the cakes.
- To serve, run a sharp knife alongside the outside of the lava cakes and invert them onto serving plates. Top with a generous scoop of whipped cream and a sprinkling of flaky sea salt for that extra flair.
With each bite of these divine Red Velvet Lava Cakes, you’ll experience a delightful explosion of flavors and textures. Enjoy your creation!
Things Worth Knowing
- Watch the baking time: Overbaking can lead to less molten centers, so keep an eye on them to maintain that gooey texture.
- Chill the ramekins: Chilling can help the cakes hold their shape better when inverted.
- Use quality chocolate: The better the quality of your chocolate, the richer the flavor of your lava cakes will be.
- Experiment with flavors: Try adding a hint of espresso powder to intensify the chocolate flavor.
How to Switch It Up
Looking to put your own twist on these Red Velvet Lava Cakes? Here are some great ideas to make them uniquely yours:
- Storage: For leftovers, store the cakes in an airtight container in the fridge for up to three days. Reheat gently in the oven.
- Freezing: You can freeze the unbaked batter in the ramekins. Just cover tightly and freeze. Bake straight from the freezer, adding a few extra minutes to the baking time.
- Pairing: Serve with fresh berries or a drizzle of chocolate sauce for an extra indulgent touch.
- Flavors: Add a touch of orange zest to the batter for a citrusy twist.
- Whipped Cream: For a fun variation, try flavoring the whipped cream with a hint of almond extract.
- Chocolate Options: Use dark chocolate for a more intense flavor or white chocolate for a sweeter version.
Great Combinations for Red Velvet Lava Cakes
When serving Red Velvet Lava Cakes, the right accompaniments can elevate the entire experience. Here are some fantastic suggestions:
- Fresh Berries: Pair your cakes with strawberries or raspberries to add a refreshing tartness.
- Whipped Cream: A dollop of freshly whipped cream on top enhances the richness of the cake.
- Ice Cream: A scoop of vanilla or cream cheese ice cream pairs beautifully with the warm lava cakes.
- Occasions: These lava cakes are perfect for romantic dinners, anniversaries, or any special celebration.
- Seasonal Desserts: They work wonderfully alongside festive holiday meals, particularly during winter and holidays.
- Chocolate Sauce: Drizzle some warm chocolate sauce over the top for an extra chocolatey treat.
FAQ
Conclusion
The Red Velvet Lava Cakes are a stunning dessert that combines beauty and flavor in every bite. With their rich and gooey center, they are sure to impress anyone who has the pleasure of indulging in them. I encourage you to try this recipe for your next gathering or even a special treat for yourself. You’ll find that it’s not only satisfying to make but also incredibly rewarding to share with those you love.
Red Velvet Lava Cakes
Ingredients
Equipment
Method
- Preheat your oven to 400 degrees F. Make sure the oven is hot enough to bake the cakes evenly. It's essential for achieving that perfect lava effect.
- Grease two 4-inch ramekins with cooking spray and set aside. This step is crucial to ensure that your cakes come out effortlessly.
- Fill a small saucepan with a few inches of water. Nestle a heatproof bowl atop the saucepan and turn the heat to medium-high. This creates a double boiler which is great for melting chocolate.
- To the bowl, add the chocolate and butter. Stir occasionally, allowing the mixture to melt completely and combine into a smooth consistency. You should see it turn glossy and rich.
- Once melted, remove from heat and set aside to cool slightly. This step prevents the eggs from cooking when combined.
- Meanwhile, in a medium bowl, whisk together the almond flour, powdered sugar, baking cocoa, and a pinch of salt. This mixture will provide the cake's structure and flavor.
- Next, add the egg yolks, eggs, and red food coloring to the dry ingredients. Whisk everything together until fully combined and smooth.
- Pour in the warm chocolate and butter mixture. Stir gently until the batter is homogeneous and beautifully rich. This is where it all comes together!
- Divide the batter between the prepared ramekins. Fill them to about three-quarters full to allow space for the lava to form.
- Place the ramekins on a baking sheet and transfer them to the oven. Bake for 15 minutes, rotating them at the 7-minute mark to ensure even baking. Look for the edges to be set while the center remains slightly jiggly.
- Once baked, remove them from the oven and let them cool for a couple of minutes. This brief resting period will help the cakes stabilize.
- Using a stand-up mixer with the whisk attachment or a bowl with an electric hand-mixer, prepare the whipped cream. Add the sour cream and powdered sugar, beating until smooth.
- Pour in the heavy cream and whip until medium peaks form, about 2 minutes. This light and airy cream will perfectly complement the cakes.
- To serve, run a sharp knife alongside the outside of the lava cakes and invert them onto serving plates. Top with a generous scoop of whipped cream and a sprinkling of flaky sea salt for that extra flair.
Notes
- Food coloring: I like to use gel food coloring because it has a more concentrated color. The pigment is stronger. But if you don’t want to add it, simply leave it out. It obviously just won’t come out red.
- Chocolate options: If you want it sweeter, use milk chocolate. If you want it a bit stronger and richer, go for bittersweet chocolate.